Introduction
In this tutorial, we will show you how to connect the SG51R servo motor to an Arduino UNO and control its position using the Arduino programming language.
A servo motor is a type of motor that is capable of precise control of its angular position. This makes them ideal for a wide range of applications, such as robotics, automation, and control systems. The SG51R servo motor is a small and versatile servo motor that can be controlled using an Arduino UNO.
Hardware Components
You will require the following hardware for Interfacing Servo Motor with Arduino.
| S.no | Component | Value | Qty |
|---|---|---|---|
| 1. | Arduino UNO | – | 1 |
| 2. | USB Cable Type A to B | – | 1 |
| 3. | Servo Motor | – | 1 |
| 4. | Power Adapter for Arduino | 9V | 1 |
| 5. | Breadboard | – | 1 |
| 6. | Jumper Wires | – | 1 |
Servo Motor with Arduino
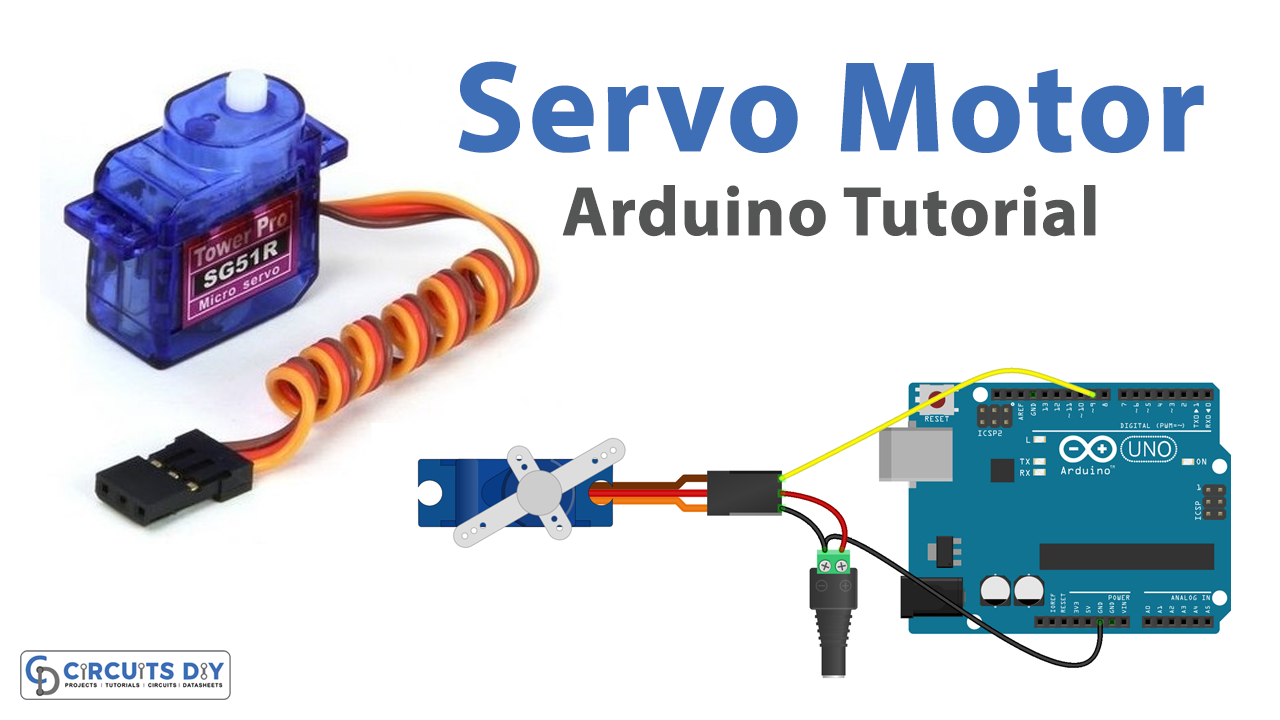
- Connect the SG51R servo motor to the Arduino UNO. Connect the red wire of the servo motor to the 5V pin on the Arduino, the brown wire to the GND pin, and the orange or yellow wire to a digital pin on the Arduino (e.g. pin 9).
- In the Arduino IDE, include the “Servo.h” library at the beginning of the sketch.
#include <Servo.h>
- Declare a Servo object in the global scope and assign it a name.
Servo myservo;
- In the setup() function, use the attach() function to connect the servo to the digital pin you are using.
myservo.attach(9);
- In the loop() function, use a for loop to iterate through a range of angle values for the servo. For example, to move the servo from 0 to 180 degrees in increments of 10 degrees, use the following code:
for (int i = 0; i < 180; i += 10) {
   myservo.write(i);
   delay(1000);
   Serial.println("Servo at " + String(i) + " degrees");
}
- Use a delay() function inside the for loop to prevent the program from moving the servo too quickly.
- Use the Serial.println() function inside the for loop to display the position of the servo on the serial monitor.
- Upload the code to the Arduino board, open the serial monitor, and set the baud rate to 9600. You should see the status of the servo as it moves through the range of positions defined in the loop.
- You can adjust the range of positions and the delay time in the for loop to control the speed and range of the movement of the servo.
Schematic
Make connections according to the circuit diagram given below.

Wiring / Connections
| Arduino | Servo Motor |
|---|---|
| 5V | VCC |
| GND | GND |
| D9 | Yellow |
Installing Arduino IDE
First, you need to install Arduino IDE Software from its official website Arduino. Here is a simple step-by-step guide on “How to install Arduino IDE“.
Installing Libraries
Before you start uploading a code, download and unzip the following libraries at /Progam Files(x86)/Arduino/Libraries (default), in order to use the sensor with the Arduino board. Here is a simple step-by-step guide on “How to Add Libraries in Arduino IDE“.
Code
Now copy the following code and upload it to Arduino IDE Software.
#include <Servo.h>

Servo myservo;  // create servo object to control a servo
// twelve servo objects can be created on most boards

int pos = 0;    // variable to store the servo position

void setup() {
  myservo.attach(9);  // attaches the servo on pin 9 to the servo object
}

void loop() {
  for (pos = 0; pos <= 180; pos += 1) { // goes from 0 degrees to 180 degrees
    // in steps of 1 degree
    myservo.write(pos);              // tell servo to go to position in variable 'pos'
    delay(15);                       // waits 15ms for the servo to reach the position
  }
  for (pos = 180; pos >= 0; pos -= 1) { // goes from 180 degrees to 0 degrees
    myservo.write(pos);              // tell servo to go to position in variable 'pos'
    delay(15);                       // waits 15ms for the servo to reach the position
  }
}
Working Explanation
In the setup() function, the servo motor is connected to the Arduino by using the attach() function which takes the pin number as an argument, this is the pin to which the orange or yellow wire of the servo motor is connected. The attach() function tells the Arduino which pin the servo is connected to so that the Arduino can communicate with the servo.
The loop() function in the coding for controlling an SG51R servo motor using an Arduino UNO microcontroller is where the position of the servo motor is controlled. In the loop() function, the position of the servo is set by using the write() function which takes an angle value as an argument. The write() function tells the servo to rotate to the specified angle. The angle value can be set to a specific value or it can be a variable that changes over time.
Applications
- Robotics
- Automation
- Control Systems
- Modeling and Simulation
- DIY Projects
Conclusion.
We hope you have found this Servo Motor Arduino Circuit very useful. If you feel any difficulty in making it feel free to ask anything in the comment section.

