Introduction
Interfacing a microSD card module with an Arduino Uno microcontroller allows you to store and retrieve data on a removable memory card using your Arduino board. The microSD card module provides an easy and convenient way to store large amounts of data, such as text files, images, and other binary data, and the Arduino Uno provides an easy way to read and write to the microSD card. This opens up a wide range of possibilities for data logging, data storage, and data retrieval in various applications, including robotics, IoT, and other embedded systems. In this way, the Arduino Uno and microSD card module combination provides a low-cost and efficient way to store and manage data in your projects.
An Arduino microSD card reader module is a module designed to interface a microSD card with an Arduino microcontroller board. The module typically includes a microSD card slot and an SPI interface for communication with the Arduino board. The microSD card slot allows for the insertion of a microSD card, which can be used to store data that can be read or written by the Arduino. The SPI interface is used to transfer data between the microSD card and the Arduino board. The module may also include level-shifting circuitry to enable communication between the microSD card and the Arduino board, which may use different operating voltages.
Hardware Components
You will require the following hardware for Interfacing Micro SD Card with Arduino.
| S.no | Component | Value | Qty |
|---|---|---|---|
| 1. | Arduino UNO | – | 1 |
| 2. | USB Cable Type A to B | – | 1 |
| 3. | Micro SD Card | – | 1 |
| 4. | Micro SD Card Module | – | 1 |
| 5. | USB 3.0 SD Card Reader | – | 1 |
| 6. | Power Adapter for Arduino | 9V | 1 |
| 7. | Jumper Wires | – | 1 |
Steps Interfacing Micro SD Card with Arduino UNO
- Include the SD.h library:
#include <SD.h>
This library is required to interface with the SD card.
- Define the SPI chip select pin used to communicate with the SD card:
#define PIN_SPI_CS 4
This sets the value of the variable “PIN_SPI_CS” to 4, which is the Arduino pin number used to select the SD card on the SPI bus.
- Declare a File object:
File myFile;
This creates an instance of the File class called “myFile” that will be used to read and write to the file.
- Set up the Arduino:
void setup() {
  Serial.begin(9600);
This initializes the serial communication between the Arduino and a computer at a baud rate of 9600.
- Initialize the SD card:
  if (!SD.begin(PIN_SPI_CS)) {
    Serial.println(F("SD CARD FAILED, OR NOT PRESENT!"));
    while (1); // don't do anything more:
  }
This checks if the SD card is present and properly initialized. If the initialization fails, an error message is printed and the program will stop executing.
- Print a message indicating that the SD card is initialized:
Serial.println(F("SD CARD INITIALIZED."));
This prints a message to the serial console to indicate that the SD card has been successfully initialized.
- Check if a file named “arduino.txt” exists on the SD card:
  if (!SD.exists("arduino.txt")) {
    Serial.println(F("arduino.txt doesn't exist. Creating arduino.txt file..."));
    // create a new file by opening a new file and immediately close it
    myFile = SD.open("arduino.txt", FILE_WRITE);
    myFile.close();
  }
This checks if a file called “arduino.txt” exists on the SD card. If it doesn’t exist, a message is printed to the serial console and a new file is created with the same name. The file is opened for writing using the “SD.open” method and immediately closed using the “myFile.close” method.
- Recheck if the file is created or not:
  if (SD.exists("arduino.txt"))
    Serial.println(F("arduino.txt exists on SD Card."));
  else
    Serial.println(F("arduino.txt doesn't exist on SD Card."));
}
This checks if the file called “arduino.txt” exists on the SD card again. If it exists, a message is printed to the serial console indicating that the file exists. Otherwise, a message is printed indicating that the file does not exist.
- Loop indefinitely:
void loop() {
}
This function is empty, so the program will loop indefinitely after the setup is complete.
Schematic
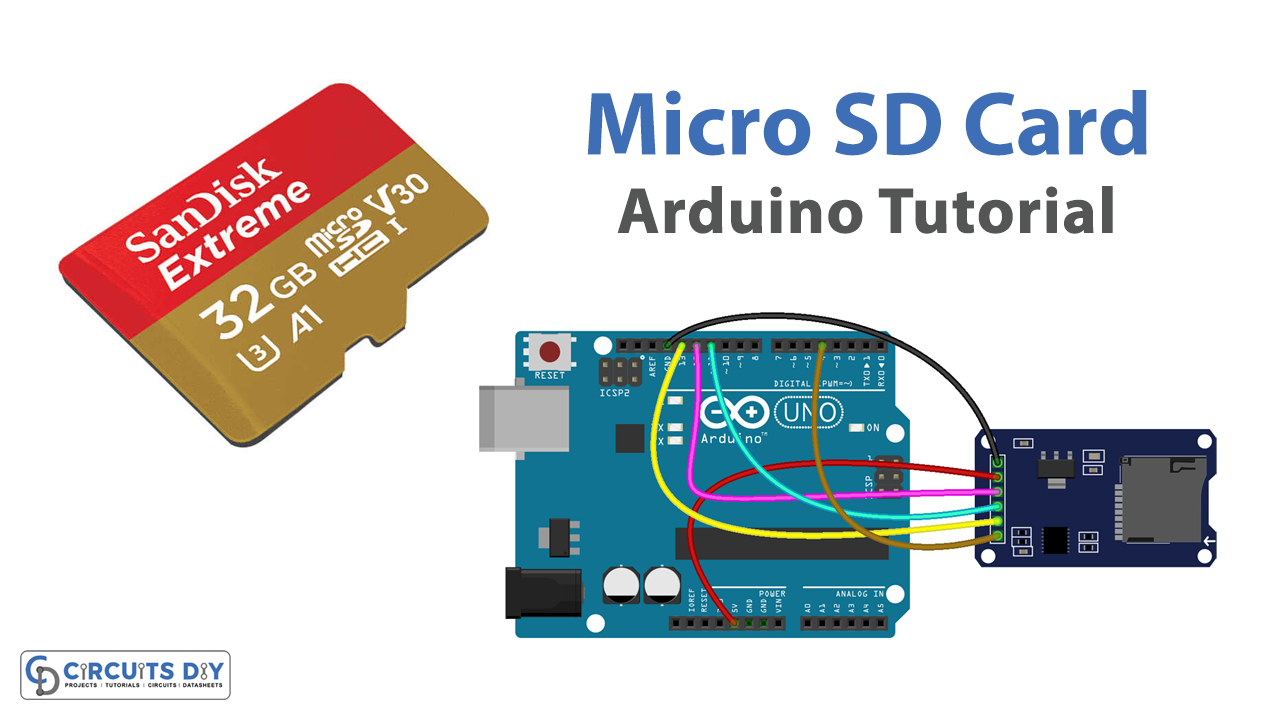
Make connections according to the circuit diagram given below.

Wiring / Connections
| Arduino | SD Card Module |
|---|---|
| 5V | VCC |
| GND | GND |
| D12 | MISO |
| D11 | MOSI |
| D13 | SCK |
| D4 | CS |
Installing Arduino IDE
First, you need to install Arduino IDE Software from its official website Arduino. Here is a simple step-by-step guide on “How to install Arduino IDE“.
Installing Libraries
Before you start uploading a code, download and unzip the following libraries at /Progam Files(x86)/Arduino/Libraries (default), in order to use the sensor with the Arduino board. Here is a simple step-by-step guide on “How to Add Libraries in Arduino IDE“.
Code
Now copy the following code and upload it to Arduino IDE Software.
#include <SD.h>
#define PIN_SPI_CS 4
File myFile;
void setup() {
  Serial.begin(9600);

  if (!SD.begin(PIN_SPI_CS)) {
    Serial.println(F("SD CARD FAILED, OR NOT PRESENT!"));
    while (1); // don't do anything more:
  }

  Serial.println(F("SD CARD INITIALIZED."));

  if (!SD.exists("arduino.txt")) {
    Serial.println(F("arduino.txt doesn't exist. Creating arduino.txt file..."));
    // create a new file by opening a new file and immediately close it
    myFile = SD.open("arduino.txt", FILE_WRITE);
    myFile.close();
  }

  // recheck if file is created or not
  if (SD.exists("arduino.txt"))
    Serial.println(F("arduino.txt exists on SD Card."));
  else
    Serial.println(F("arduino.txt doesn't exist on SD Card."));
}

void loop() {
}
Working Explanation
The SD library is included at the beginning of the code with #include <SD.h>. The PIN_SPI_CS constant is defined as the pin that the SD card’s chip select (CS) pin is connected to. In the setup() function, the serial communication is initiated with Serial.begin(9600). The SD.begin(PIN_SPI_CS) function attempts to initialize the SD card. If initialization fails, a message is printed to the serial monitor and the program stops executing with while(1). If initialization succeeds, a message is printed to the serial monitor indicating that the SD card has been initialized.
The SD.exists() function checks if a file named arduino.txt exists on the SD card. If the file does not exist, a message is printed to the serial monitor indicating that the file is not present, and a new file is created with SD.open("arduino.txt", FILE_WRITE). The file is then closed with myFile.close(). The SD.exists() function is called again to check if the file has been created, and a message is printed to the serial monitor accordingly. The loop() function is empty and simply waits for further instructions.
Applications
- Data logging
- Media storage and playback
- Sensor data storage
- Remote data transfer and storage
- Internet of Things (IoT) applications
- Robotics and automation
- Embedded systems design
- Security and surveillance systems
- Home automation and smart devices
Conclusion.
We hope you have found this Micro SD Card Circuit very useful. If you feel any difficulty in making it feel free to ask anything in the comment section.

