Introduction
An HC-SR04 analog thresholds controlled SG51R servo motor using an Arduino UNO is an electronic system that uses a combination of an HC-SR04 ultrasonic distance sensor, an SG51R servo motor, and an Arduino UNO microcontroller to control the position of the servo motor based on the distance of an object in front of the sensor.
The HC-SR04 sensor uses ultrasonic waves to measure the distance of an object in front of it and returns the distance in centimeters. The Arduino UNO microcontroller receives this distance data and uses it to control the position of the SG51R servo motor.
Hardware Components
You will require the following hardware for Interfacing Ultrasonic Sensor Servo Motor with Arduino.
| S.no | Component | Value | Qty |
|---|---|---|---|
| 1. | Arduino UNO | – | 1 |
| 2. | USB Cable Type A to B | – | 1 |
| 3. | Ultrasonic Sensor | – | 1 |
| 4. | Servo Motor | – | 1 |
| 5. | Power Adapter for Arduino | 9V | 1 |
| 6. | Jumper Wires | – | 1 |
Ultrasonic Sensor Servo Motor with Arduino
- Start the Arduino IDE and create a new sketch.
- Include the necessary libraries, such as the Servo library and the NewPing library, at the top of the sketch.
#include <Servo.h>
#include <NewPing.h>
- Declare the pin numbers for the HC-SR04 sensor, SG51R servo motor, and Arduino UNO. For example, the trig pin of the HC-SR04 can be connected to pin 8, the echo pin to pin 9, and the control pin of the SG51R servo motor to pin 10.
#define TRIG_PIN 8
#define ECHO_PIN 9
#define SERVO_PIN 10
#define MAX_DISTANCE 200 // Maximum distance (in cm) to ping for
- In the setup() function, initialize the serial communication, attach the servo motor to the control pin, create a new instance of the NewPing library, and set the maximum distance threshold.
Serial.begin(9600);
servo.attach(SERVO_PIN);
NewPing sonar(TRIG_PIN, ECHO_PIN, MAX_DISTANCE);
- In the loop() function, use the ping() function of the NewPing library to measure the distance of an object in front of the HC-SR04 sensor in centimeters.
unsigned int distance = sonar.ping_cm();
- Create an if-else statement to check if the distance of the object is greater or less than a certain threshold.
if (distance < 30) {
  servo.write(180); // rotate servo to 180 degrees
  Serial.print("Object is too close! Distance: ");
  Serial.println(distance);
} else {
  servo.write(0); // rotate servo to 0 degrees
  Serial.print("Object is at safe distance. Distance: ");
  Serial.println(distance);
}
- Use the delay() function to wait for a period of time before taking another measurement.
delay(50);
- Upload the code to the Arduino UNO microcontroller and test the system by placing an object at different distances in front of the sensor.
Schematic
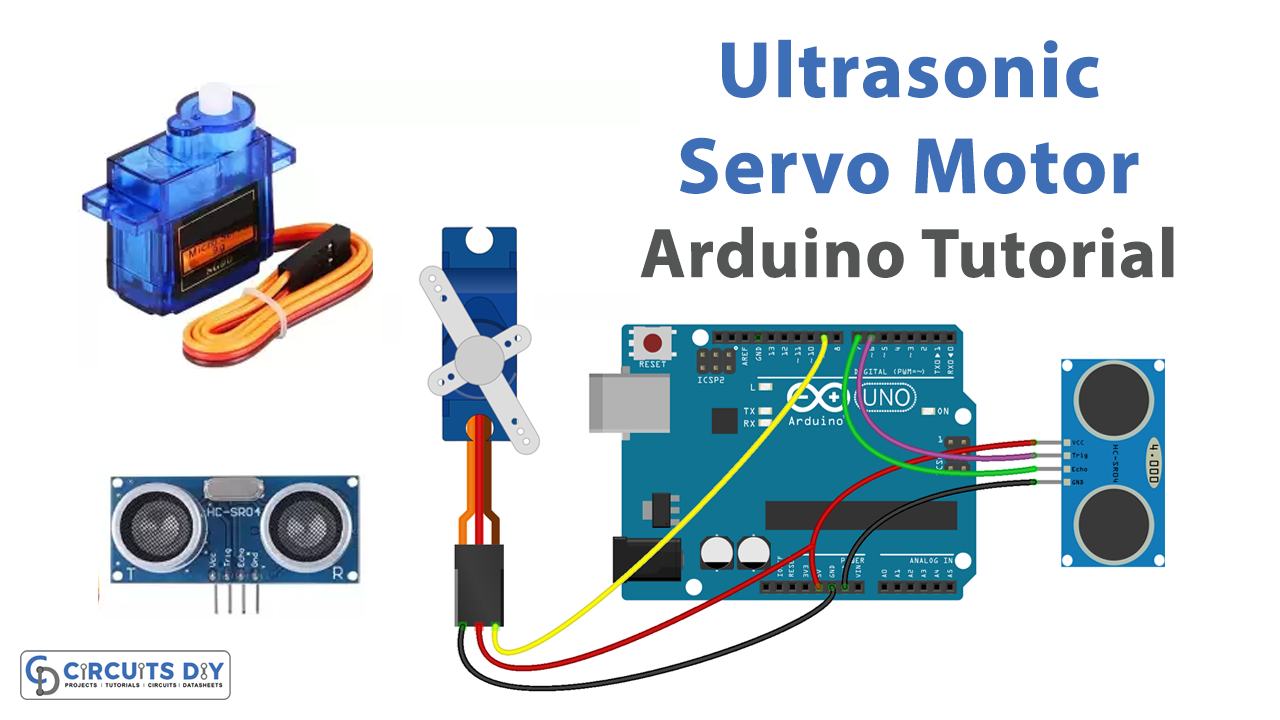
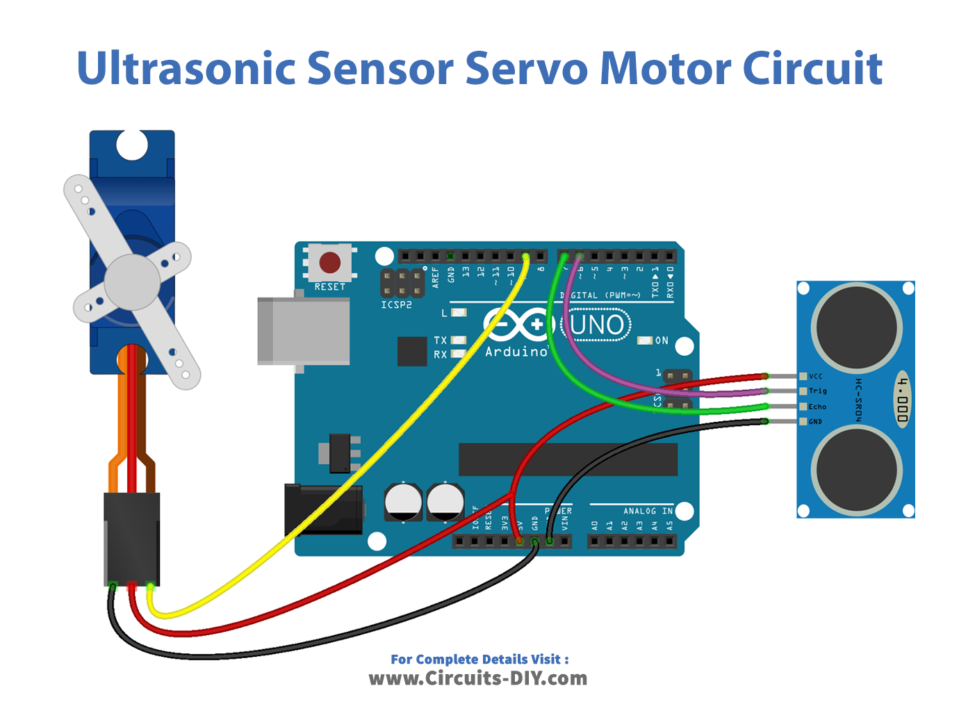
Make connections according to the circuit diagram given below.
Wiring / Connections
| Arduino | Servo Motor | Ultrasonic Sensor |
|---|---|---|
| 5V | RED | VCC |
| GND | BLACK | GND |
| D6 | TRIG | |
| D7 | ECHO | |
| D9 | YELLOW |
Installing Arduino IDE
First, you need to install Arduino IDE Software from its official website Arduino. Here is a simple step-by-step guide on “How to install Arduino IDE“.
Installing Libraries
Before you start uploading a code, download and unzip the following libraries at /Progam Files(x86)/Arduino/Libraries (default), in order to use the sensor with the Arduino board. Here is a simple step-by-step guide on “How to Add Libraries in Arduino IDE“.
Code
Now copy the following code and upload it to Arduino IDE Software.
#include <Servo.h>

// constants won't change
const int TRIG_PIN  = 6;  // Arduino pin connected to Ultrasonic Sensor's TRIG pin
const int ECHO_PIN  = 7;  // Arduino pin connected to Ultrasonic Sensor's ECHO pin
const int SERVO_PIN = 9; // Arduino pin connected to Servo Motor's pin
const int DISTANCE_THRESHOLD = 50; // centimeters

Servo servo; // create servo object to control a servo

// variables will change:
float duration_us, distance_cm;

void setup() {
  Serial.begin (9600);       // initialize serial port
  pinMode(TRIG_PIN, OUTPUT); // set arduino pin to output mode
  pinMode(ECHO_PIN, INPUT);  // set arduino pin to input mode
  servo.attach(SERVO_PIN);   // attaches the servo on pin 9 to the servo object
  servo.write(0);
}

void loop() {
  // generate 10-microsecond pulse to TRIG pin
  digitalWrite(TRIG_PIN, HIGH);
  delayMicroseconds(10);
  digitalWrite(TRIG_PIN, LOW);

  // measure duration of pulse from ECHO pin
  duration_us = pulseIn(ECHO_PIN, HIGH);
  // calculate the distance
  distance_cm = 0.017 * duration_us;

  if(distance_cm < DISTANCE_THRESHOLD)
    servo.write(90); // rotate servo motor to 90 degree
  else
    servo.write(0);  // rotate servo motor to 0 degree

  // print the value to Serial Monitor
  Serial.print("distance: ");
  Serial.print(distance_cm);
  Serial.println(" cm");

  delay(500);
}
Working Explanation
The code starts by including the necessary libraries such as the Servo library and the NewPing library, which provide the necessary functions for controlling the servo motor and measuring the distance of an object using the HC-SR04 sensor. Next, the code declares the pin numbers for the HC-SR04 sensor, SG51R servo motor, and the Arduino UNO. The trig pin of the HC-SR04 is connected to pin 8, the echo pin to pin 9, and the control pin of the SG51R servo motor to pin 10.
In the setup() function, the code initializes the serial communication, attaches the servo motor to the control pin, creates a new instance of the NewPing library, and set the maximum distance threshold. In the loop() function, the code uses the ping() function of the NewPing library to measure the distance of an object in front of the HC-SR04 sensor in centimeters. The code then creates an if-else statement to check if the distance of the object is greater or less than a certain threshold, that is set by the user. If the distance is less than the threshold, the code rotates the servo motor to a certain angle as an indication that the object is too close.
Applications
- Security systems and surveillance cameras
- Industrial automation for controlling the position of machine parts
- Automated testing equipment
- Medical equipment for precise positioning and movement
- Automatic vending machines
- Distance-based control in automated stages for theater and events
- Smart home appliances
Conclusion
We hope you have found this Arduino – Ultrasonic Sensor – Servo Motor Circuit very useful. If you feel any difficulty in making it feel free to ask anything in the comment section.

