Introduction
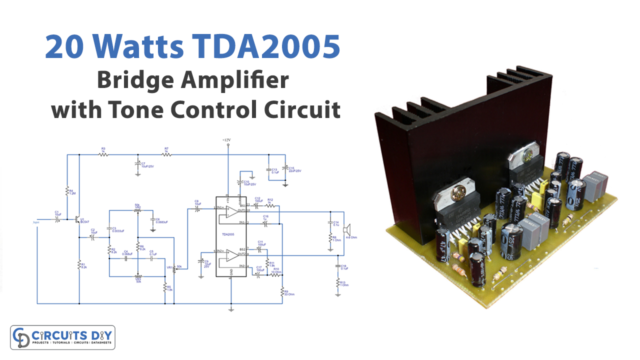
Attention all DIY electronics enthusiasts! Are you ready to take your audio experience to the next level? In this blog, you’ll discover the magic of creating your own simple 20-watt amplifier circuit. No more dull, weak sounds from your speakers. Get ready to crank up the volume and bask in crisp and powerful sound glory.
This guide is designed specifically for beginners, so even if you have little to no experience in electronics, you’ll be able to follow along easily. Let’s dive into the world of amplifiers and start building!
Hardware Required
You will require the following hardware for the 20Watt Amplifier Circuit.
| S.no | Components | Value | QTY |
|---|---|---|---|
| 1 | IC | TDA2004 | 1 |
| 2 | Transistor | BC548 | |
| 3 | Polar Capacitor | 10u, 22u, 100u | 4, 3, 3 |
| 4 | Non Polar Capacitor | 0.0033, 0.068, 0.1, | 1, 2, 4 |
| 5 | Resistor | 1, 1.8k, 8.2k, 1.2M, 33, 1k, 10, | 2, 2, 2, 1, 1, 2, 1 |
| 6 | V. Resistor | 50k | 3 |
| 7 | Speaker | – | 1 |
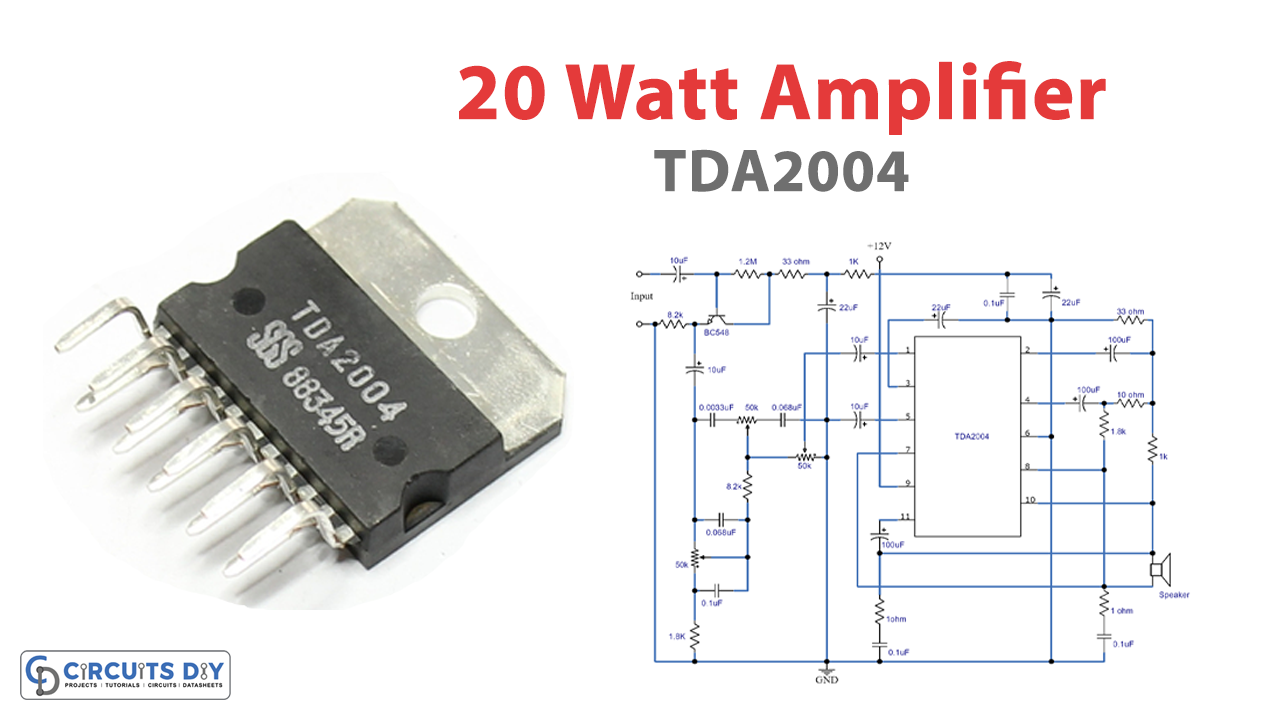
Circuit Diagram

Working Explanation
- IC1 (TDA2005) is the system’s backbone, designed explicitly for amplifier projects. It contains a pair of op-amps connected to a bridge to generate power.
- The input signal is sent into the circuit through the C1 capacitor and is amplified by transistor Q1.
- The following components regulate the signal level and manage high-frequency sound:
- C2, C3, C6 capacitors
- VR2 potentiometer
- To manage low-frequency or bass sound, the following components are used:
- C4, C5 capacitors
- VR3 potentiometer
- The signal sent through VR1 is adjusted by coupling the capacitor C8 to the IC1 (Pin 1) input.
- R9, R10, and R12 resistors maintain the circuit’s gain.
- The C11 and C12 capacitors act as gain traps for low frequency.
- The C17 capacitor, a feedback component, is set for low-scale frequency.
- The following components prevent high-frequency modulating oscillation:
- R8
- C14
- R13
- C18
- The output of the proposed simple 20-watt amplifier comes from pin 8 & Pin 10.
Final Words
With this simple 20-watt amplifier circuit, you can now enhance your audio experience. This circuit will amplify the sound to the desired level. You can quickly assemble the circuit with the clear instructions in this blog. So, what are you waiting for? Gather the components and get started on your own DIY amplifier project today. And for any query, our comment section is there for you!