Introduction
Pushbutton or switch bouncing is a simple yet annoying problem that is very common if you are dealing with any kind of electronic circuit involving switches. Simply put, it introduces false button presses and pushes due to electrical noise or mechanical bouncing into whatever project you are working on. So in this tutorial, we are going to understand how to create a pushbutton debouncing algorithm using a simple pushbutton and an ESP32-WROOM microcontroller.
What is Button Debouncing?
Pushbutton debouncing is a technique used in electronics to ensure that the signal from a pushbutton is interpreted accurately and correctly. It involves continuous monitoring of the button’s state, with a debounce delay introduced when a state change is detected. This delay helps filter out the rapid, unstable state changes caused by bouncing.

Hardware Components
You’ll need the following hardware components to get started:
Steps-by-Step Guide
(1) Setting up Arduino IDE
Download Arduino IDE Software from its official site. Here is a step-by-step guide on “How to install Arduino IDE“.
(2) ESP32 in Arduino IDE
There’s an add-on that allows you to program the ESP32 using the Arduino IDE. Here is a step-by-step guide on “How to Install ESP32 on Arduino IDE“.
(3) Include Libraries
Before you start uploading a code, download and unzip the ezButton.h library at /Program Files(x86)/Arduino/Libraries (default). Here is a step-by-step guide on “How to Add Libraries in Arduino IDE“.
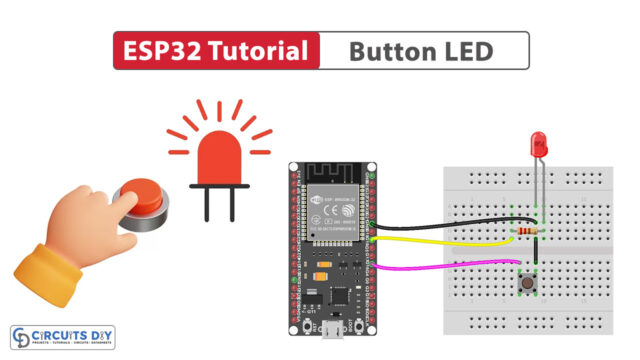
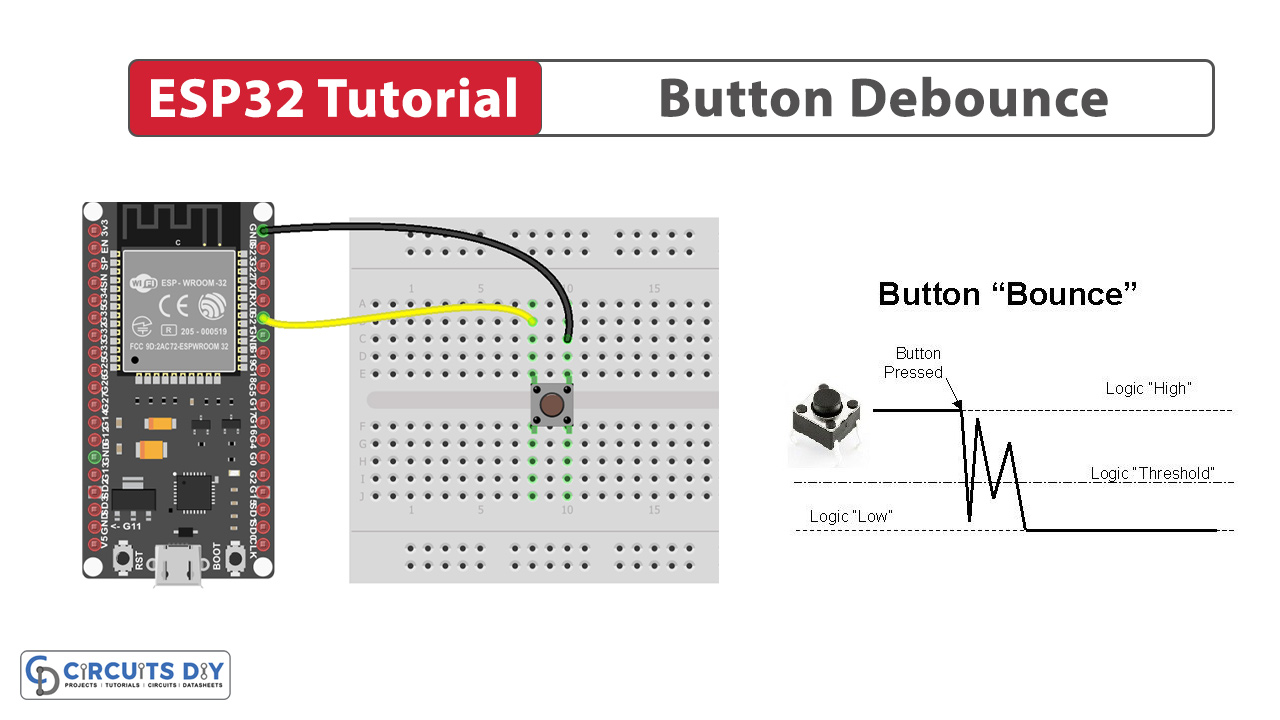
(4) Schematic
Make connections according to the circuit diagram given below.
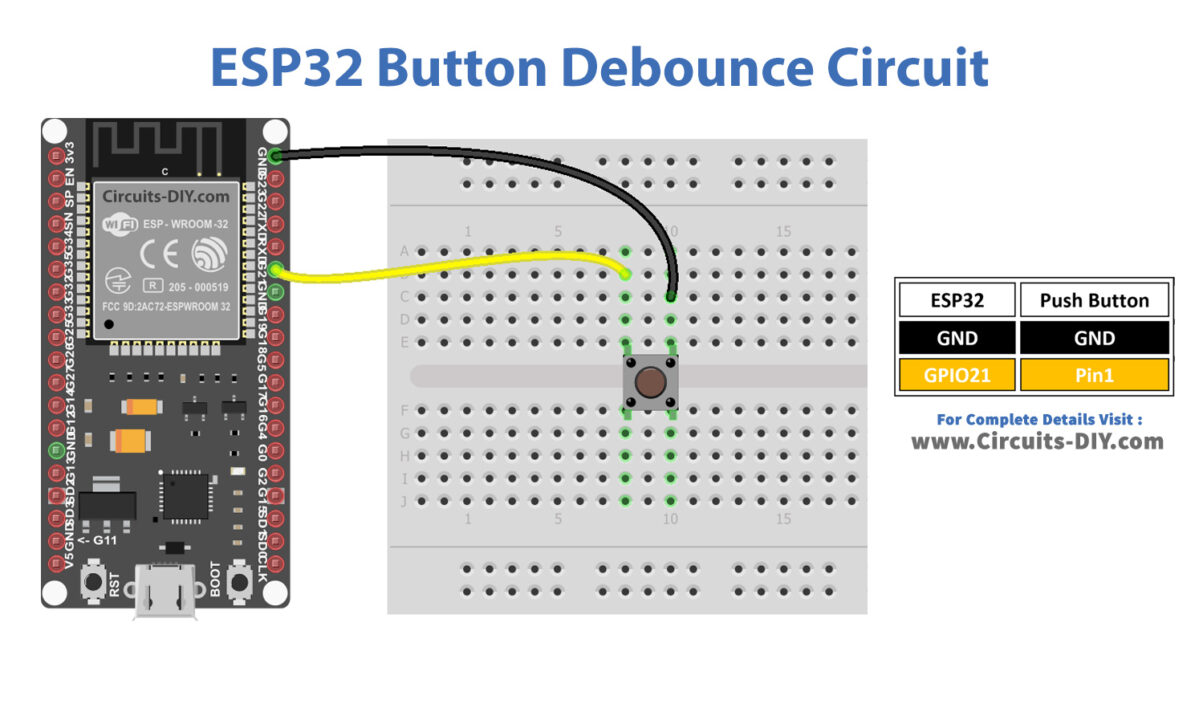
Wiring / Connections
| ESP32 | Button |
|---|---|
| GND | GND |
| GIOP21 | Pin 1 |
(5) Uploading Code
Now copy the following code and upload it to Arduino IDE Software.
Button Bounce Code
This code demonstrates how to detect button presses/releases and provides feedback through the serial monitor.
#define BUTTON_PIN 21  // GIOP21 pin connected to button

// Variables will change:
int lastState = LOW;  // the previous state from the input pin
int currentState;     // the current reading from the input pin

void setup() {
  // initialize serial communication at 9600 bits per second:
  Serial.begin(9600);
  // initialize the pushbutton pin as an pull-up input
  // the pull-up input pin will be HIGH when the switch is open and LOW when the switch is closed.
  pinMode(BUTTON_PIN, INPUT_PULLUP);
}

void loop() {
  // read the state of the switch/button:
  currentState = digitalRead(BUTTON_PIN);

  if (lastState == HIGH && currentState == LOW)
    Serial.println("The button is pressed");
  else if (lastState == LOW && currentState == HIGH)
    Serial.println("The button is released");

  // save the the last state
  lastState = currentState;
}
To observe the result on the Serial Monitor, press and hold the button for several seconds before releasing it once.
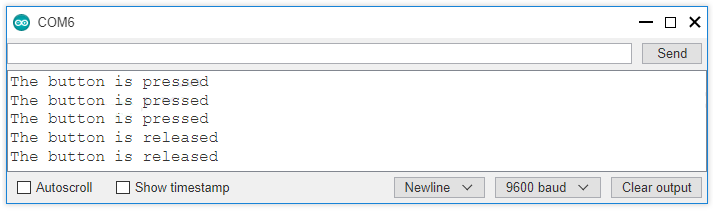
You’ve noticed that although you pressed and released the button only once, the ESP32 registered multiple presses and releases.
Button Debounce Code
This code is for debouncing a button connected to GPIO pin 21 on an ESP32 microcontroller.
#define BUTTON_PIN     21 // GIOP21 pin connected to button
#define DEBOUNCE_TIME  50 // the debounce time in millisecond, increase this time if it still chatters

// Variables will change:
int lastSteadyState = LOW;       // the previous steady state from the input pin
int lastFlickerableState = LOW;  // the previous flickerable state from the input pin
int currentState;                // the current reading from the input pin

// the following variables are unsigned longs because the time, measured in
// milliseconds, will quickly become a bigger number than can be stored in an int.
unsigned long lastDebounceTime = 0;  // the last time the output pin was toggled

void setup() {
  // initialize serial communication at 9600 bits per second:
  Serial.begin(9600);
  // initialize the pushbutton pin as an pull-up input
  // the pull-up input pin will be HIGH when the switch is open and LOW when the switch is closed.
  pinMode(BUTTON_PIN, INPUT_PULLUP);
}

void loop() {
  // read the state of the switch/button:
  currentState = digitalRead(BUTTON_PIN);

  // check to see if you just pressed the button
  // (i.e. the input went from LOW to HIGH), and you've waited long enough
  // since the last press to ignore any noise:

  // If the switch/button changed, due to noise or pressing:
  if (currentState != lastFlickerableState) {
    // reset the debouncing timer
    lastDebounceTime = millis();
    // save the the last flickerable state
    lastFlickerableState = currentState;
  }

  if ((millis() - lastDebounceTime) > DEBOUNCE_TIME) {
    // whatever the reading is at, it's been there for longer than the debounce
    // delay, so take it as the actual current state:

    // if the button state has changed:
    if(lastSteadyState == HIGH && currentState == LOW)
      Serial.println("The button is pressed");
    else if(lastSteadyState == LOW && currentState == HIGH)
      Serial.println("The button is released");

    // save the the last steady state
    lastSteadyState = currentState;
  }
}
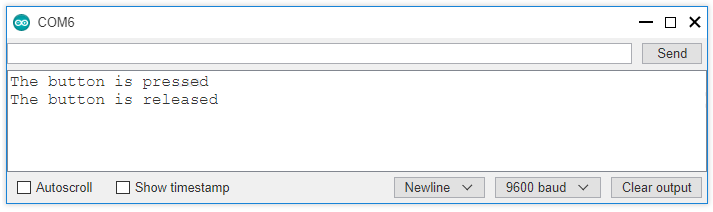
You performed a single press and release, and the ESP32 accurately registered only one press and release, effectively eliminating any chattering.
ESP32 Button Debounce with Library
This powerful library simplifies the process of debouncing buttons connected to ESP32 microcontrollers. By effectively handling electrical noise and mechanical bouncing, ezButton.h ensures accurate and reliable button state detection.
#include <ezButton.h>

#define DEBOUNCE_TIME 50 // the debounce time in millisecond, increase this time if it still chatters

ezButton button(21); // create ezButton object that attach to pin GPIO21

void setup() {
  Serial.begin(9600);
  button.setDebounceTime(DEBOUNCE_TIME); // set debounce time to 50 milliseconds
}

void loop() {
  button.loop(); // MUST call the loop() function first

  if (button.isPressed())
    Serial.println("The button is pressed");

  if (button.isReleased())
    Serial.println("The button is released");
}