Introduction
Smoke sensors are found pretty much at every place. This sensor is essentially a fire protection device. Therefore, it has vast applications. Whether it’s the industrial sector or a commercial sector, this sensor is utilized everywhere. In the homes and restaurants, they are used in the kitchens to give the signal if a flame gets burst. Industries bought this sensor so that it sends the signal if the explosion happens.
The main purpose of this device is to warn the people of the surroundings if a fire occurs. This sensor has notable importance. Therefore, it should be installed in every place. Thus, this tutorial is about interfacing ” MQ-2 Gas/Smoke Sensor with Arduino UNO”.
An Overview about MQ-2 Sensor
The MQ-2 smoke sensor is the metal oxide semiconductor sensor. Hence, also recognized as a chemiresistor. Its working principle is based on the resistor. When it detects smoke or fire, the value of its resistance changes. That’s how the gas or smoke gets detected. The sensor works on a very low voltage of around 5Volts. Also, it draws a current of 500mA. The sensor is compact and simple to access.

Hardware Required
| S.no | Component | Value | Qty |
|---|---|---|---|
| 1. | Arduino | UNO | 1 |
| 2. | USB Cable Type A to B | – | 1 |
| 3. | Jumper Wires | – | – |
| 4. | Gas/Smoke Sensor | MQ-2 | – |
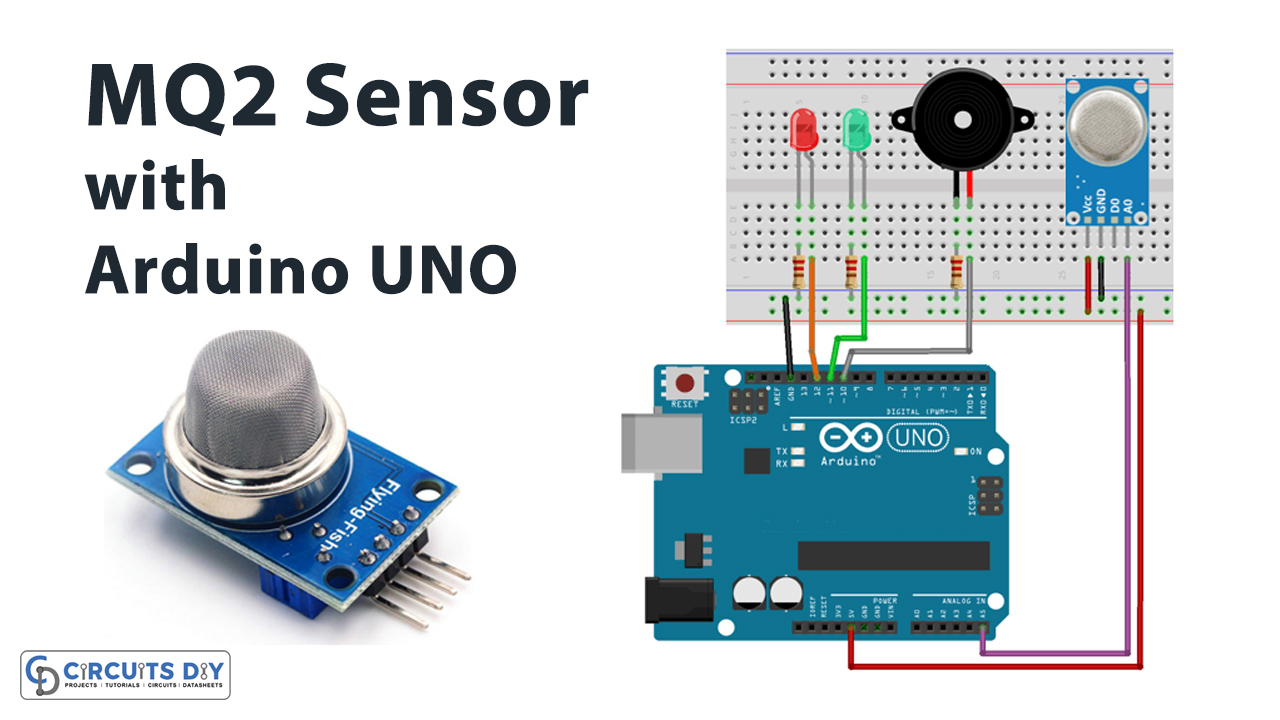
Circuit Diagram
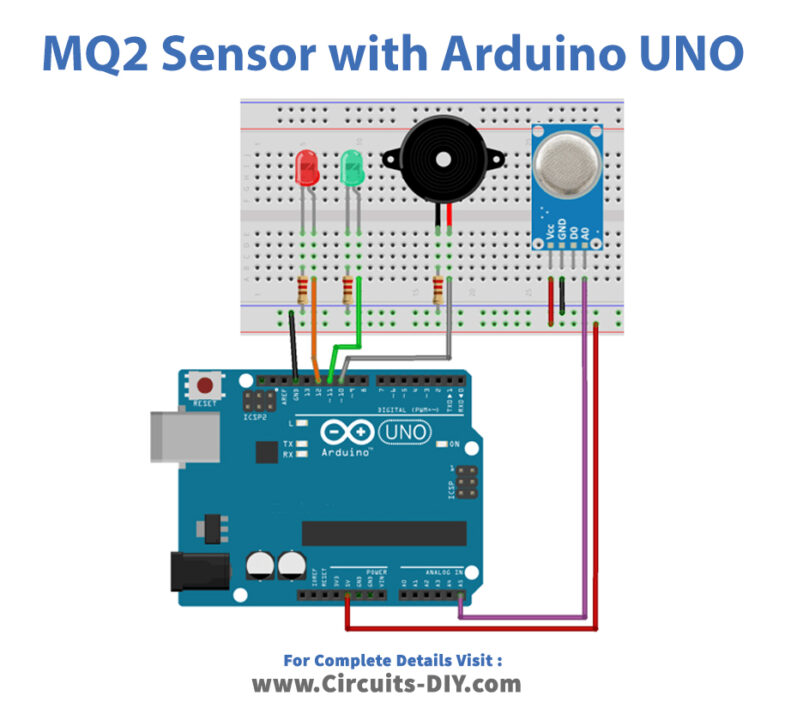
Connection Table
| Arduino | MQ-2 Gas/Smoke Sensor |
|---|---|
| Analog Pin | A0 |
| Digital Pin | D0 |
| GND | GND |
| 5V | VCC |
Arduino Code
// Circuits DIY
 // For Complete Details Visit -> https://circuits-diy.com
int redLed = 12;
int greenLed = 11;
int buzzer = 10;
int smokeA0 = A5;
// Your threshold value
int sensorThres = 400;

void setup() {
  pinMode(redLed, OUTPUT);
  pinMode(greenLed, OUTPUT);
  pinMode(buzzer, OUTPUT);
  pinMode(smokeA0, INPUT);
  Serial.begin(9600);
}

void loop() {
  int analogSensor = analogRead(smokeA0);

  Serial.print("Pin A0: ");
  Serial.println(analogSensor);
  // Checks if it has reached the threshold value
  if (analogSensor > sensorThres)
  {
    digitalWrite(redLed, HIGH);
    digitalWrite(greenLed, LOW);
    tone(buzzer, 1000, 200);
  }
  else
  {
    digitalWrite(redLed, LOW);
    digitalWrite(greenLed, HIGH);
    noTone(buzzer);
  }
  delay(100);
}
Working Explanation
Connect the MQ-2 Gas/Smoke Sensor with Arduino in the same way as described above. Upload the code in your Arduino that is mentioned above. Adjust the threshold using the potentiometer screw in the module. Now, bring the smoke or gas in front of the sensor. There is a comparator in the module sensor, it compares the value to the threshold value described in the code. And, when the smoke reaches a certain threshold value, it will turn ON the red LED and the buzzer.
Code Explanation
- The code first defines which pins of Arduino are connected with which component. Also, it specifies the threshold value. We are using 400 as a threshold value
- In the void setup, it has defined the Pin modes for input and output pins of an Arduino
- In the void loop, it has described the conditions, that if the value of the sensor is greater than the threshold value, the red LED goes high and green LED goes low. Also, a buzzer would make some sound. Else, the red LED goes low and green remains high and the buzzer produces no tune.
Application and Uses
- In industries to sense if the explosion happens
- In the kitchen of the restaurant
- For home and office automation systems, etc