Introduction
The real-time clock (RTC) is used to conserve the updated track of the time. Since It calculates the passage of time, therefore used in almost every electronic device. It keeps the whole track of data of hours, minutes, second, month, date, day, etc. The RTC clock works in either 24 hours or 12 hours of formats. RTC is the same as the system clock. The only difference is that RTC can run even when the system power is OFF, while the system clock can’t work in that way. In this tutorial, we are going to enter the face “Real-Time Clock (RTC) DS3231 Module with Arduino UNO”.
The RTC module has a built-in backup battery. This enables the module to maintain the time, even when the power is OFF. Hence, you don’t need to reset the power again and again. The module we are using is inexpensive and highly accurate. The module works on either 3.3 volts or 5 Volts. It uses the 12C communication protocol. Thus, it uses only two pins of an Arduino board that is very feasible for an Arduino.

Hardware Required
| S.no | Component | Value | Qty |
|---|---|---|---|
| 1. | Arduino | UNO | 1 |
| 2. | USB Cable Type A to B | – | 1 |
| 3. | Jumper Wires | – | – |
| 4. | RTC Module | DS3231 | – |
Circuit Diagram
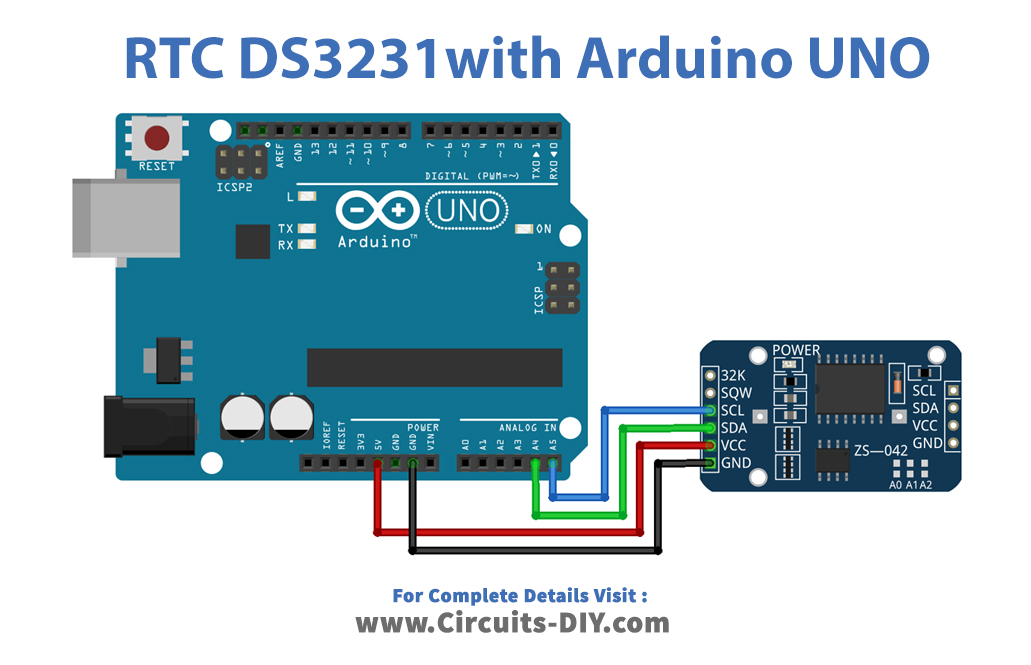
Connection Table
| Arduino | RTC module |
|---|---|
| A5 | SCL |
| A4 | SDA |
| 5V | VCC |
| GND | GND |
Arduino Code
// Circuits DIY
// For Complete Details Visit -> https://circuits-diy.com

#include "Wire.h"
#define DS3231_I2C_ADDRESS 0x68
// Convert normal decimal numbers to binary coded decimal
byte decToBcd(byte val){
  return( (val/10*16) + (val%10) );
}
// Convert binary coded decimal to normal decimal numbers
byte bcdToDec(byte val){
  return( (val/16*10) + (val%16) );
}
void setup(){
  Wire.begin();
  Serial.begin(9600);
  // set the initial time here:
  // DS3231 seconds, minutes, hours, day, date, month, year
  setDS3231time(30,42,16,5,13,10,16);
}
void setDS3231time(byte second, byte minute, byte hour, byte dayOfWeek, byte
dayOfMonth, byte month, byte year){
  // sets time and date data to DS3231
  Wire.beginTransmission(DS3231_I2C_ADDRESS);
  Wire.write(0); // set next input to start at the seconds register
  Wire.write(decToBcd(second)); // set seconds
  Wire.write(decToBcd(minute)); // set minutes
  Wire.write(decToBcd(hour)); // set hours
  Wire.write(decToBcd(dayOfWeek)); // set day of week (1=Sunday, 7=Saturday)
  Wire.write(decToBcd(dayOfMonth)); // set date (1 to 31)
  Wire.write(decToBcd(month)); // set month
  Wire.write(decToBcd(year)); // set year (0 to 99)
  Wire.endTransmission();
}
void readDS3231time(byte *second,
byte *minute,
byte *hour,
byte *dayOfWeek,
byte *dayOfMonth,
byte *month,
byte *year){
  Wire.beginTransmission(DS3231_I2C_ADDRESS);
  Wire.write(0); // set DS3231 register pointer to 00h
  Wire.endTransmission();
  Wire.requestFrom(DS3231_I2C_ADDRESS, 7);
  // request seven bytes of data from DS3231 starting from register 00h
  *second = bcdToDec(Wire.read() & 0x7f);
  *minute = bcdToDec(Wire.read());
  *hour = bcdToDec(Wire.read() & 0x3f);
  *dayOfWeek = bcdToDec(Wire.read());
  *dayOfMonth = bcdToDec(Wire.read());
  *month = bcdToDec(Wire.read());
  *year = bcdToDec(Wire.read());
}
void displayTime(){
  byte second, minute, hour, dayOfWeek, dayOfMonth, month, year;
  // retrieve data from DS3231
  readDS3231time(&second, &minute, &hour, &dayOfWeek, &dayOfMonth, &month,
  &year);
  // send it to the serial monitor
  Serial.print(hour, DEC);
  // convert the byte variable to a decimal number when displayed
  Serial.print(":");
  if (minute<10){
    Serial.print("0");
  }
  Serial.print(minute, DEC);
  Serial.print(":");
  if (second<10){
    Serial.print("0");
  }
  Serial.print(second, DEC);
  Serial.print(" ");
  Serial.print(dayOfMonth, DEC);
  Serial.print("/");
  Serial.print(month, DEC);
  Serial.print("/");
  Serial.print(year, DEC);
  Serial.print(" Day of week: ");
  switch(dayOfWeek){
  case 1:
    Serial.println("Sunday");
    break;
  case 2:
    Serial.println("Monday");
    break;
  case 3:
    Serial.println("Tuesday");
    break;
  case 4:
    Serial.println("Wednesday");
    break;
  case 5:
    Serial.println("Thursday");
    break;
  case 6:
    Serial.println("Friday");
    break;
  case 7:
    Serial.println("Saturday");
    break;
  }
}
void loop(){
  displayTime(); // display the real-time clock data on the Serial Monitor,
  delay(1000); // every second
}
Working Explanation
Connect the real-time clock RTC) Module with Arduino UNO. Copy the code from here and paste it into your Arduino IDE. Then upload the code to the board. Now, open the serial monitor. Here you can see the current time and date. The clock would work even when you disconnect the power from Arduino. It won’t get reset.
Code Explanation
The code first has included that library for the real-time clock module. Also, it has formulated the program to convert the decimal into binary and binary into decimal numbers. For this purpose it jas used the variable byte.
In the void setup, it has set the initial time. Set all the parameters, which are, second, minute, hour, date, date, month, and year. The code then multiplied all these parameters with the byte variable. Then it has the code that allows fetching the data from the DS3231. Further, it sends it to the serial monitor to print. In the void loop, it just used displayTime function to display the real-time clock.
Application and Uses
Since it’s a timekeeping device, therefore it can be used everywhere. For example it can be used in
- Laptops.
- Computers.
- Watches.
- Electronic devices that need clock.