
Overview
In the realm of embedded electronics and IoT (Internet of Things) projects, the ESP32 has emerged as a versatile and powerful microcontroller platform. Its capabilities, coupled with its affordability, have made it a favorite among hobbyists and professionals alike. However, the full potential of the ESP32 can only be realized when combined with the right display technology, and that’s where OLED (Organic Light-Emitting Diode) displays come into play.
In today’s tutorial, we are going to use “OLED Displays with ESP32-WROOM Microcontroller“
Introduction to an OLED Display?
OLED, or Organic Light-Emitting Diode, display is a type of electronic visual display technology that uses organic compounds to emit light when an electric current is applied. Unlike traditional LCD (Liquid Crystal Display) screens, which require a backlight to illuminate pixels, OLED displays are self-emissive. This means that each individual pixel in an OLED display emits its own light, allowing for deep blacks, high contrast ratios, and vibrant colors.
OLED technology is known for its advantages, including faster response times, wider viewing angles, and reduced power consumption compared to some other display technologies.

PCBGOGO has offered high-quality PCBs and the best PCB assembly service all over the world since 2015. Discover an incredible offer that puts PCB prototyping within reach for just $1. Yes, you read that right – for only a dollar, you can bring your innovative ideas to life with a PCB prototype. Don’t miss out on this fantastic opportunity to turn your electronics projects into reality. Explore the campaign here: PCBGOGO $1 PCB Prototype and pave the way for your next big creation!
Hardware Components
You’ll need the following hardware components to get started:

| Components | Value / Model | Qty |
|---|---|---|
| ESP32 PCB | PCB-GOGO | 1 |
| ESP32 | WROOM | 1 |
| OLED Display | SSD1306 0.96 Inch | 1 |
| DC Power for ESP32 | 12V | 1 |
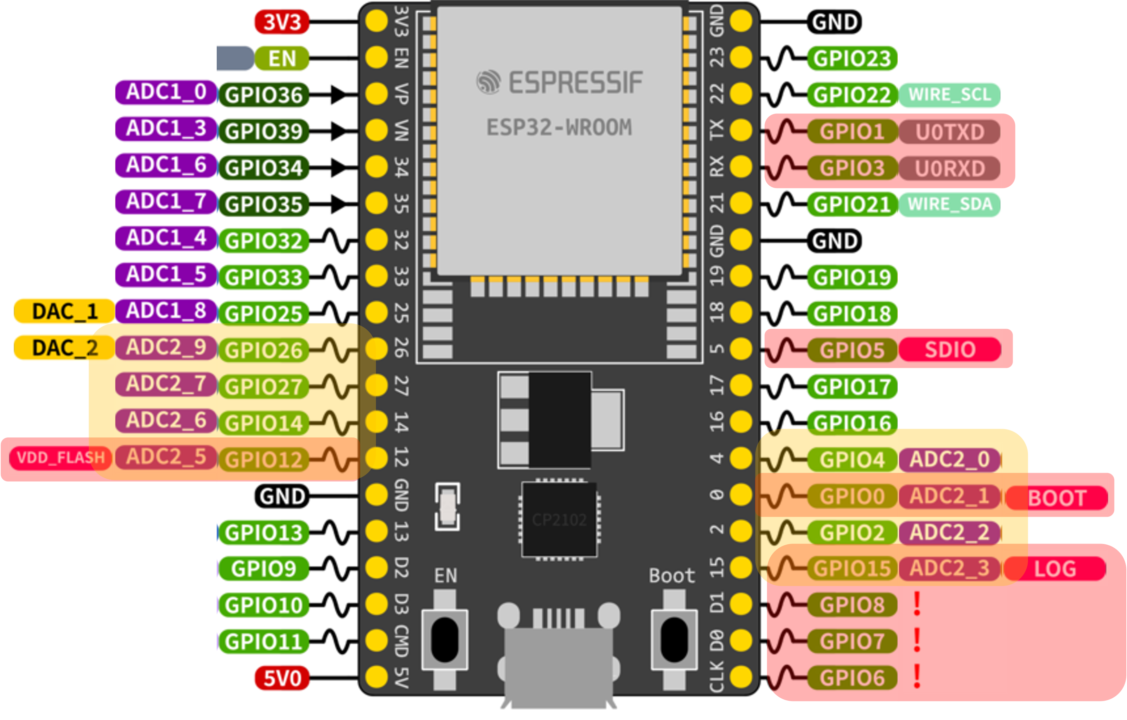
ESP32 Pinout
Steps-by-Step Guide
(1) Setting up Arduino IDE
Download Arduino IDE Software from its official site. Here is a step-by-step guide on “How to install Arduino IDE“.
(2) ESP32 in Arduino IDE
There’s an add-on that allows you to program the ESP32 using the Arduino IDE. Here is a step-by-step guide on “How to Install ESP32 on Arduino IDE“.
(3) Include Libraries
Before you start uploading a code, download and unzip the Wire.h, Adafruit_GFX.h, Adafruit_SSD1306.h library at /Program Files(x86)/Arduino/Libraries (default). Here is a step-by-step guide on “How to Add Libraries in Arduino IDE“.
(4) Schematic
Make connections according to the circuit diagram given below.

Wiring / Connections
| ESP32 | OLED Display |
|---|---|
| 3V3 | VCC |
| GND | GND |
| D21 | SDA |
| D22 | SCL |
(5) Uploading Code
Now copy the following code and upload it to Arduino IDE Software.
/* Circuits DIY
 * For Complete Details Visit
 * https://www.circuits-diy.com/how-to-use-oled-displays-with-esp32-boards/
 */

#include <Wire.h>
#include <Adafruit_GFX.h>
#include <Adafruit_SSD1306.h>

#define SCREEN_WIDTH 128 // OLED display width, in pixels
#define SCREEN_HEIGHT 64 // OLED display height, in pixels

#define OLED_RESET 4
Adafruit_SSD1306 display(SCREEN_WIDTH, SCREEN_HEIGHT, &Wire, OLED_RESET);

#define NUMFLAKES     10 // Number of snowflakes in the animation example

#define LOGO_HEIGHT   16
#define LOGO_WIDTH    16
static const unsigned char PROGMEM logo_bmp[] =
{0xFF, 0xFF, 0xFF, 0xFF, 0xFF, 0xFF, 0xFF, 0xFF, 0xFF, 0xFF, 0xFF, 0xFF, 0xFF, 0xFF, 0xFF, 0xFF,
  0xFF, 0xFF, 0xFF, 0xFF, 0xFF, 0xFF, 0xFF, 0xFF, 0xFF, 0xFF, 0xFF, 0xFF, 0xFF, 0xFF, 0xFF, 0xFF,
};


void setup() {
  display.begin(SSD1306_SWITCHCAPVCC, 0x3C);
  display.display();
  delay(2000);

}

void loop() {
  // intro();
  testdrawline();      // Draw many lines
  testdrawrect();      // Draw rectangles (outlines)
  testfillrect();      // Draw rectangles (filled)
  testdrawcircle();    // Draw circles (outlines)
  testfillcircle();    // Draw circles (filled)
  testdrawroundrect(); // Draw rounded rectangles (outlines)
  testfillroundrect(); // Draw rounded rectangles (filled)
  testdrawtriangle();  // Draw triangles (outlines)
  testfilltriangle();  // Draw triangles (filled)
  testdrawbitmap();    // Draw a small bitmap image
  testanimate(logo_bmp, LOGO_WIDTH, LOGO_HEIGHT); // Animate bitmaps
}

void intro() {
  display.clearDisplay();
  display.setTextSize(2);
  display.setTextColor(SSD1306_WHITE);
  display.setCursor(40, 0);
  display.println(F("OLED"));
  display.setCursor(20, 20);
  display.println(F("Display"));
  display.setCursor(15, 40);
  display.println(F("Tutorial"));
  display.display();// Show initial text
  delay(100);

  // Scroll in various directions, pausing in-between:
  display.startscrollright(0x00, 0x0F);
  delay(2000);
  display.stopscroll();
  delay(1000);
  display.startscrollleft(0x00, 0x0F);
  delay(2000);
  display.stopscroll();
  delay(1000);
  display.startscrolldiagright(0x00, 0x07);
  delay(2000);
  display.startscrolldiagleft(0x00, 0x07);
  delay(2000);
  display.stopscroll();
  delay(1000);
}

void testdrawline() {
  int16_t i;

  display.clearDisplay(); // Clear display buffer

  for (i = 0; i < display.width(); i += 4) {
    display.drawLine(0, 0, i, display.height() - 1, SSD1306_WHITE);
    display.display(); // Update screen with each newly-drawn line
    delay(1);
  }
  for (i = 0; i < display.height(); i += 4) {
    display.drawLine(0, 0, display.width() - 1, i, SSD1306_WHITE);
    display.display();
    delay(1);
  }
  delay(250);

  display.clearDisplay();

  for (i = 0; i < display.width(); i += 4) {
    display.drawLine(0, display.height() - 1, i, 0, SSD1306_WHITE);
    display.display();
    delay(1);
  }
  for (i = display.height() - 1; i >= 0; i -= 4) {
    display.drawLine(0, display.height() - 1, display.width() - 1, i, SSD1306_WHITE);
    display.display();
    delay(1);
  }
  delay(250);

  display.clearDisplay();

  for (i = display.width() - 1; i >= 0; i -= 4) {
    display.drawLine(display.width() - 1, display.height() - 1, i, 0, SSD1306_WHITE);
    display.display();
    delay(1);
  }
  for (i = display.height() - 1; i >= 0; i -= 4) {
    display.drawLine(display.width() - 1, display.height() - 1, 0, i, SSD1306_WHITE);
    display.display();
    delay(1);
  }
  delay(250);

  display.clearDisplay();

  for (i = 0; i < display.height(); i += 4) {
    display.drawLine(display.width() - 1, 0, 0, i, SSD1306_WHITE);
    display.display();
    delay(1);
  }
  for (i = 0; i < display.width(); i += 4) {
    display.drawLine(display.width() - 1, 0, i, display.height() - 1, SSD1306_WHITE);
    display.display();
    delay(1);
  }

  delay(2000); // Pause for 2 seconds
}

void testdrawrect(void) {
  display.clearDisplay();

  for (int16_t i = 0; i < display.height() / 2; i += 2) {
    display.drawRect(i, i, display.width() - 2 * i, display.height() - 2 * i, SSD1306_WHITE);
    display.display(); // Update screen with each newly-drawn rectangle
    delay(1);
  }

  delay(2000);
}

void testfillrect(void) {
  display.clearDisplay();

  for (int16_t i = 0; i < display.height() / 2; i += 3) {
    // The INVERSE color is used so rectangles alternate white/black
    display.fillRect(i, i, display.width() - i * 2, display.height() - i * 2, SSD1306_INVERSE);
    display.display(); // Update screen with each newly-drawn rectangle
    delay(1);
  }

  delay(2000);
}

void testdrawcircle(void) {
  display.clearDisplay();

  for (int16_t i = 0; i < max(display.width(), display.height()) / 2; i += 2) {
    display.drawCircle(display.width() / 2, display.height() / 2, i, SSD1306_WHITE);
    display.display();
    delay(1);
  }

  delay(2000);
}

void testfillcircle(void) {
  display.clearDisplay();

  for (int16_t i = max(display.width(), display.height()) / 2; i > 0; i -= 3) {
    // The INVERSE color is used so circles alternate white/black
    display.fillCircle(display.width() / 2, display.height() / 2, i, SSD1306_INVERSE);
    display.display(); // Update screen with each newly-drawn circle
    delay(1);
  }

  delay(2000);
}

void testdrawroundrect(void) {
  display.clearDisplay();

  for (int16_t i = 0; i < display.height() / 2 - 2; i += 2) {
    display.drawRoundRect(i, i, display.width() - 2 * i, display.height() - 2 * i,
                          display.height() / 4, SSD1306_WHITE);
    display.display();
    delay(1);
  }

  delay(2000);
}

void testfillroundrect(void) {
  display.clearDisplay();

  for (int16_t i = 0; i < display.height() / 2 - 2; i += 2) {
    // The INVERSE color is used so round-rects alternate white/black
    display.fillRoundRect(i, i, display.width() - 2 * i, display.height() - 2 * i,
                          display.height() / 4, SSD1306_INVERSE);
    display.display();
    delay(1);
  }

  delay(2000);
}

void testdrawtriangle(void) {
  display.clearDisplay();

  for (int16_t i = 0; i < max(display.width(), display.height()) / 2; i += 5) {
    display.drawTriangle(
      display.width() / 2  , display.height() / 2 - i,
      display.width() / 2 - i, display.height() / 2 + i,
      display.width() / 2 + i, display.height() / 2 + i, SSD1306_WHITE);
    display.display();
    delay(1);
  }

  delay(2000);
}

void testfilltriangle(void) {
  display.clearDisplay();

  for (int16_t i = max(display.width(), display.height()) / 2; i > 0; i -= 5) {
    // The INVERSE color is used so triangles alternate white/black
    display.fillTriangle(
      display.width() / 2  , display.height() / 2 - i,
      display.width() / 2 - i, display.height() / 2 + i,
      display.width() / 2 + i, display.height() / 2 + i, SSD1306_INVERSE);
    display.display();
    delay(1);
  }

  delay(2000);
}
void testdrawbitmap(void) {
  display.clearDisplay();

  display.drawBitmap(
    (display.width()  - LOGO_WIDTH ) / 2,
    (display.height() - LOGO_HEIGHT) / 2,
    logo_bmp, LOGO_WIDTH, LOGO_HEIGHT, 1);
  display.display();
  delay(1000);
}

#define XPOS   0 // Indexes into the 'icons' array in function below
#define YPOS   1
#define DELTAY 2

void testanimate(const uint8_t *bitmap, uint8_t w, uint8_t h) {
  int8_t f, icons[NUMFLAKES][3];

  // Initialize 'snowflake' positions
  for (f = 0; f < NUMFLAKES; f++) {
    icons[f][XPOS]   = random(1 - LOGO_WIDTH, display.width());
    icons[f][YPOS]   = -LOGO_HEIGHT;
    icons[f][DELTAY] = random(1, 6);
    Serial.print(F("x: "));
    Serial.print(icons[f][XPOS], DEC);
    Serial.print(F(" y: "));
    Serial.print(icons[f][YPOS], DEC);
    Serial.print(F(" dy: "));
    Serial.println(icons[f][DELTAY], DEC);
  }

  for (;;) { // Loop forever...
    display.clearDisplay(); // Clear the display buffer

    // Draw each snowflake:
    for (f = 0; f < NUMFLAKES; f++) {
      display.drawBitmap(icons[f][XPOS], icons[f][YPOS], bitmap, w, h, SSD1306_WHITE);
    }

    display.display(); // Show the display buffer on the screen
    delay(200);        // Pause for 1/10 second

    // Then update coordinates of each flake...
    for (f = 0; f < NUMFLAKES; f++) {
      icons[f][YPOS] += icons[f][DELTAY];
      // If snowflake is off the bottom of the screen...
      if (icons[f][YPOS] >= display.height()) {
        // Reinitialize to a random position, just off the top
        icons[f][XPOS]   = random(1 - LOGO_WIDTH, display.width());
        icons[f][YPOS]   = -LOGO_HEIGHT;
        icons[f][DELTAY] = random(1, 6);
      }
    }
  }
}
How code works
#include <Wire.h>
#include <Adafruit_GFX.h>
#include <Adafruit_SSD1306.h>
This section includes necessary libraries for working with the OLED display and I2C communication.
#define SCREEN_WIDTH 128 // OLED display width, in pixels
#define SCREEN_HEIGHT 64 // OLED display height, in pixels
#define OLED_RESET 4

Adafruit_SSD1306 display(SCREEN_WIDTH, SCREEN_HEIGHT, &Wire, OLED_RESET);
Here, the code defines constants for the screen width, height, and the OLED reset pin. Then, it initializes the OLED display using these settings.
#define NUMFLAKES     10 // Number of snowflakes in the animation example

#define LOGO_HEIGHT   16
#define LOGO_WIDTH    16
static const unsigned char PROGMEM logo_bmp[] =
{0xFF, 0xFF, 0xFF, 0xFF, 0xFF, 0xFF, 0xFF, 0xFF, 0xFF, 0xFF, 0xFF, 0xFF, 0xFF, 0xFF, 0xFF, 0xFF,
  0xFF, 0xFF, 0xFF, 0xFF, 0xFF, 0xFF, 0xFF, 0xFF, 0xFF, 0xFF, 0xFF, 0xFF, 0xFF, 0xFF, 0xFF, 0xFF,
};
This section defines constants and a bitmap (in the form of an array) for use in graphics demonstrations.
void setup() {
  display.begin(SSD1306_SWITCHCAPVCC, 0x3C);
  display.display();
  delay(2000);
}
In the setup() function, the OLED display is initialized with the specified settings, and there’s a delay of 2 seconds before moving on.
void loop() {
  // Various graphics and animation test functions are called here.
}
The loop() function repeatedly calls various test functions to demonstrate different graphics and animations on the OLED display.
Graphics Test Functions:
There are several functions such as testdrawline(), testdrawrect(), testfillrect(), testdrawcircle(), testfillcircle(), testdrawroundrect(), testfillroundrect(), testdrawtriangle(), testfilltriangle(), and testdrawbitmap(). Each of these functions demonstrates drawing or filling different shapes or images on the OLED display.
void testanimate(const uint8_t *bitmap, uint8_t w, uint8_t h) {
  // Animation logic goes here
}
The testanimate() function is used to animate the graphics on the OLED display, in this case, it animates snowflakes using the provided bitmap.
The core functionality is in the loop() function, where it repeatedly calls these graphics and animation functions to showcase various capabilities of the OLED display.
This code is essentially a demonstration of how to use an OLED display with an ESP32 microcontroller, with a focus on drawing different shapes and animations on the display.
Applications
OLED displays are commonly used in various applications, including smartphones, televisions, wearable devices, digital cameras, and embedded systems, due to their ability to deliver sharp, high-quality visuals with remarkable energy efficiency.
Conclusion
We’ve explored the fundamental concepts of OLED technology and its advantages, which include vibrant colors, high contrast ratios, and exceptional visibility. By following the step-by-step instructions and code examples provided in this article, you now have the knowledge and tools to integrate OLED displays seamlessly into your ESP32-based projects. Whether you’re creating a wearable device, a weather station, or any other IoT application, the combination of ESP32 and OLED opens up a world of possibilities for visually stunning and dynamic displays.
Related posts:
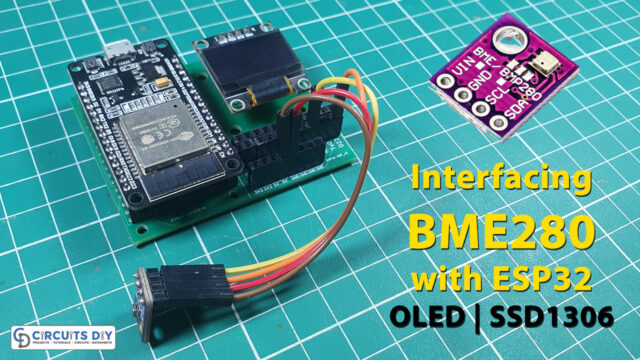 Interfacing BME280 with ESP32 & Display Values on OLED
 How to make Long-Range FM Transmitter Circuit-Weekend Projects
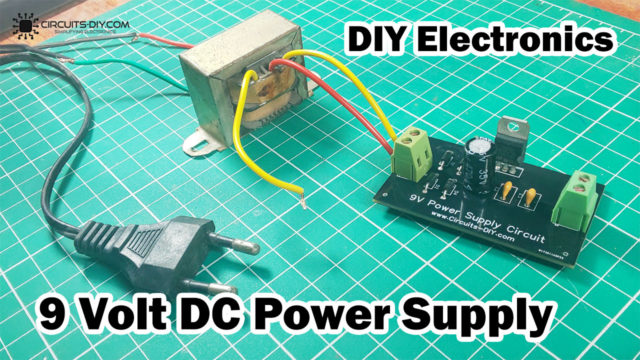 9 Volt Power Supply using LM7809 Voltage Regulator
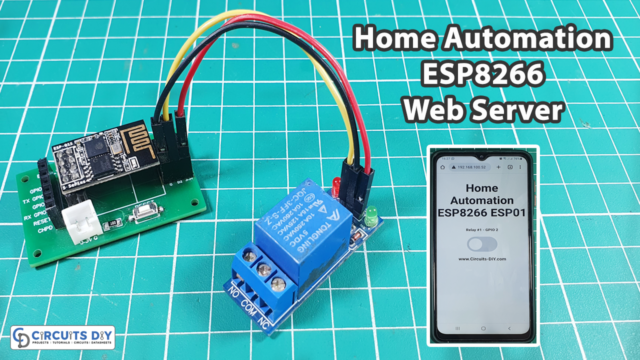 Home Automation with ESP8266 Web Server & Relay Module
 Simple Insect Mosquito Repellent - Electronics Projects
 Police LED light Flasher Circuit Using 12V Relay - DIY