An intercom is a stand-alone voice communications system for use within a building or small collection of buildings. It is a two-way communication electronic device that contains circuitry for the purpose of transmitting and receiving audio transmissions. An intercom allows a person speaking into a microphone to be heard on a speaker by people in a different room or area.
In this project, I am going to show you a simple and effective one-way intercom circuit that uses transistors as an amplifier as a key component. Imagine your home is large or has many floors and you need to call someone on the other floor. Isn’t it nice if you are able to communicate easily with each other through the intercom rather than using cell phone calls?
Hardware Components :
| S.no | Component | Value | Qty |
|---|---|---|---|
| 1. | Bread board | – | 2 |
| 2. | battery | 9V | 2 |
| 3. | Connecting wires | – | 2 |
| 4. | NPN transistors | BC548 | 2 |
| 5. | slide switch S1 | – | 2 |
| 6. | Push-button switch S2 | – | 2 |
| 7. | Mic (condenser microphone) | – | 2 |
| 8. | Speaker | 8Ω | 2 |
| 9. | Nonpolar capacitors | 0.1µF,0.1µ,0.1µF | 2,2,2 |
| 10. | Polar capacitors | 10µF/16V,10µF/16V,100µF/16V | 2,2,2,2 |
| 11. | Resistor | 10K,10K,1M,220K,2.2K,100K,150Ω | 2,2,2,2,2,2,2 |
Intercom Circuit
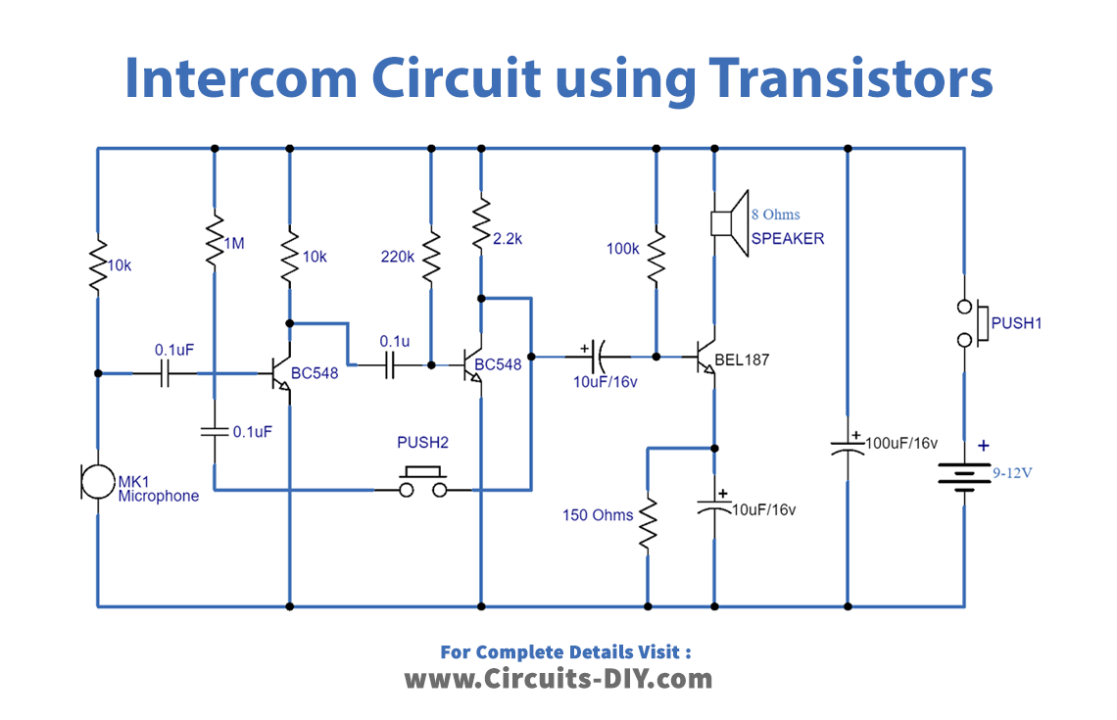
Working Explanation
The circuit uses a three-stage RC-coupled transistors amplifier circuit. On pressing switch S2, it will generate a ringing signal as the two BC48 transistors will act as an astable multivibrator. This signal is then amplified by the BEL187 transistor to drive the speaker. On releasing the switch S2, the circuit will act as an ordinary amplifier and you can talk to the other side through it.
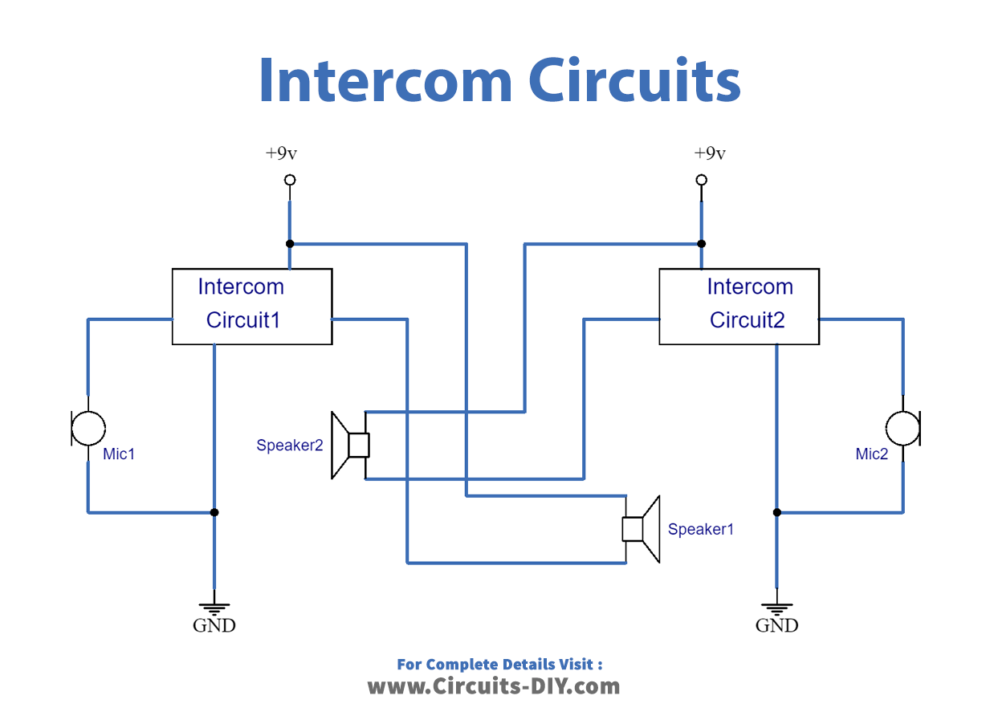
It uses a 9V -12V battery that lasts longer due to the minimum current usage of only 15mA. It is a small circuit that can be made on a Vero board or PCB and can easily be mounted in any small box. In order to make the two-way intercom, make the identical circuit and cascade them as shown in the figure.
Related posts:
 How To Make A Touchless Hand Sanitizer Dispenser - DIY Project
 Heart Rate Monitor Circuit Using LM358 IC | DIY Project
 How to make a Simple Heartbeat Sensor Circuit
 How to make Electronic Digital Clock using AT89C2051 - DIY Project
 Dual LED Flasher using Relay | Flip Flop LED Circuit
 Obstacle Detector by IR Sensor & ATmega328 Arduino