Overview
In the world of electronics and IoT (Internet of Things), measuring distance is a fundamental task for various applications. Whether you’re building a smart robot, a parking sensor, or monitoring the level of liquid in a tank, accurately measuring distance is a key component. One popular and cost-effective way to accomplish this is by using an HC-SR04 ultrasonic sensor in conjunction with an ESP32 microcontroller.
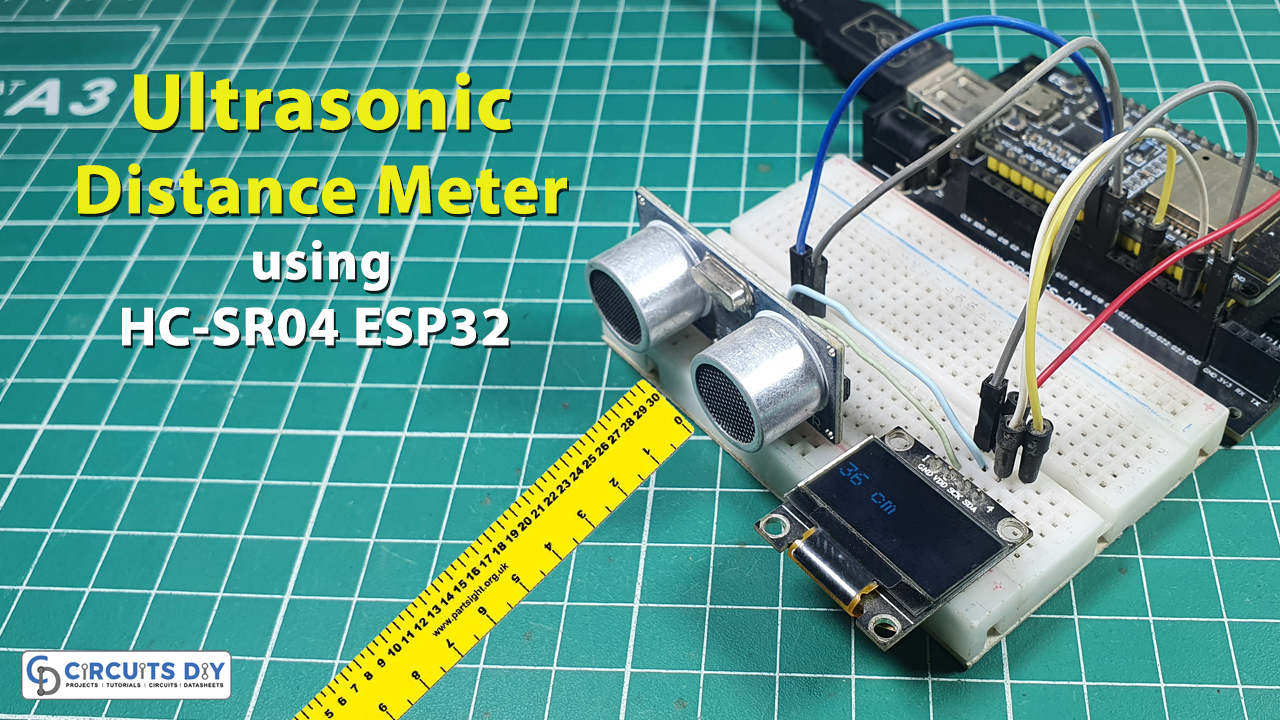
In today’s tutorial, we are going to make a “Distance Meter” using an Ultrasonic Sensor & ESP32 Microcontroller.
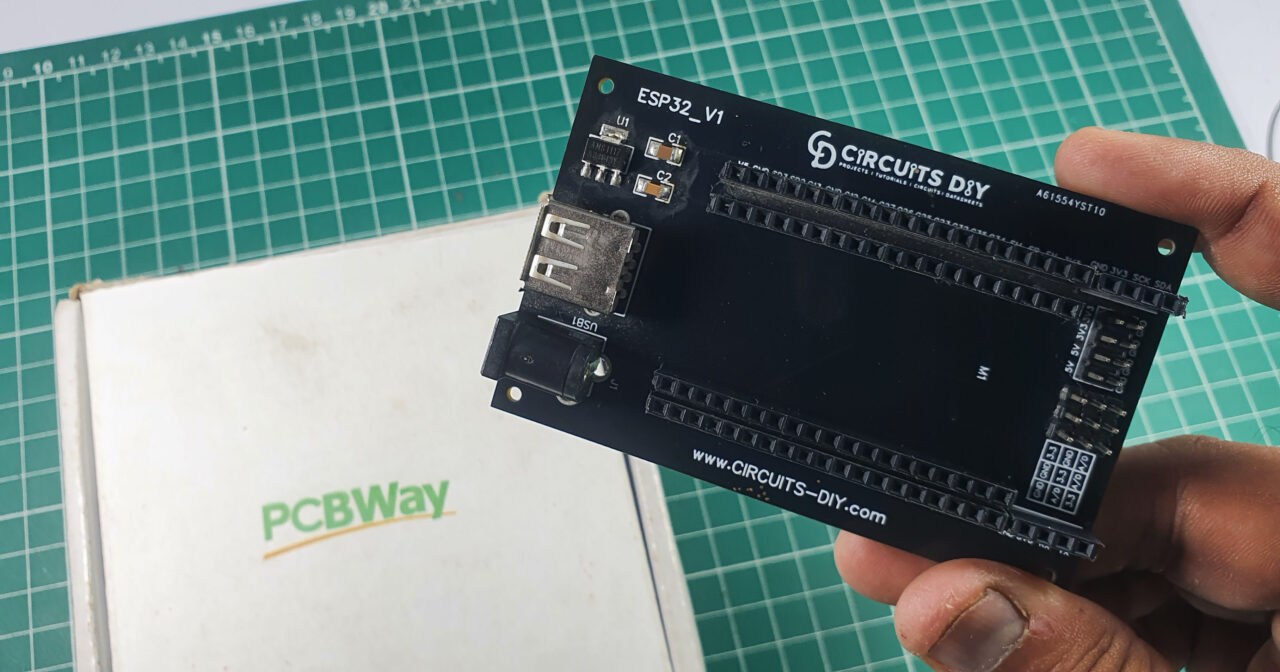
This Project is sponsored by PCBWay. They have an open-source community, people can share their design projects with each other. Moreover, every time people place an order for your board, PCBWay will donate 10% of the cost of PCB to you, for your contribution to the Open Source Community.
Understanding the HC-SR04 Ultrasonic Sensor
The HC-SR04 is an affordable and readily available ultrasonic sensor that operates on the principle of sending and receiving ultrasonic waves. It measures distance by calculating the time it takes for a sound wave to travel to an object and bounce back to the sensor. The basic operation involves the following steps:
- Trigger Pulse: The microcontroller, in our case the ESP32, sends a short trigger pulse to the HC-SR04.
- Ultrasonic Wave Emission: Upon receiving the trigger pulse, the sensor emits an ultrasonic wave, which travels through the air.
- Reflection: When the ultrasonic wave hits an object, it bounces back to the sensor.
- Echo Pulse: The sensor detects the reflected wave and generates an echo pulse.
- Calculating Distance: The time taken for the echo pulse to return is measured, and by using the speed of sound in the air, we can calculate the distance to the object.
Hardware Components
You’ll need the following hardware components to get started:
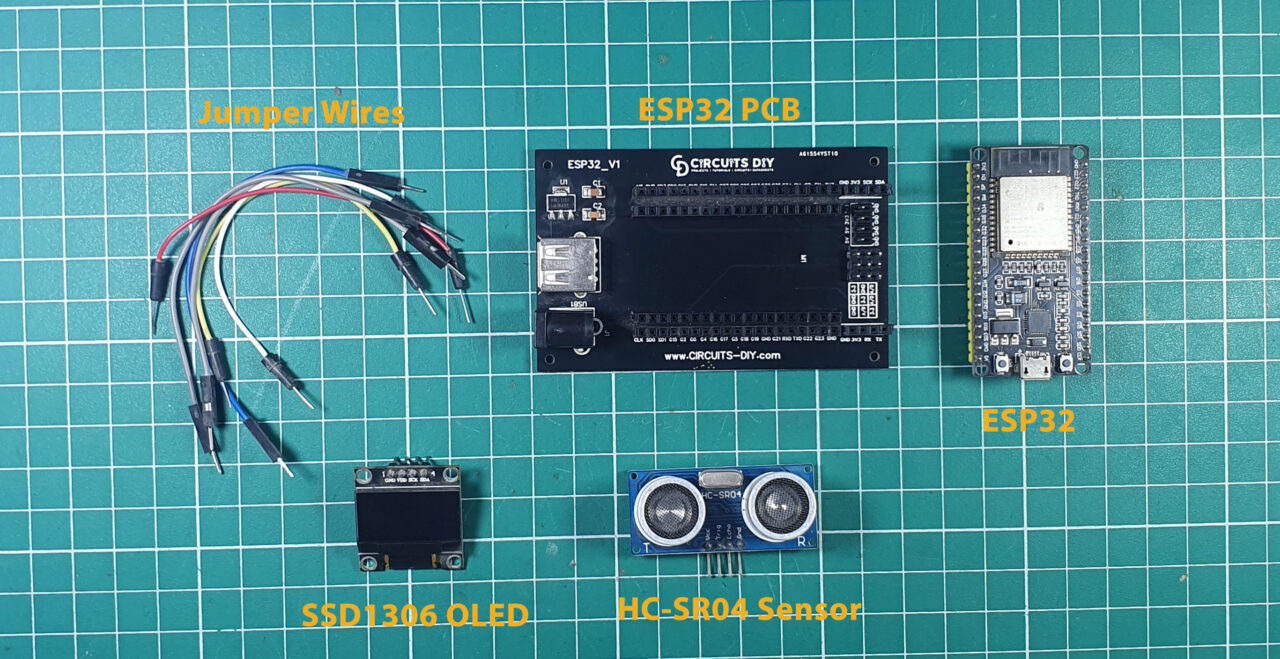
| Components | Value / Model | Qty |
|---|---|---|
| ESP32 | – | 1 |
| Ultrasonic Sensor | HC-SR04 | 1 |
| OLED Display | SSD1306 0.96″ I2C | 1 |
| Breadboard | – | 1 |
| Jumper Wires | – | 1 |
| DC Power for ESP32 |
ESP32 Pinout
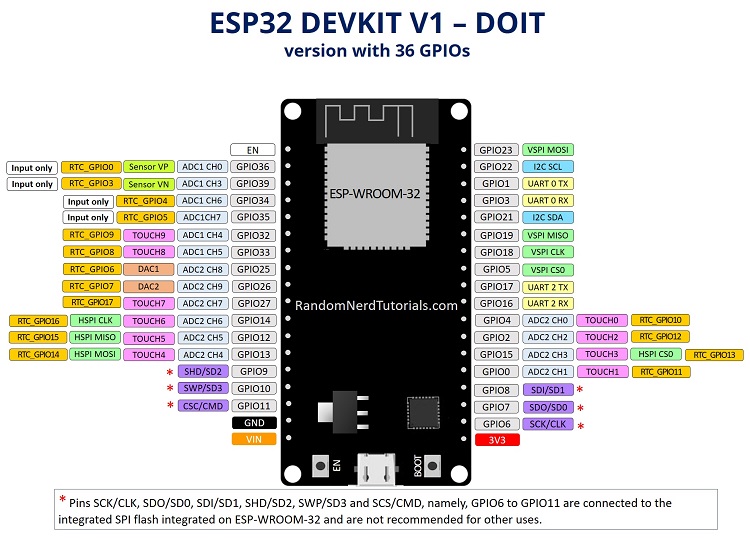
For details, on the datasheet of the ESP32 Microcontroller visit this link.
Ultrasonic Sensor Pinout
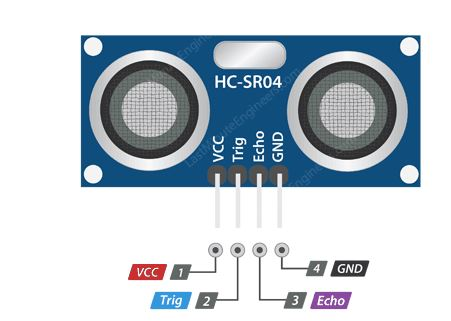
For details, on the datasheet of Ultrasonic Sensor Pinout visit this link.
Steps-by-Step Guide
(1) Setting up Arduino IDE
Download Arduino IDE Software from its official site. Here is a step-by-step guide on “How to install Arduino IDE“.
(2) ESP32 in Arduino IDE
There’s an add-on that allows you to program the ESP32 using the Arduino IDE. Here is a step-by-step guide on “How to Install ESP32 on Arduino IDE“.
(3) Include Libraries
Before you start uploading a code, download and unzip the Wire.h, Adafruit_GFX.h, Adafruit_SSD1306.h library at /Program Files(x86)/Arduino/Libraries (default). Here is a step-by-step guide on “How to Add Libraries in Arduino IDE“.
(4) Schematic
Make connections according to the circuit diagram given below.
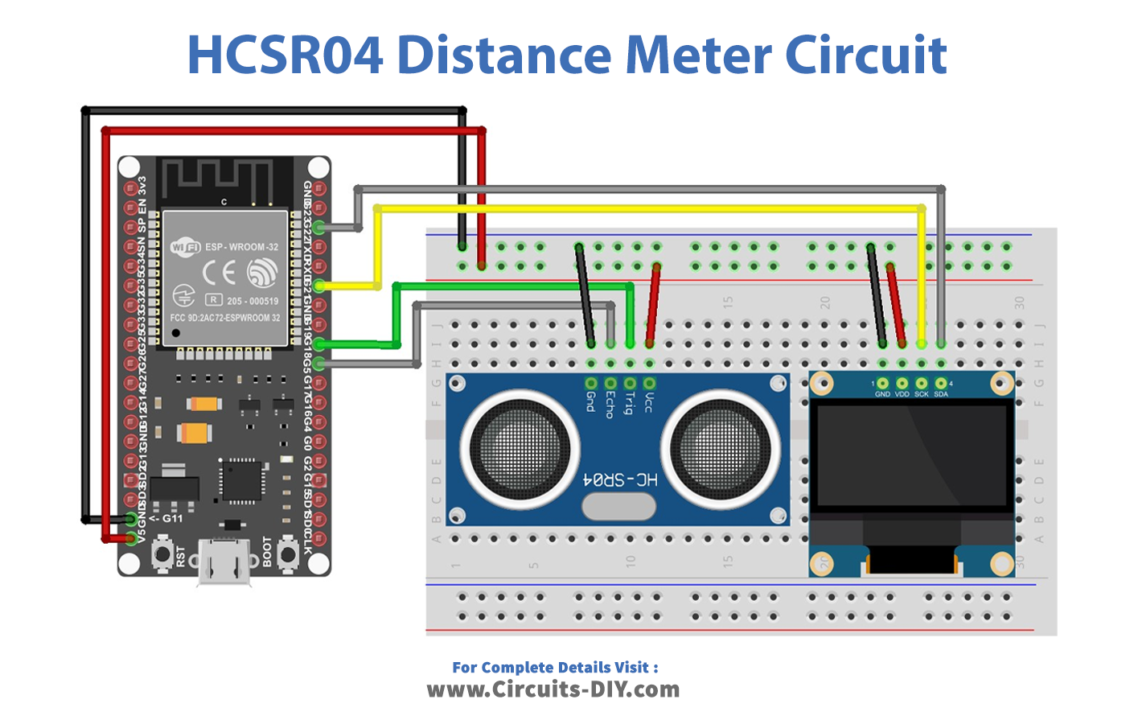
Wiring / Connections
| ESP32 | Ultrasonic Sensor | OLED Display |
|---|---|---|
| VIN | VCC | VDD |
| GND | GND | GND |
| GPIO 5 | ECHO | |
| GPIO 18 | TRIG | |
| GPIO 21 | SCK | |
| GPIO 22 | SDA |
(5) Uploading Code
Now copy the following code and upload it to Arduino IDE Software.
/* Circuits DIY
 * For Complete Details Visit
 * https://www.circuits-diy.com/distance-meter-using-hcsr04-ultrasonic-sensor-esp32
 */

#include <Wire.h>
#include <Adafruit_GFX.h>
#include <Adafruit_SSD1306.h>

#define SCREEN_WIDTH 128 // OLED display width, in pixels
#define SCREEN_HEIGHT 64 // OLED display height, in pixels

// Declaration for an SSD1306 display connected to I2C (SDA, SCL pins)
Adafruit_SSD1306 display(SCREEN_WIDTH, SCREEN_HEIGHT, &Wire, -1);

const int trigPin = 5;
const int echoPin = 18;

//define sound speed in cm/uS
#define SOUND_SPEED 0.034
#define CM_TO_INCH 0.393701

long duration;
int distanceCm;
int distanceInch;

void setup() {
  Serial.begin(115200);
  pinMode(trigPin, OUTPUT); // Sets the trigPin as an Output
  pinMode(echoPin, INPUT); // Sets the echoPin as an Input

  if(!display.begin(SSD1306_SWITCHCAPVCC, 0x3C)) {
    Serial.println(F("SSD1306 allocation failed"));
    for(;;);
  }
  delay(500);
  display.clearDisplay();

  display.setTextSize(2);
  display.setTextColor(WHITE);
}

void loop() {
  // Clears the trigPin
  digitalWrite(trigPin, LOW);
  delayMicroseconds(2);
  // Sets the trigPin on HIGH state for 10 micro seconds
  digitalWrite(trigPin, HIGH);
  delayMicroseconds(10);
  digitalWrite(trigPin, LOW);

  // Reads the echoPin, returns the sound wave travel time in microseconds
  duration = pulseIn(echoPin, HIGH);

  // Calculate the distance
  distanceCm = duration * SOUND_SPEED/2;

  // Convert to inches
  distanceInch = distanceCm * CM_TO_INCH;

  // Prints the distance in the Serial Monitor
  Serial.print("Distance (cm): ");
  Serial.println(distanceCm);
  Serial.print("Distance (inch): ");
  Serial.println(distanceInch);

  display.clearDisplay();
  display.setCursor(0, 25);
  //Display distance in cm
  display.print(distanceCm);
  display.print(" cm");

  // Display distance in inches
  /* display.print(distanceInch);
  display.print(" in");*/
  display.display();

 delay(500);
}
How code works
#include <Wire.h>
#include <Adafruit_GFX.h>
#include <Adafruit_SSD1306.h>
These lines include necessary libraries for working with the I2C communication protocol and the Adafruit graphics library. The Wire.h library is used for I2C communication, while Adafruit_GFX and Adafruit_SSD1306 are used to control and display graphics on the OLED screen.
#define SCREEN_WIDTH 128
#define SCREEN_HEIGHT 64
const int trigPin = 5;
const int echoPin = 18;
#define SOUND_SPEED 0.034
#define CM_TO_INCH 0.393701SCREEN_WIDTHandSCREEN_HEIGHTdefine the dimensions of the OLED display (128×64 pixels).trigPinandechoPinare defined to specify the digital pins on the Arduino (in this case, pins 5 and 18) to which the HC-SR04 sensor is connected.SOUND_SPEEDrepresents the speed of sound in centimeters per microsecond. It’s used in the distance calculation.CM_TO_INCHis a constant used to convert centimeters to inches.
void setup() {
  Serial.begin(115200);
  pinMode(trigPin, OUTPUT);
  pinMode(echoPin, INPUT);

  if (!display.begin(SSD1306_SWITCHCAPVCC, 0x3C)) {
    Serial.println(F("SSD1306 allocation failed"));
    for (;;);
  }
  delay(500);
  display.clearDisplay();

  display.setTextSize(2);
  display.setTextColor(WHITE);
}Serial.begin(115200)initializes serial communication to print debugging information to the serial monitor.pinModesetstrigPinas an output andechoPinas an input, preparing them for communication with the HC-SR04 sensor.- The code initializes the OLED display using the
beginfunction, and if the initialization fails, it displays an error message and enters an infinite loop. The display is also cleared, and text size and color are set.
void loop() {
  digitalWrite(trigPin, LOW);
  delayMicroseconds(2);
  digitalWrite(trigPin, HIGH);
  delayMicroseconds(10);
  digitalWrite(trigPin, LOW);

  duration = pulseIn(echoPin, HIGH);
  distanceCm = duration * SOUND_SPEED / 2;
  distanceInch = distanceCm * CM_TO_INCH;

  Serial.print("Distance (cm): ");
  Serial.println(distanceCm);
  Serial.print("Distance (inch): ");
  Serial.println(distanceInch);

  display.clearDisplay();
  display.setCursor(0, 25);
  display.print(distanceCm);
  display.print(" cm");
  display.display();

  delay(500);
}- The
loopfunction is where the main distance measurement and display logic occurs. - It triggers the HC-SR04 sensor by sending a trigger pulse (a brief HIGH signal) and then measures the time it takes for the echo signal to return using
pulseIn. - The distance in centimeters and inches is calculated using the measured time and displayed on both the OLED screen and the serial monitor.
- A brief delay (500 milliseconds) is added to control the measurement rate.
In summary, this code initializes the display, sets up the pins for the ultrasonic sensor, and repeatedly measures and displays distance data on an OLED screen and the serial monitor. It serves as a basic distance measurement system that you can build with real components like an OLED display and an HC-SR04 sensor.
Applications
- Smart Robots
- Parking Sensors
- Liquid Level Monitoring
- Automatic Doors
- Security Systems
- Wildlife Monitoring etc
Conclusion
The combination of the HC-SR04 Ultrasonic Sensor and the ESP32 microcontroller offers an accessible and versatile solution for measuring distance in various applications. Whether used in robotics, automation, or IoT projects, this distance meter serves as a foundational tool, enabling precise and real-time distance measurements.