Overview
In today’s world, we have lots of smart devices that can be controlled remotely. Imagine being able to turn on or off your home appliances using your phone or computer, even if you’re far away. This is where the ESP32, a tiny but powerful wifi based microcontroller, comes into play.
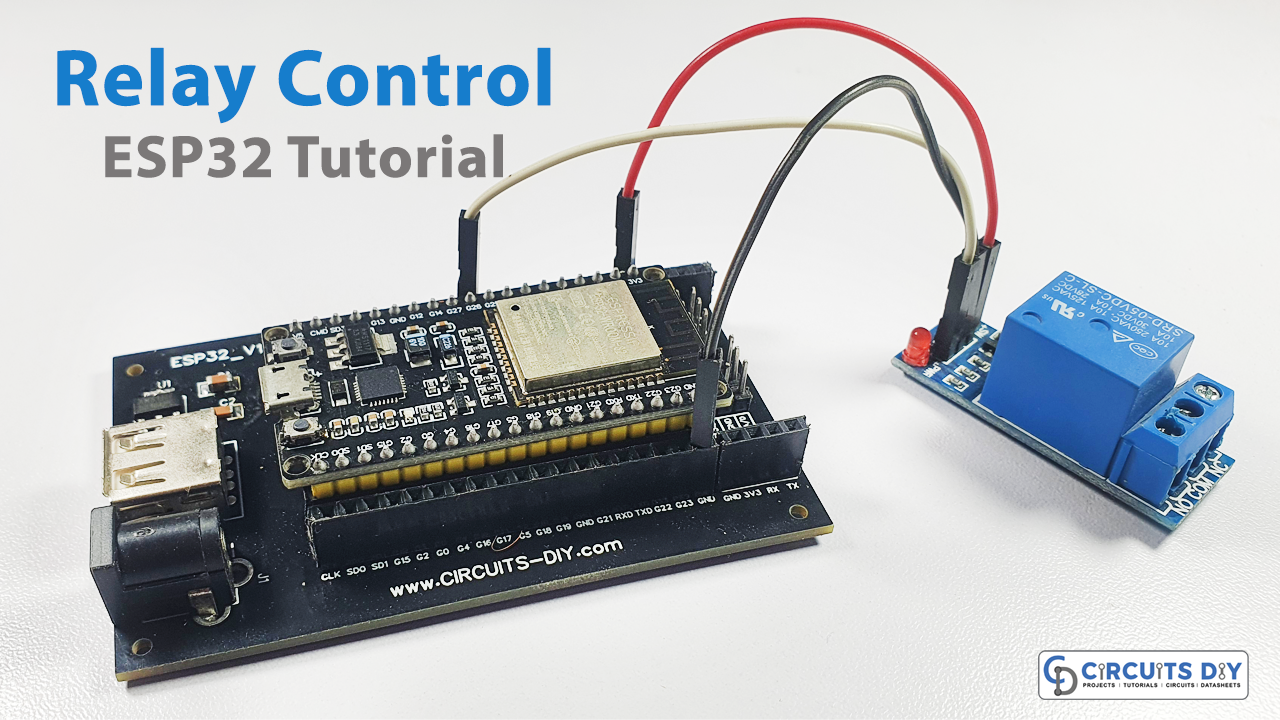
In today’s tutorial, we are going to learn “How to control the AC Relay Module” using an ESP32-WROOM Microcontroller via Web Server.
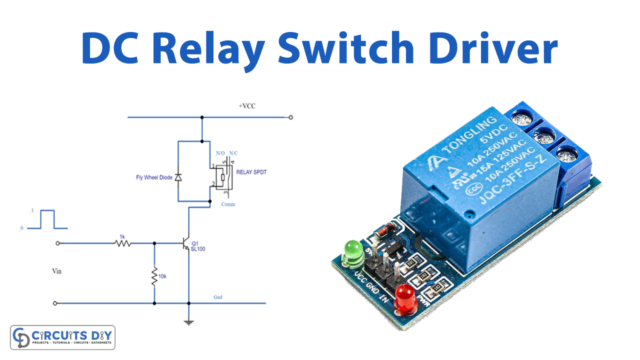
Introduction to a Relay Module
A relay is an electromechanical switch that operates through an electromagnetic coil and a set of contacts. It is a fundamental component in electronics and automation systems, serving as a bridge between low-voltage electronic circuits and high-voltage electrical devices. The primary function of a relay is to control the flow of electrical current to a load, such as a motor, a light bulb, or an appliance, based on the activation of a control signal.

PCBGOGO has offered high-quality PCBs and the best PCB assembly service all over the world since 2015. Discover an incredible offer that puts PCB prototyping within reach for just $1. Yes, you read that right – for only a dollar, you can bring your innovative ideas to life with a PCB prototype. Don’t miss out on this fantastic opportunity to turn your electronics projects into reality. Explore the campaign here: PCBGOGO $1 PCB Prototype and pave the way for your next big creation!
Hardware Components
You’ll need the following hardware components to get started:

Follow the next table or schematic diagram to wire the relay model to the ESP32 board.
| Components | Value / Model | Qty |
|---|---|---|
| PCB Board | – | 1 |
| ESP32 | – | 1 |
| Relay Module | 5V | 1 |
| AC Bulb | – | 1 |
| Jumper Wires | – | 1 |
| DC Power for ESP32 | 5V | 1 |
Steps-by-Step Guide
(1) Setting up Arduino IDE
Download Arduino IDE Software from its official site. Here is a step-by-step guide on “How to install Arduino IDE“.
(2) ESP32 in Arduino IDE
There’s an add-on that allows you to program the ESP32 using the Arduino IDE. Here is a step-by-step guide on “How to Install ESP32 on Arduino IDE“.
(3) Include Libraries
Before you start uploading a code, download and unzip the WiFi.h, ESPAsyncWebServer.h library at /Program Files(x86)/Arduino/Libraries (default). Here is a step-by-step guide on “How to Add Libraries in Arduino IDE“.
(4) Schematic
Make connections according to the circuit diagram given below.
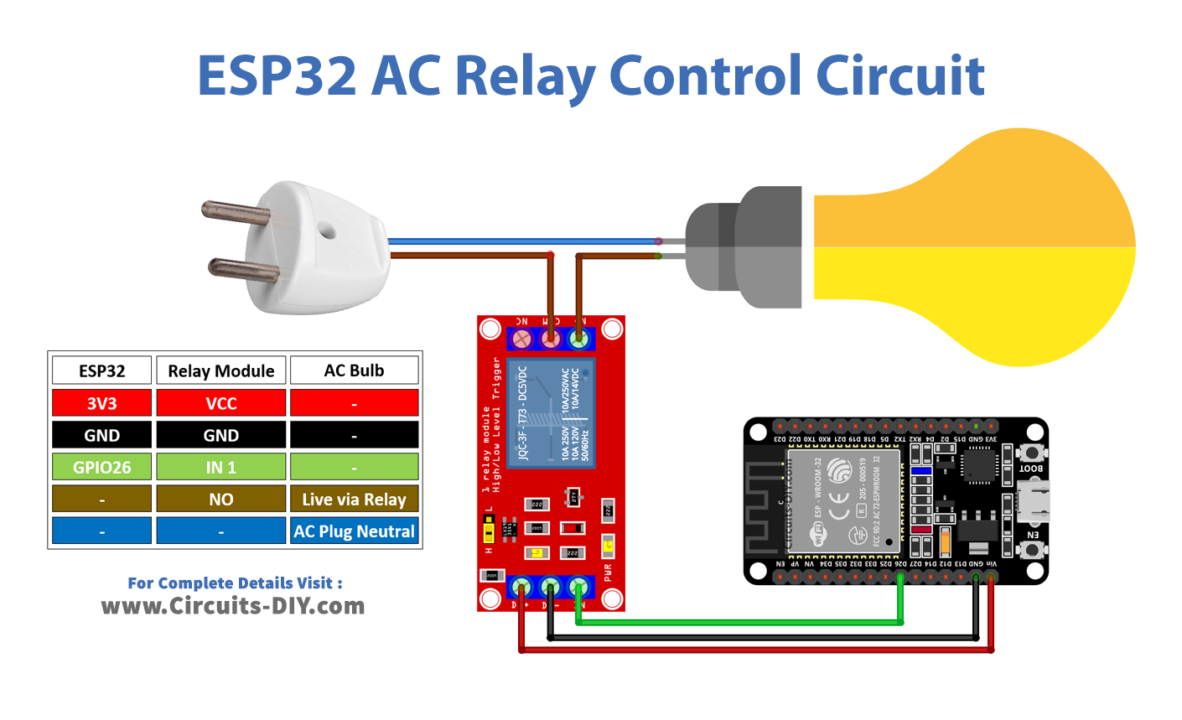
Wiring / Connections
| ESP32 | Relay Module | Bulb |
|---|---|---|
| 3V3 | VCC | – |
| GND | GND | – |
| GPIO26 | IN1 | – |
| – | – | LIVE wire via NO of Relay |
| – | – | NEUTRAL to Plug |
(5) Uploading Code
Now copy the following code and upload it to Arduino IDE Software.
/* Circuits DIY
 * For Complete Details Visit
 * https://www.circuits-diy.com/esp32-tutorials-control-ac-appliances-with-relay-web-server
 */

#include "WiFi.h"
#include "ESPAsyncWebServer.h"

// Set to true to define Relay as Normally Open (NO)
#define RELAY_NO    true

// Set number of relays
#define NUM_RELAYS  2

// Assign each GPIO to a relay
int relayGPIOs[NUM_RELAYS] = {26, 27};

// Replace with your network credentials
const char* ssid = "Your SSID";
const char* password = "Your Password";

const char* PARAM_INPUT_1 = "relay";
const char* PARAM_INPUT_2 = "state";

// Create AsyncWebServer object on port 80
AsyncWebServer server(80);

const char index_html[] PROGMEM = R"rawliteral(
<!DOCTYPE HTML><html>
<head>
  <meta name="viewport" content="width=device-width, initial-scale=1">
  <style>
    html {font-family: Arial; display: inline-block; text-align: center;}
    h2 {font-size: 3.0rem;}
    p {font-size: 3.0rem;}
    body {max-width: 600px; margin:0px auto; padding-bottom: 25px;}
    .switch {position: relative; display: inline-block; width: 120px; height: 68px}
    .switch input {display: none}
    .slider {position: absolute; top: 0; left: 0; right: 0; bottom: 0; background-color: #ccc; border-radius: 34px}
    .slider:before {position: absolute; content: ""; height: 52px; width: 52px; left: 8px; bottom: 8px; background-color: #fff; -webkit-transition: .4s; transition: .4s; border-radius: 68px}
    input:checked+.slider {background-color: #2196F3}
    input:checked+.slider:before {-webkit-transform: translateX(52px); -ms-transform: translateX(52px); transform: translateX(52px)}
  </style>
</head>
<body>
  <h2>ESP32 AC Relay Control</h2>
  %BUTTONPLACEHOLDER%
<script>function toggleCheckbox(element) {
  var xhr = new XMLHttpRequest();
  if(element.checked){ xhr.open("GET", "/update?relay="+element.id+"&state=1", true); }
  else { xhr.open("GET", "/update?relay="+element.id+"&state=0", true); }
  xhr.send();
}</script>
</body>
</html>
)rawliteral";

// Replaces placeholder with button section in your web page
String processor(const String& var){
  //Serial.println(var);
  if(var == "BUTTONPLACEHOLDER"){
    String buttons ="";
    for(int i=1; i<=NUM_RELAYS; i++){
      String relayStateValue = relayState(i);
      buttons+= "<h4>Relay #" + String(i) + " - GPIO " + relayGPIOs[i-1] + "</h4><label class=\"switch\"><input type=\"checkbox\" onchange=\"toggleCheckbox(this)\" id=\"" + String(i) + "\" "+ relayStateValue +"><span class=\"slider\"></span></label>";
    }
    return buttons;
  }
  return String();
}

String relayState(int numRelay){
  if(RELAY_NO){
    if(digitalRead(relayGPIOs[numRelay-1])){
      return "";
    }
    else {
      return "checked";
    }
  }
  else {
    if(digitalRead(relayGPIOs[numRelay-1])){
      return "checked";
    }
    else {
      return "";
    }
  }
  return "";
}

void setup(){
  // Serial port for debugging purposes
  Serial.begin(115200);

  // Set all relays to off when the program starts - if set to Normally Open (NO), the relay is off when you set the relay to HIGH
  for(int i=1; i<=NUM_RELAYS; i++){
    pinMode(relayGPIOs[i-1], OUTPUT);
    if(RELAY_NO){
      digitalWrite(relayGPIOs[i-1], HIGH);
    }
    else{
      digitalWrite(relayGPIOs[i-1], LOW);
    }
  }

  // Connect to Wi-Fi
  WiFi.begin(ssid, password);
  while (WiFi.status() != WL_CONNECTED) {
    delay(1000);
    Serial.println("Connecting to WiFi..");
  }

  // Print ESP32 Local IP Address
  Serial.println(WiFi.localIP());

  // Route for root / web page
  server.on("/", HTTP_GET, [](AsyncWebServerRequest *request){
    request->send_P(200, "text/html", index_html, processor);
  });

  // Send a GET request to <ESP_IP>/update?relay=<inputMessage>&state=<inputMessage2>
  server.on("/update", HTTP_GET, [] (AsyncWebServerRequest *request) {
    String inputMessage;
    String inputParam;
    String inputMessage2;
    String inputParam2;
    // GET input1 value on <ESP_IP>/update?relay=<inputMessage>
    if (request->hasParam(PARAM_INPUT_1) & request->hasParam(PARAM_INPUT_2)) {
      inputMessage = request->getParam(PARAM_INPUT_1)->value();
      inputParam = PARAM_INPUT_1;
      inputMessage2 = request->getParam(PARAM_INPUT_2)->value();
      inputParam2 = PARAM_INPUT_2;
      if(RELAY_NO){
        Serial.print("NO ");
        digitalWrite(relayGPIOs[inputMessage.toInt()-1], !inputMessage2.toInt());
      }
      else{
        Serial.print("NC ");
        digitalWrite(relayGPIOs[inputMessage.toInt()-1], inputMessage2.toInt());
      }
    }
    else {
      inputMessage = "No message sent";
      inputParam = "none";
    }
    Serial.println(inputMessage + inputMessage2);
    request->send(200, "text/plain", "OK");
  });
  // Start server
  server.begin();
}

void loop() {

}
How code works
#include "WiFi.h"
#include "ESPAsyncWebServer.h"
Includes the necessary library for handling Wi-Fi connectivity and Web server on ESP32.
#define RELAY_NO true
#define NUM_RELAYS 2
Defines whether the relays are Normally Open (NO) or Normally Closed (NC) and the number of relays used in the system.
int relayGPIOs[NUM_RELAYS] = {26, 27};An array that holds the GPIO pins connected to each relay.
const char* ssid = "Your SSID";
const char* password = "Your Password";index_html[];The string contains an HTML template for the web page that will be served by the ESP32. It includes styles and placeholders for buttons that control the relays. The processor function replaces the %BUTTONPLACEHOLDER% in the HTML template with dynamically generated buttons for toggling the relays
The relayState function determines the initial state of each relay based on whether they are Normally Open or Normally Closed.
server.on("/", HTTP_GET, ...): Handles requests for the root page (“/”) and sends the HTML page with generated buttons.
server.on("/update", HTTP_GET, ...): Handles updates to relay states based on the query parameters received from the web page
The loop function is left empty. In this case, since the server is asynchronous, the ESP32 will handle incoming requests without blocking the loop.
Applications
- Home Automation:
- Industrial Automation:
- IoT Projects
- Security Systems:
Conclusion
In the realm of the Internet of Things (IoT), the ESP32 microcontroller has proven itself as a versatile platform capable of bridging the gap between the digital and physical worlds. With the integration of a web server, it becomes a powerful tool for remotely controlling real-world devices, as exemplified by our exploration of relay control in this article.