We all have sure observed that our phone display turns off during phone calls when we put it near our ears. So, do you ever wonder how does this happen???
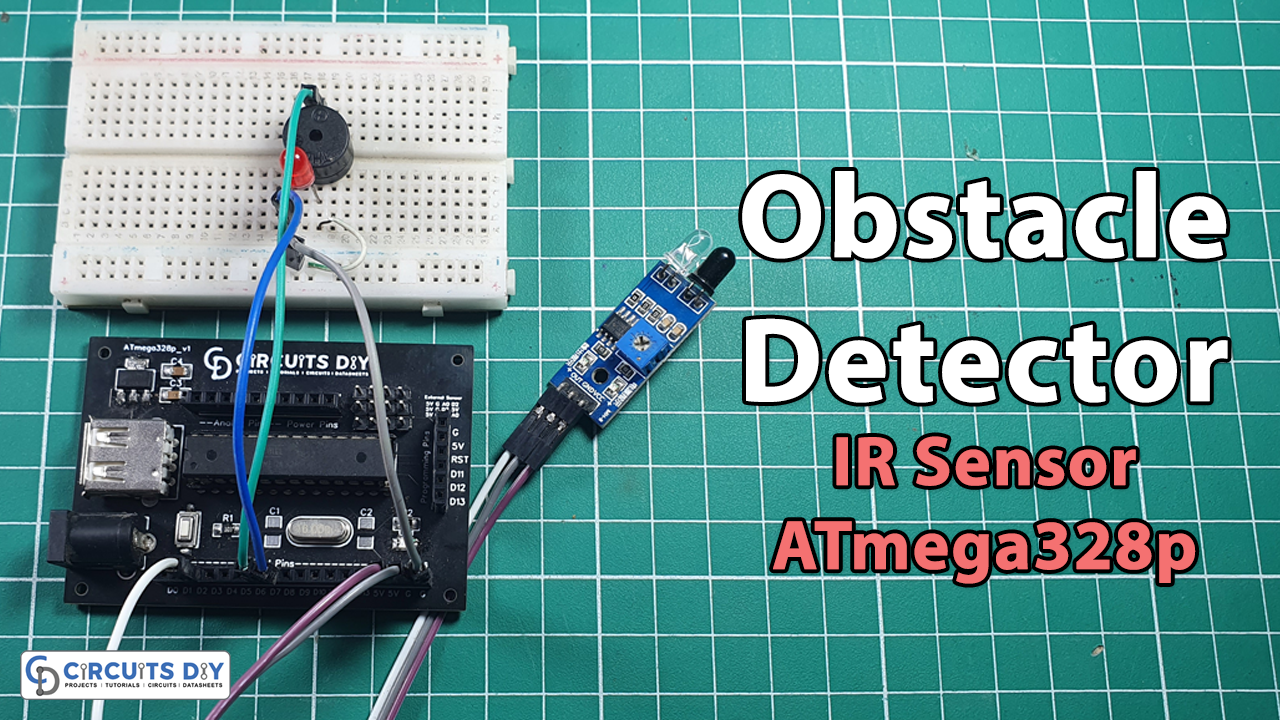
It is not a hi-tech thing but a simple IR sensor to detect the obstacles near the phone we are also making the same project in this article, we are going to make an “Obstacle Detector” with an Infrared IR Sensor and ATmega328p Chip. This commonly used IR Sensor can also be used as Line Follower Robot we will discuss that later. Let’s start making it a simple Obstacle Detector.
PCBWay commits to meeting the needs of its customers from different industries in terms of quality, delivery, cost-effectiveness, and any other demanding requests. As one of the most experienced PCB manufacturers in China. They pride themselves to be your best business partners as well as good friends in every aspect of your PCB needs.
Hardware Required
You will require the following hardware to make this obstacle detector.
| S.no | Component | Value | Qty |
|---|---|---|---|
| 1. | IC | ATmega328p | 1 |
| 2. | USB cable for uploading the code | – | 1 |
| 3. | IR Sensor | – | 1 |
| 4. | Buzzer and LED | – | 1 |
| 5. | Resistor | 220-ohm | 1 |
| 7. | Jumper wires and a breadboard | – | 1 |
Atmega328p Pinout

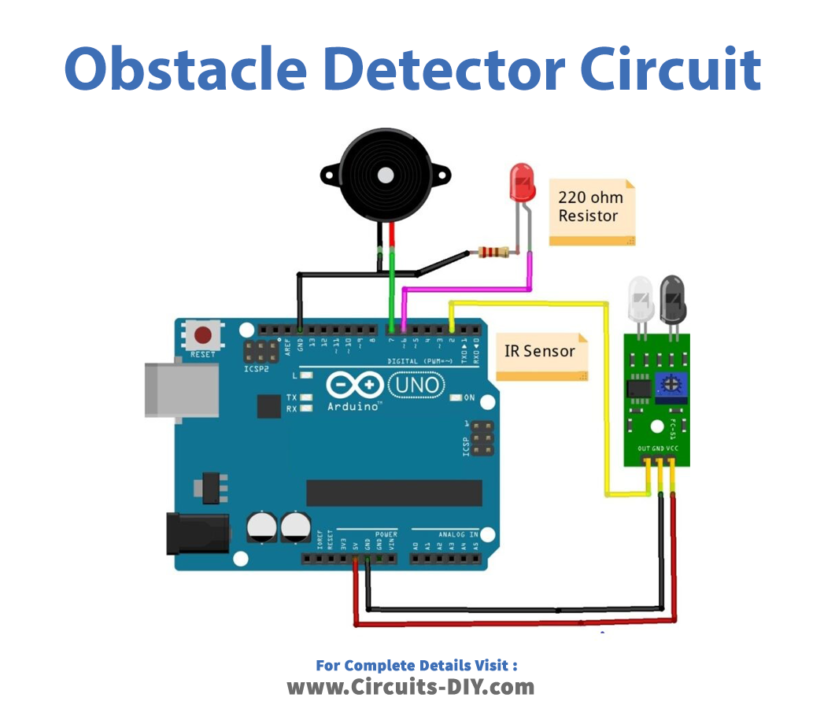
Obstacle Detector Circuit
Connection Table
| Arduino UNO | IR Sensor | |
| ( +5V ) | VCC | |
| GND | GND | |
| D2 Pin | OUT Pin | |
| Arduino UNO | Buzzer | |
| D7 Pin | Positive | |
| GND | Negative | |
| Arduino | LED R | 220 Ohm Resistor |
| D6 Pin | Anode Pin | |
| GND | Terminal 1 | |
| Cathode Pin | Terminal 2 |
Working Explanation
As the code in the setup section, we define the pin along with the type to which the sensor is connected and also initialize the pin and type for the led and buzzer.
In the loop section, we read the digital value on pin 2 of the microcontroller and according to the value, we apply conditions either 1 or 0 to turn the led and buzzer on or off. In the analog code in the loop section, we read the analog value i.e., 0-1023 values on pin A0 and according to the value of 200 or more, we turn the led and buzzer on or off.
Atmega328p Code
 int val = 0 ;
 void setup()
 {
 Serial.begin(9600); // sensor buart rate
 pinMode(2,INPUT);  // IR sensor output pin connected
 pinMode(6,OUTPUT);  // LED
 pinMode(7,OUTPUT);  // BUZZER
 }
 void loop()
 {
 val = digitalRead(2);  //  IR sensor output pin connected
 Serial.println(val);  // see the value in serial monitor in Arduino IDE
 delay(500);
 if(val == 1 )
 {
 digitalWrite(6,HIGH);  // LED ON
 digitalWrite(7,HIGH);  // BUZZER ON
 }
 else
 {
 digitalWrite(6,LOW);  // LED OFF
 digitalWrite(7,LOW);  // BUZZER OFF
 }
 }
Applications
- To detect the presence of objects nearby
- Security Alarm
- Smart Gadgets