Overview
The Seedstudio XIAO, powered by the RP2040 microcontroller, has quickly gained popularity in the maker and electronics community due to its affordability, versatility, and robust performance. One of the fascinating aspects of the RP2040 is its ability to interface with a wide range of sensors and modules.
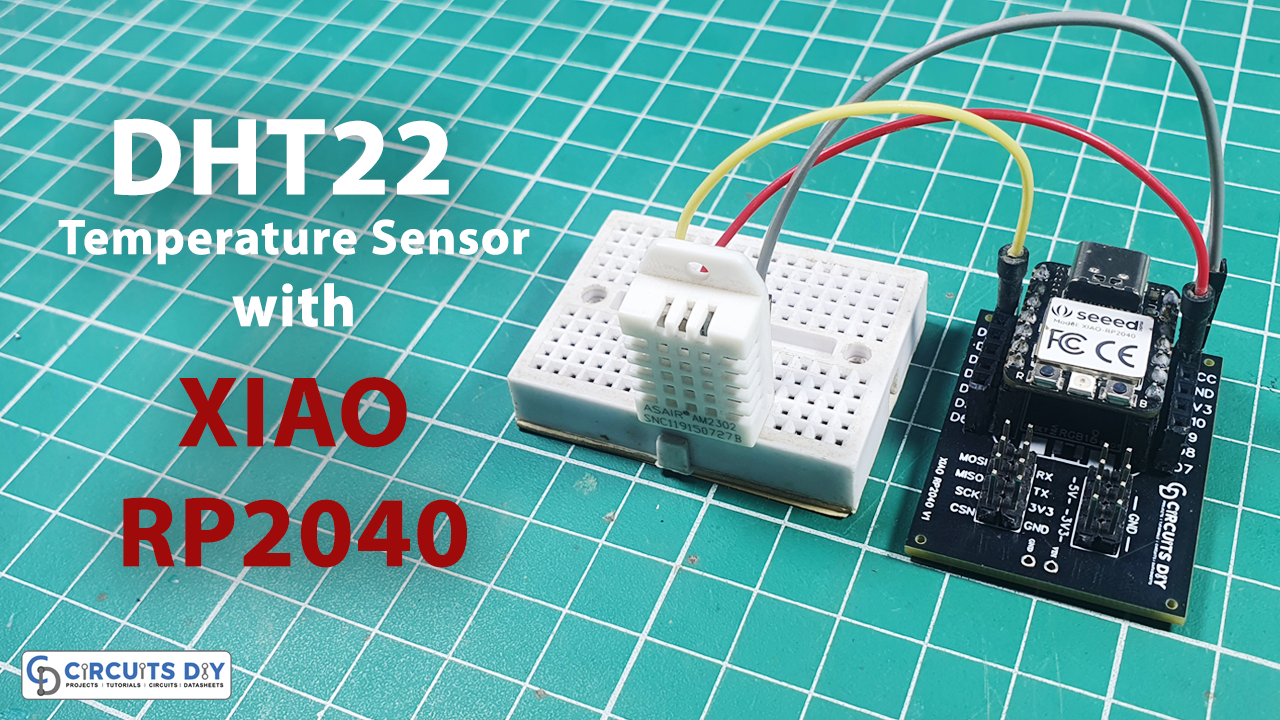
In today’s tutorial, we are going to interface the “DHT22 Temperature Sensor” using an XIAO RP2040 Microcontroller.
Introduction to DHT22 Sensor
The DHT22, also known as the AM2302, is a popular sensor for measuring temperature and humidity. It is affordable, relatively accurate, and easy to use. The sensor communicates via a single-wire digital interface, which makes it an excellent choice for microcontroller-based projects.
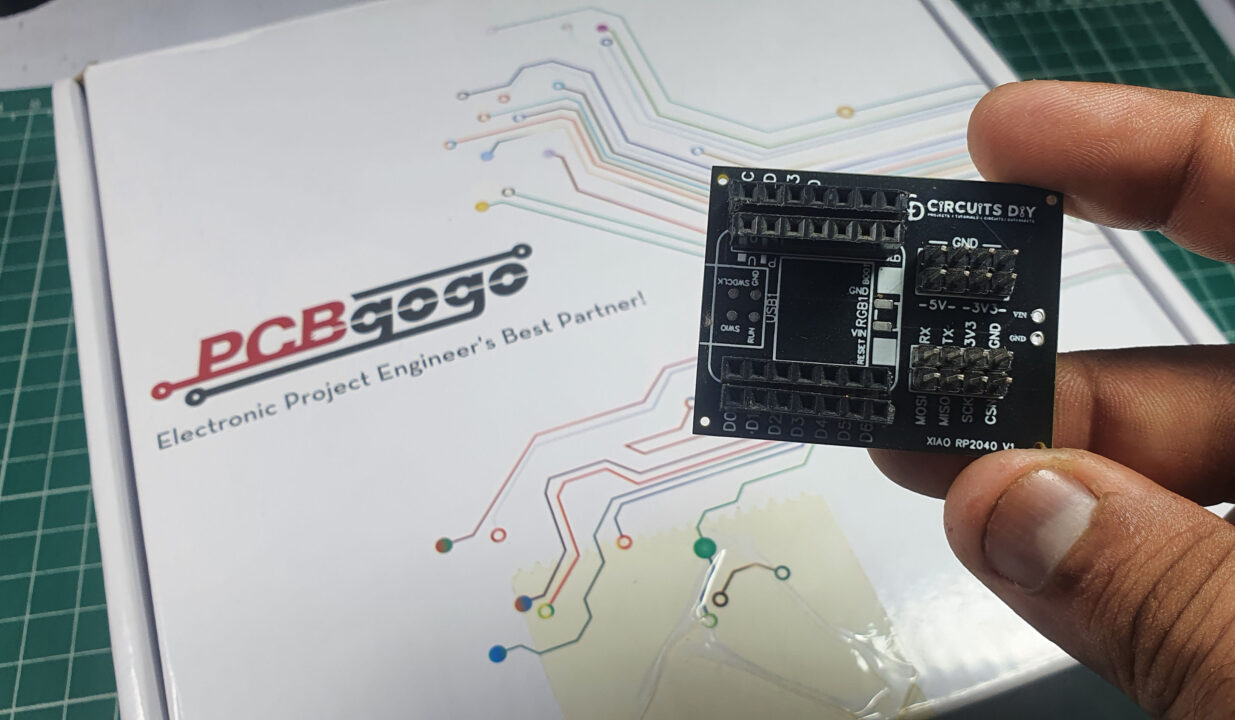
PCBGOGO has offered high-quality PCBs and the best PCB assembly service all over the world since 2015. Discover an incredible offer that puts PCB prototyping within reach for just $1. Yes, you read that right – for only a dollar, you can bring your innovative ideas to life with a PCB prototype. Don’t miss out on this fantastic opportunity to turn your electronics projects into reality. Explore the campaign here: PCBGOGO $1 PCB Prototype and pave the way for your next big creation!
Celebrate the 8th Anniversary with PCBGOGO and get up to $250 in coupons and lots of unexpected gifts https://www.pcbgogo.com/PCBGOGO_8th_year_celebration.html
Hardware Components
You’ll need the following hardware components to get started:
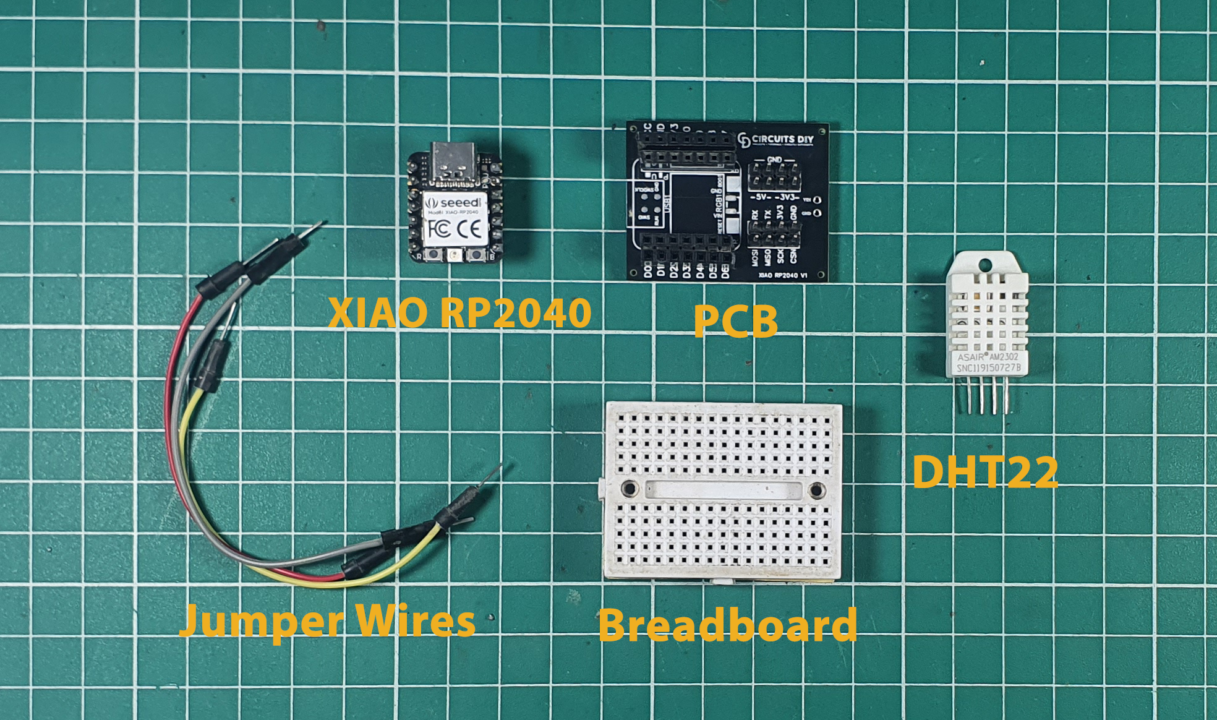
| Components | Value / Model | Qty |
|---|---|---|
| PCB | PCB-GOGO | 1 |
| XIAO Microcontroller | RP2040 | 1 |
| Temperature Sensor | DHT22 | 1 |
| Jumper Wires | – | 1 |
XIAO RP2040 Pinout
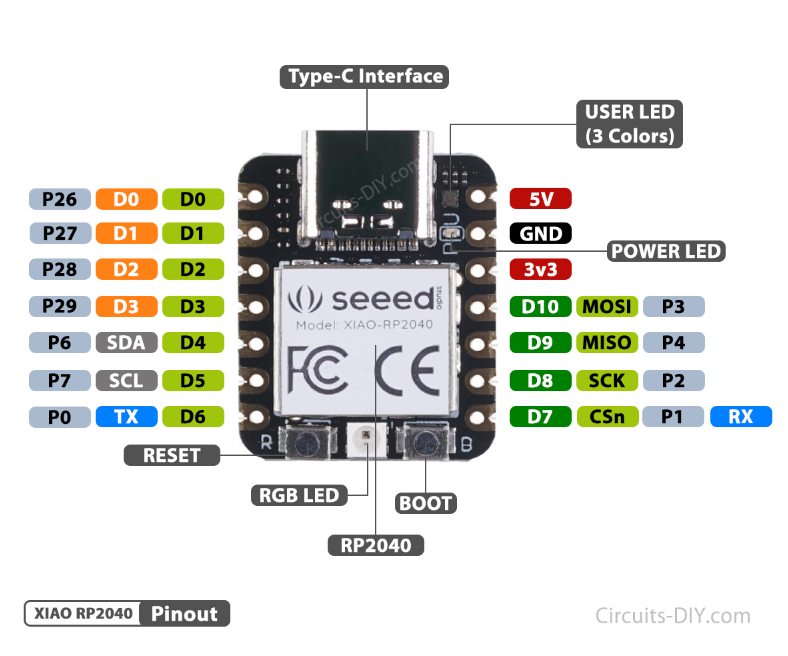
For details on the datasheet of the XIAO RP2040 Microcontroller visit this link.
| Pin No | Pin Name |
|---|---|
| 1 | P26 / A0 / D0 |
| 2 | P27 / A1 / D1 |
| 3 | P28 / A2 / D2 |
| 4 | P29 / A3 / D3 |
| 5 | P6 / SDA/ D4 |
| 6 | P7 / SCL / D5 |
| 7 | P0 / TX / D6 |
| 8 | P1 / RX / CSN / D7 |
| 9 | P2 / SCK / D8 |
| 10 | P3 / MISO / D9 |
| 11 | P4 / MOSI / D10 |
| 12 | 3V3 |
| 13 | GND |
| 14 | 5V |
DHT22 Temperature Sensor Pinout
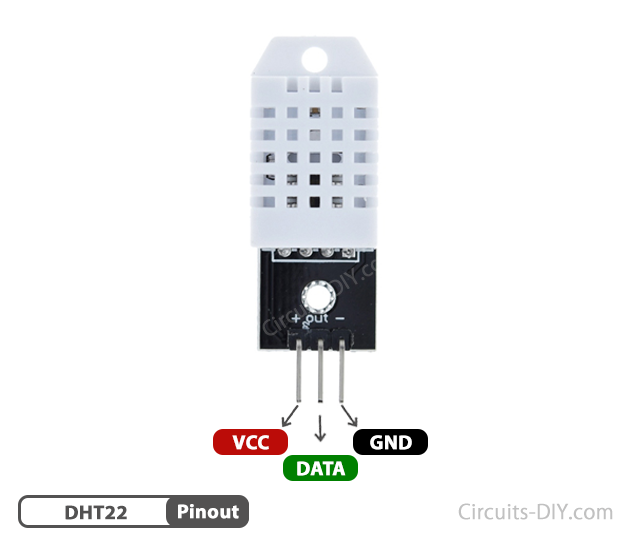
For a details datasheet of the DHT22 Temperature Sensor visit this link.
| Pin No | Pin Name | Pin Description |
|---|---|---|
| 1 | VCC | VCC is the +5 volt Positive Pin |
| 2 | DATA | Outputs both Temperature and Humidity through Serial Data |
| 3 | GND | GND is the (Ground) Negative |
Steps-by-Step Guide
(1) Setting up Arduino IDE
Download Arduino IDE Software from its official site. Here is a step-by-step guide on “How to install Arduino IDE“.
(2) XIAO RP2040 in Arduino IDE
There’s an add-on that allows you to program the XIAO RP2040 using the Arduino IDE. Here is a step-by-step guide on “How to Install XIAO RP2040 on Arduino IDE“.
(3) Include Libraries
Before you start uploading a code, download and unzip the DHT.h library at /Program Files(x86)/Arduino/Libraries (default). Here is a step-by-step guide on “How to Add Libraries in Arduino IDE“.
(4) Schematic
Make connections according to the circuit diagram given below.
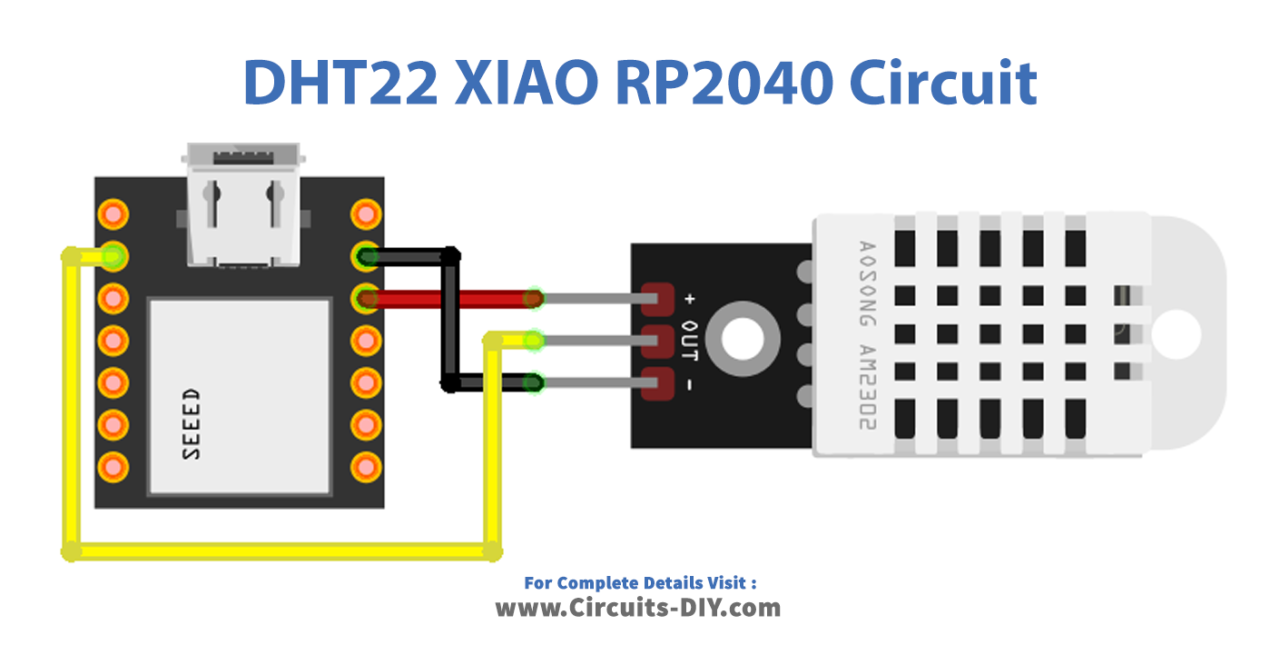
Wiring / Connections
| XIAO RP2040 | DHT22 Temperature Sensor |
|---|---|
| 3.3V | VCC |
| D1 | Data |
| GND | GND |
(5) Uploading Code
Now copy the following code and upload it to Arduino IDE Software.
/* Circuits DIY
* For Complete Details Visit
* https://www.circuits-diy.com/interfacing-dht22-temperature-sensor-with-xiao-rp2040/
*/
#include "DHT.h"
#define DHTPIN 27 // Digital pin connected to the DHT sensor
#define DHTTYPE DHT22 // DHT 22
DHT dht(DHTPIN, DHTTYPE);
void setup()
{
Serial.begin(115200);
Serial.println(F("DHTxx test!"));
dht.begin();
delay(2000);
}
void loop()
{
float h = dht.readHumidity();
float t = dht.readTemperature();
// Check if any reads failed and exit early (to try again).
if (isnan(h) || isnan(t))
{
Serial.println(F("Failed to read from DHT sensor!"));
return;
}
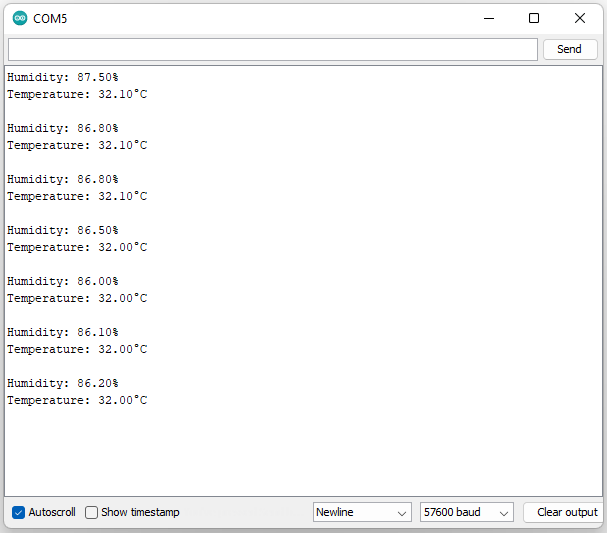
Serial.print(F("Humidity: "));
Serial.print(h);
Serial.println("%");
Serial.print(F("Temperature: "));
Serial.print(t);
Serial.println(F("°C "));
Serial.println("");
delay(2000);
}How code works
#include "DHT.h"
#define DHTPIN 27     // Digital pin connected to the DHT sensor
#define DHTTYPE DHT22   // DHT 22
DHT dht(DHTPIN, DHTTYPE);
In this section, the code includes the “DHT.h” library, defines a constant DHTPIN to specify the digital pin where the DHT22 sensor is connected, and sets DHTTYPE to DHT22. An instance of the DHT class is created and configured with these parameters.
void setup() {
  Serial.begin(115200);
  Serial.println(F("DHTxx test!"));
  dht.begin();
  delay(2000);
}
In the setup function, serial communication is initiated at a baud rate of 115200. A startup message is printed to the serial monitor. The DHT sensor is initialized using dht.begin(), and there is a 2-second delay to allow the sensor to stabilize.
void loop() {
  float h = dht.readHumidity();
  float t = dht.readTemperature();
Inside the loop function, two float variables, h and t, are used to store the humidity and temperature readings obtained from the DHT sensor.
  // Check if any reads failed and exit early (to try again).
  if (isnan(h) || isnan(t)) {
    Serial.println(F("Failed to read from DHT sensor!"));
    return;
  }
The code checks if the humidity (h) or temperature (t) readings are “not a number” (NaN), which can occur if the sensor fails to provide valid data. If any of the readings are NaN, an error message is printed to the serial monitor, and the loop is exited early to attempt another reading
  Serial.print(F("Humidity: "));
  Serial.print(h);
  Serial.println("%");
  Serial.print(F("Temperature: "));
  Serial.print(t);
  Serial.println(F("°C "));
  Serial.println("");
  delay(2000);
If both humidity and temperature readings are valid, the code proceeds to print these values to the serial monitor. The data is displayed with appropriate labels and units (percentage for humidity and degrees Celsius for temperature). There is also a 2-second delay before the loop repeats, providing a gap between consecutive readings.
This code is designed to interface with a DHT22 temperature and humidity sensor and continuously provide real-time data through the serial monitor, making it suitable for environmental monitoring and data logging applications.
Applications
- Indoor Climate Monitoring
- Greenhouse Control
- Weather Stations
- HVAC Systems
- Home Automation
- Data Logging etc
Conclusion
The provided Arduino code interfaces a DHT22 temperature and humidity sensor with a microcontroller. It reads temperature and humidity data from the sensor and displays it on the serial monitor. The code includes error checking to ensure data validity and runs in a continuous loop, making it suitable for real-time monitoring and data collection applications.