Introduction
Reading/Writing Serial EEPROM via I2C using an Arduino UNO is a process that entails communication with an external Serial EEPROM device through the use of the I2C protocol. This process provides a means by which an Arduino UNO can store and retrieve data from the Serial EEPROM device, thus expanding the available memory of the Arduino. The communication process is simplified by utilizing the Wire library provided by the Arduino platform, which makes it accessible to hobbyists and makers with little experience in electronics and programming.
In essence, this technique offers a valuable tool for Arduino users seeking to augment the capabilities of their projects by increasing the available memory.
Hardware Components
You will require the following hardware for ABC.
| Components | Value | Qty |
|---|---|---|
| Arduino UNO | – | 1 |
| 24LC01 | – | 1 |
| LED | – | 1 |
| Resistor | Ω | 1 |
| Breadboard | – | 1 |
| Jumper Wires | – | 1 |
Arduino Code
- Include the Wire library header file:
#include <Wire.h>
- Define a function to write a byte of data to the EEPROM:
void eeprom_i2c_write(byte address, byte from_addr, byte data) {
  Wire.beginTransmission(address); // Start transmission to the EEPROM
  Wire.send(from_addr); // Send the memory address to write to
  Wire.send(data); // Send the byte of data to write
  Wire.endTransmission(); // End transmission to the EEPROM
}
- Define a function to read a byte of data from the EEPROM:
byte eeprom_i2c_read(int address, int from_addr) {
  Wire.beginTransmission(address); // Start transmission to the EEPROM
  Wire.send(from_addr); // Send the memory address to read from
  Wire.endTransmission(); // End transmission to the EEPROM

  Wire.requestFrom(address, 1); // Request one byte of data from the EEPROM
  if(Wire.available()) // If a byte of data is available
    return Wire.receive(); // Return the byte of data
  else
    return 0xFF; // Otherwise, return an error code
}
- Initialize the I2C bus and the serial monitor in the
setup()function:
void setup() {
  Wire.begin(); // Initialize the I2C bus
  Serial.begin(9600); // Initialize the serial monitor
}
- Write the letters ‘a’ through ‘j’ to the first ten memory addresses of the EEPROM in a
forloop using theeeprom_i2c_write()function:
for(int i = 0; i < 10; i++) {
  eeprom_i2c_write(B01010000, i, 'a'+i); // Write a byte of data to the EEPROM
  delay(100); // Wait for 100 milliseconds
}
- Print a message to the serial monitor indicating that the data has been written:
Serial.println("Writen to memory!"); // Print a message to the serial monitor
- Read the data from the first ten memory addresses of the EEPROM in a
forloop using theeeprom_i2c_read()function:
(int i = 0; i < 10; i++) {
  byte r = eeprom_i2c_read(B01010000, i); // Read a byte of data from the EEPROM
  Serial.print(i); // Print the memory address
  Serial.print(" - "); // Print a separator
  Serial.print(r); // Print the byte of data
  Serial.print("\n"); // Print a new line
  delay(1000); // Wait for one second
}
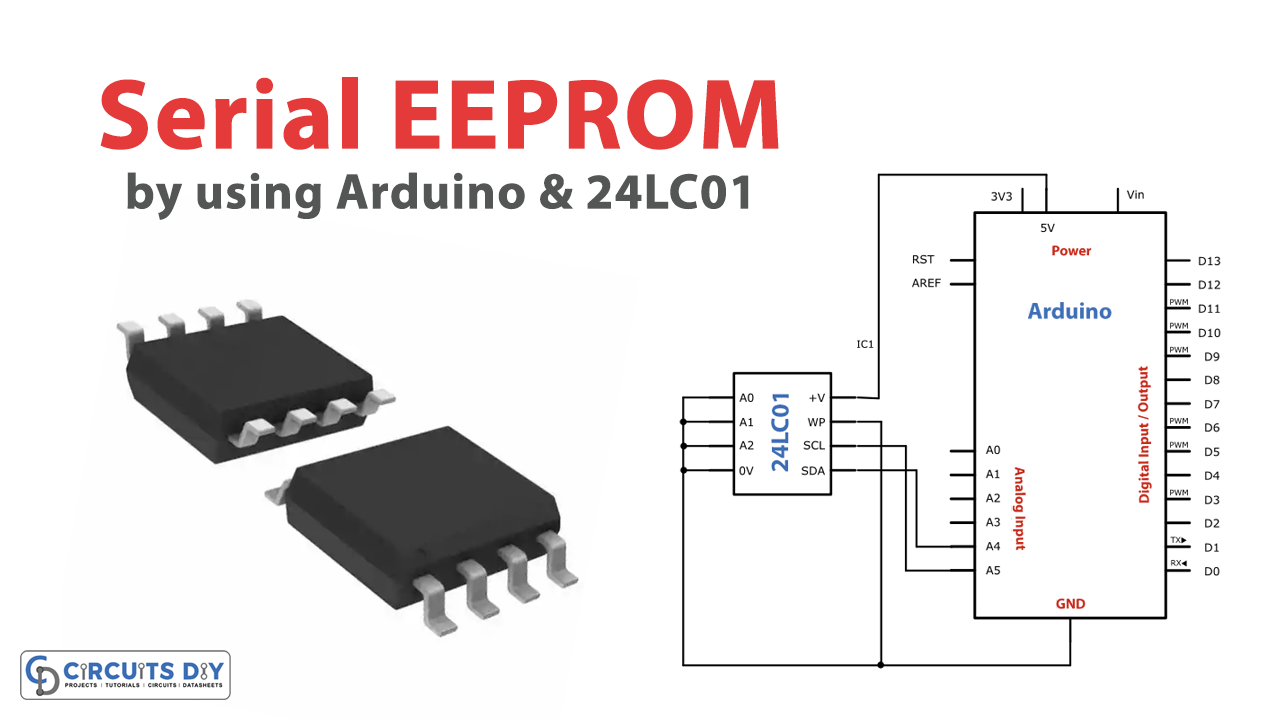
Schematic
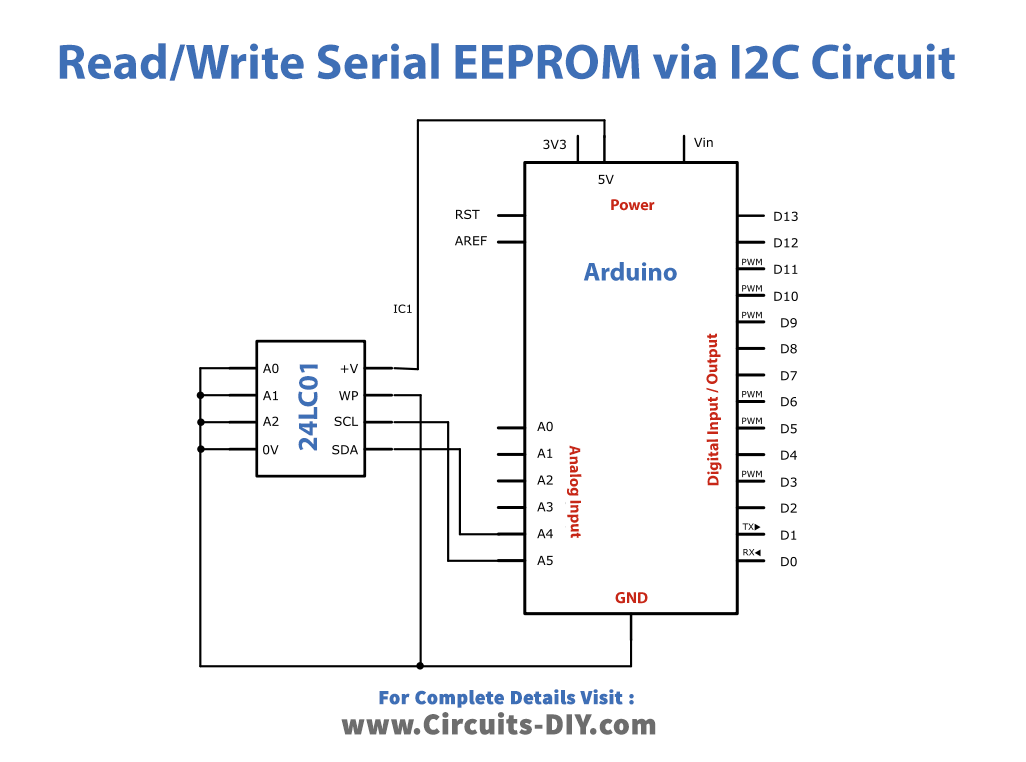
Wiring / Connections
| Arduino | 24LC01 |
|---|---|
| 5V | 5V |
| GND | A0, A1, A2, 0V, WP |
| A4 | SDA |
| A5 | SCL |
Full Code
#include <Wire.h>

void eeprom_i2c_write(byte address, byte from_addr, byte data) {
  Wire.beginTransmission(address);
  Wire.send(from_addr);
  Wire.send(data);
  Wire.endTransmission();
}

byte eeprom_i2c_read(int address, int from_addr) {
  Wire.beginTransmission(address);
  Wire.send(from_addr);
  Wire.endTransmission();

  Wire.requestFrom(address, 1);
  if(Wire.available())
    return Wire.receive();
  else
    return 0xFF;
}

void setup() {
  Wire.begin();
  Serial.begin(9600);

  for(int i = 0; i < 10; i++) {
    eeprom_i2c_write(B01010000, i, 'a'+i);
    delay(100);
  }

  Serial.println("Writen to memory!");
}

void loop() {
  for(int i = 0; i < 10; i++) {
    byte r = eeprom_i2c_read(B01010000, i);
    Serial.print(i);
    Serial.print(" - ");
    Serial.print(r);
    Serial.print("\n");
    delay(1000);
  }
}
Working Explanation
The eeprom_i2c_write() function writes a single byte of data to a specified address in the EEPROM. The function takes three arguments: address is the I2C address of the EEPROM chip, from_addr is the memory address in the EEPROM to write to, and data is the byte of data to write. The function starts a transmission to the EEPROM using Wire.beginTransmission(), sends the memory address and data bytes using Wire.send(), and ends the transmission using Wire.endTransmission(). The eeprom_i2c_read() function reads a single byte of data from a specified address in the EEPROM. The function takes two arguments: address is the I2C address of the EEPROM chip, and from_addr is the memory address in the EEPROM to read from. The function starts a transmission to the EEPROM using Wire.beginTransmission(), sends the memory address using Wire.send(), and ends the transmission using Wire.endTransmission(). The function then requests one byte of data from the EEPROM using Wire.requestFrom() and returns the byte if it is available, or 0xFF if it is not.
In the setup() function, the sketch writes the letters ‘a’ through ‘j’ to the first ten memory addresses of the EEPROM using a for loop and the eeprom_i2c_write() function. It then prints a message to the serial monitor indicating that the data has been written. In the loop() function, the sketch reads the data from the first ten memory addresses of the EEPROM using another for loop and the eeprom_i2c_read() function. It prints each byte of data to the serial monitor, along with its memory address. The loop then waits for one second before reading the next byte of data.
Applications
- Data storage
- Sensor data logging
- Security systems
- Automation systems
- Industrial control systems

