Introduction
To determine the angular position of the rotating shaft, a sensor called a rotary encoder is used. Thus, the sensor produces electrical signals according to the rotation. The sensor has a wide range of applications in packaging, textile, printing, robotics, and other different industries. Thus, in this article, we are going to interface “Rotary Encoder with Arduino UNO”. Rotary encoders are the modernized digital equivalent of the potentiometer, but they are more adaptable.
An Overview
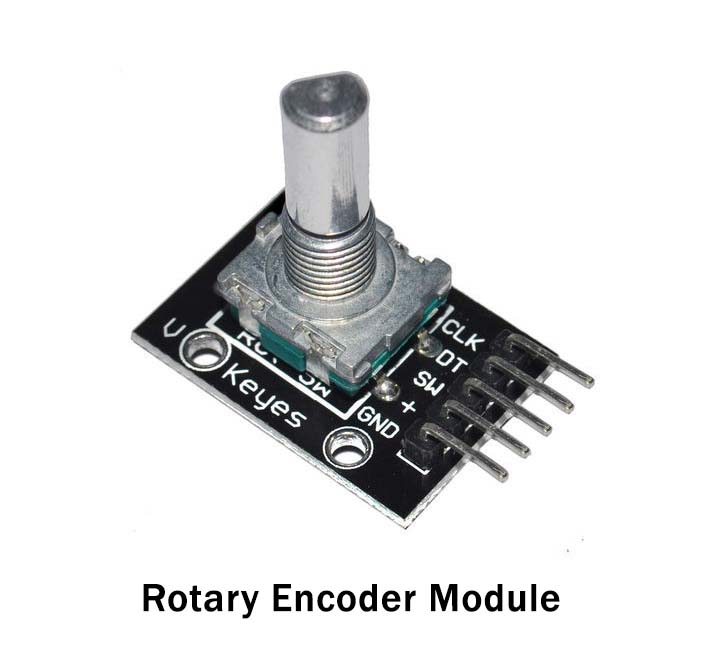
Hardware Overview
The module included a disk, a disk with equally spaced contact zones attached to the common pin C, along with two other contact pins A and B.
This particular module comes on a breakout board with five pins, which we will use in this demonstration with Arduino. The output A pin is the first, the output B pin is the second, the Button pin is the third, and the VCC and GND pins are the last two pins.
Working Principle
When the disc begins to rotate in steps, pins A and B will make contact with the common pin, resulting in the generation of two square wave output signals. If we just count the pulses of the signal, we can determine the rotational position using any of the two outputs. However, we must analyze both signals at the same time if we wish to determine the direction of rotation.
The two output signals are always 90 degrees out of phase with one another. Output A will be ahead of output B if the encoder rotates clockwise.
Difference between Rotary Encoder and Potentiometer
The most evident distinction between rotary potentiometers and encoders is that encoders can spin in either direction continuously, whereas potentiometers can only turn a certain amount clockwise or counter-clockwise before they must stop.
Hence, When you need to know the exact position of a knob, potentiometers are the way to go. Rotary encoders, on the other hand, are appropriate for cases when you only need to know the change in position rather than the exact position.
Hardware Required
| S.no | Components | Value | Qty |
|---|---|---|---|
| 1 | Arduino UNO | 1 | |
| 2 | USB Cable Type A to B | 1 | |
| 3 | Jumper Wires | – | |
| 4 | Rotary Encoder | KY-040 | 1 |
| 5 | Bread Board | 1 |
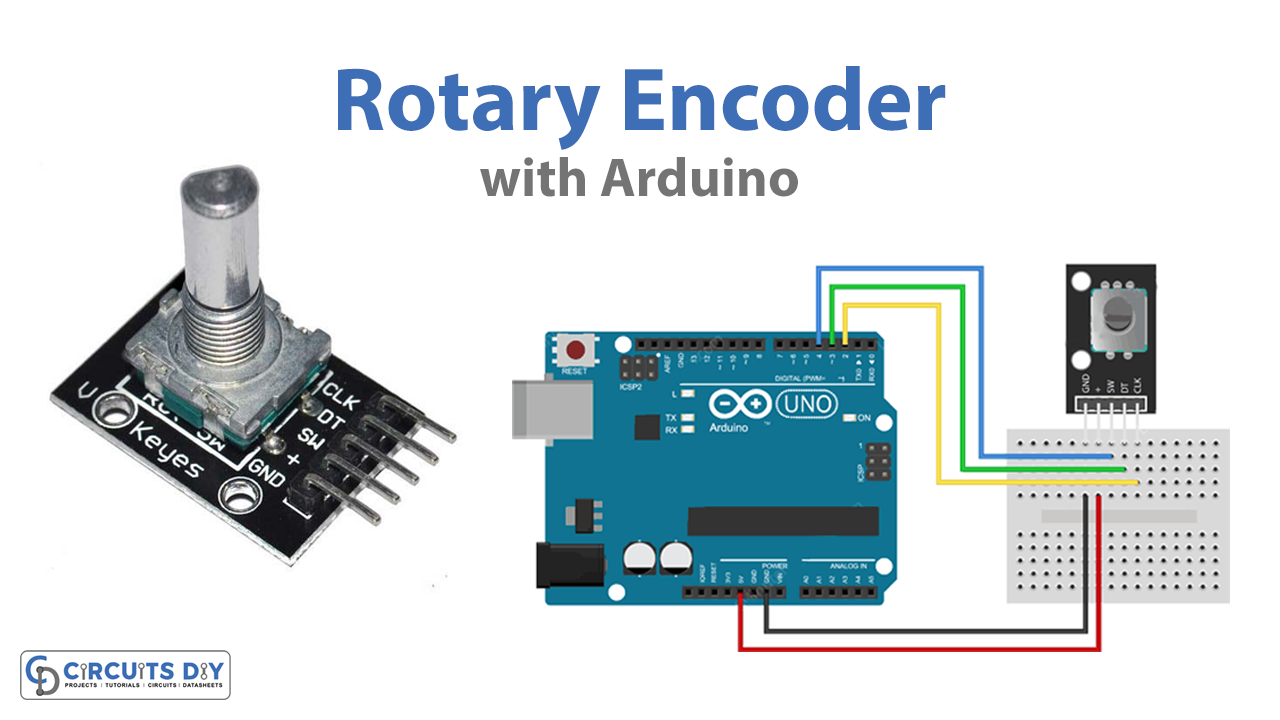
Circuit Diagram

Connection Table
| Arduino | Rotary Encoder |
|---|---|
| GND | GND |
| 5V | VCC |
| D4 | SW |
| D3 | DT |
| D2 | CLK |
Arduino Code
// Rotary Encoder Inputs
#define CLK 2
#define DT 3
#define SW 4

int counter = 0;
int currentStateCLK;
int lastStateCLK;
String currentDir ="";
unsigned long lastButtonPress = 0;

void setup() {

	// Set encoder pins as inputs
	pinMode(CLK,INPUT);
	pinMode(DT,INPUT);
	pinMode(SW, INPUT_PULLUP);

	// Setup Serial Monitor
	Serial.begin(9600);

	// Read the initial state of CLK
	lastStateCLK = digitalRead(CLK);
}

void loop() {

	// Read the current state of CLK
	currentStateCLK = digitalRead(CLK);

	// If last and current state of CLK are different, then pulse occurred
	// React to only 1 state change to avoid double count
	if (currentStateCLK != lastStateCLK  && currentStateCLK == 1){

		// If the DT state is different than the CLK state then
		// the encoder is rotating CCW so decrement
		if (digitalRead(DT) != currentStateCLK) {
			counter --;
			currentDir ="CCW";
		} else {
			// Encoder is rotating CW so increment
			counter ++;
			currentDir ="CW";
		}

		Serial.print("Direction: ");
		Serial.print(currentDir);
		Serial.print(" | Counter: ");
		Serial.println(counter);
	}

	// Remember last CLK state
	lastStateCLK = currentStateCLK;

	// Read the button state
	int btnState = digitalRead(SW);

	//If we detect LOW signal, button is pressed
	if (btnState == LOW) {
		//if 50ms have passed since last LOW pulse, it means that the
		//button has been pressed, released and pressed again
		if (millis() - lastButtonPress > 50) {
			Serial.println("Button pressed!");
		}

		// Remember last button press event
		lastButtonPress = millis();
	}

	// Put in a slight delay to help debounce the reading
	delay(1);
}
Working Explanation
To understand Rotary Rotary Encoder with Arduino UNO, connect the circuit according to the circuit diagram or follow the connection table. Then write the above-given code in Arduino IDE, and upload that in the ARDUINO UNO. The Arduino process the code and control the encoder’s output. Hence, you will observe the rotation of the rotary encoder according to your code.
Code Explanation
- Firstly, define the encoder’s pins which are connected to different pins of Arduino. For example, the CLK pin is connected to pin 2 of Arduino, DT to pin 3, and SW to pin 4. Then defined different variables which will be used in the code. The variable counter represents the count when the knob of the potentiometer gets rotated. The variables currentStateCLK, and lastStateCLK are there to keep the state of the output of CLK. currentDir variable has been defined to be used later for the printing of direction on the monitor. And, lastButtonPress is defined to debounce the switch.
- In the void setup, we have declared the encoder’s pins as input. Moreover, to read the value from the CLK pin, we gave the function digitalRead (CLK), and stored that reading in the variable lastStateCLK.
- In the void loop, to read the current status from the CLK pin we again gave the function digitalRead (CLK), and stored that in currentStateCLK. Then we give the if statement and compared lastStateCLK with currentStateCLK to determine the status direction of rotation. If they are different, it means, the knob has a counter-clockwise direction. We then set the current to CWW. If they are equal, it means, the knob has a clockwise direction. We then set the currentDir to CW. After that, we update the lastStateCLK with the current state. Then we read the switch button state and gave the if function. And, according to that function, if the button remains low for more than 50ms, it would print Button Pressed on a serial Monitor.
Application and Uses
- In conveyor belts to control the speed and direction.
- It can be used to compress large numbers of inputs into a smaller number of outputs in various electronics projects.
- Extruders, presses, welders, and different automated metal forming machinery.
Related posts:
 Write Variable to SD Card - Arduino Tutorial
 How to make an LED Cube - 4x4x4 - Arduino Project
 BME280 Temperature, Humidity, and Pressure Sensor Module with Arduino
 LDR Light Sensor - Arduino Tutorial
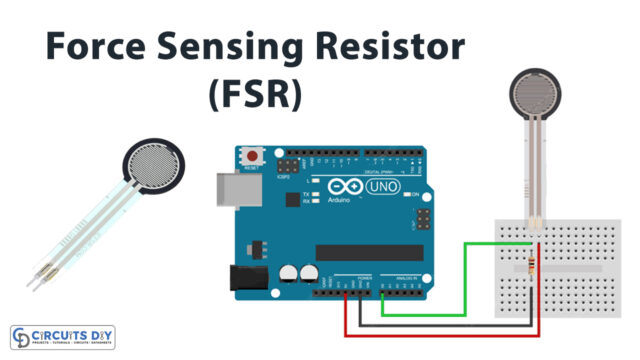 Interfacing Force Sensing Resistor (FSR) with Arduino UNO
 How to Interface Magnetic Reed Switch with Arduino UNO