Solder paste not only performs the function of a physical interconnection material; but, also serves as the PCBs’ structural support, thermal interface, and electrical conductor. It is crucial to the SMT PCB manufacturing process; that, the correct amount of solder is printed in exactly the right place. SMT Solder Paste Printing is the most critical process in terms of the quality perspective of the final PCB. Once the Solder Paste data and the stencil are ready; then, the process of SMT Solder Paste Printing can commence. In today’s tutorial, we will understand the SMT Solder printing process and the key performance parameters and indicators that should be monitored throughout the process.
SMT PCB Solder Paste Printing
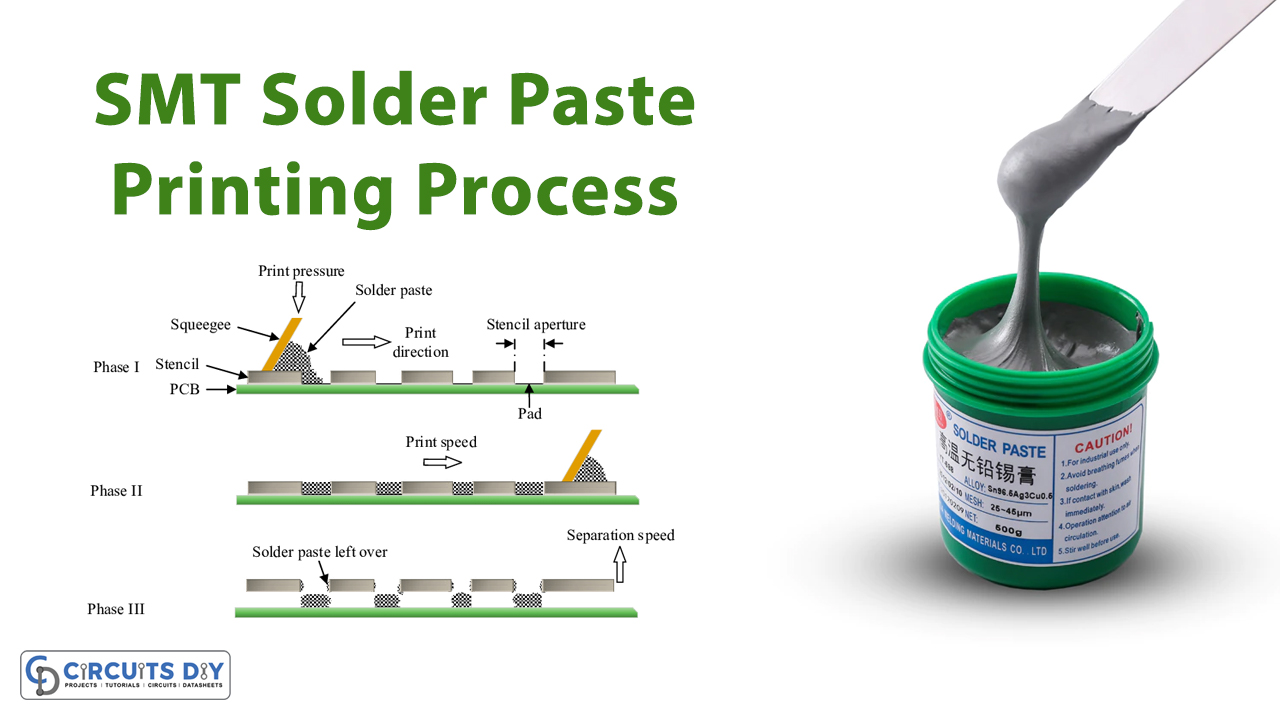
SMT solder paste printing is the meticulous process of applying the right amount of solder paste on the solder pads. The most basic way of performing this task is to screen-print the solder paste onto the board through a stencil. Some manufacturers also prefer jet printing with this step. Solder Paste printing is the most sensitive part of the manufacturing process. Many PCB board defects often occur at this stage due to the use of substandard techniques and equipment.

The process comprises of spreading the solder paste onto the circuit board with the help of a manual or semi-automatic stencil printer. Here, a squeegee blade allows pressure for the spreading of the solder paste across the stencil which, in turn, allows even spread of solder paste on the PCB board. The blades are usually constructed from metal. One can also use polyurethane for this purpose.
PCB Solder paste
PCB Solder paste or solder cream is a mixture of minute tinning solder spheres adhering to a special form of solder flux. It is one of the most important materials in the manufacturing of SMT PCB boards; As it connects SMD components on SMT PCBs. Solder paste also makes it possible to solder through-hole pin in paste components by printing solder paste in the holes. It’s a suspension of powder metal solder in a thick fluid medium, which is the flux.

Key Parameters To Consider During Solder Paste Printing
1) Speed of The Squeegee Blade
The travel velocity of the squeegee blade tells how much time is available for the solder paste to “roll” into the apertures of the stencil and onto the pads of the PCB. Typically a setting of 25mm per second is used but this is variable depending on the size of the apertures within the stencil and the solder paste used.

2) Angle of the Squeegee Blade
The angle of the squeegee blade also plays a major role in efficient solder paste printing. The ideal squeegee blade angle is 60 by design engineers. If the angle of the squeegee blade is greater than 60, this can result in ‘scooping’ of the solder paste. Scooping of the solder paste results in an insufficient amount of solder paste being deposited on the solder pad. On the other hand, if the angle is less than 60; the squeegee blade will leave a residue of solder paste on the stencil, reducing its life.

3) Squeegee Blade Pressure
It is important to pay close attention to the amount of pressure, that the squeegee blade applies on the stencil board; As it is imperative to apply sufficient pressure across the entire length of the squeegee blade to ensure a clean wipe of the stencil. A typical setting for the squeegee blade pressure is 500gm of pressure per 25mm of the squeegee blade. If the pressure is too low, it can result in the ‘smearing’ of the solder paste on the stencil board. The smearing of the solder paste results in poor deposition of the solder paste on the PCB solder pads. On the other hand, if the pressure is too high, this can result in excess wear and tear on the squeegee and the stencil, and may also cause bleeding of the paste between the stencil and the PCB.

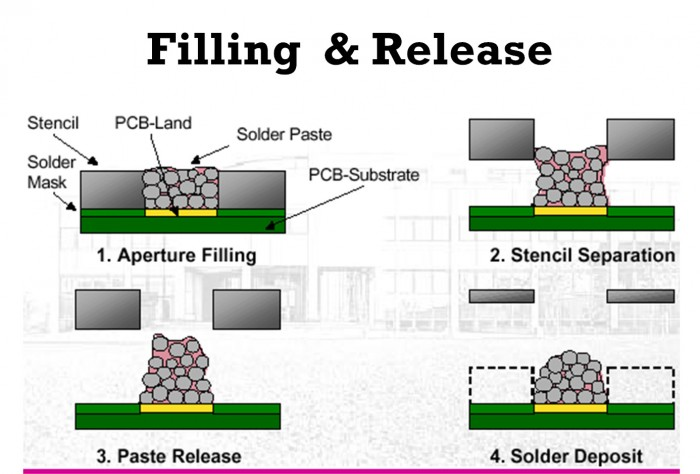
4) Speed of Stencil Separation
Stencil separation speed at which the PCB card separated from the stencil board after printing. Ideally, the servo speed should be 3mm per second; and, it must be controlled by the size of the apertures within the stencils. In any case, if the stencil separation speed deviates from the ideal value; it may not allow the solder paste to fully release from the stencil apertures and the formation of high edges around the deposits also known as “dog ears” may occur.
5) Cleaning of the Stencil Board
The stencil board must be cleaned regularly during operation. Many of the automatic printing machines have a system that can be set to clean the stencil after a fixed number of prints using lint-free material applied with a cleaning chemical such as an IPA cleaner. The system performs two functions, the first being the cleaning of the underside of the stencil to stop smudging, and the second is the cleaning of the apertures using a vacuum pump to stop blockages.

6) Stencil & Squeegee Integrity
The stencil and the squeegee blade must go through daily inspection; and, they should be in a proper storage container, so as to preserve their function and mechanical integrity. If any damage to squeegees or stencils comes in any inspection; immediate changes help ensure a reliable and repeatable process.