Introduction
Interfacing a 16×2 LCD Module with an Arduino UNO to count pushbutton presses is a simple and efficient way to keep track of button presses using a microcontroller. This system can be used in a variety of applications such as counting the number of times a button is pressed, displaying the count on an LCD screen, and communicating the count to the serial monitor for debugging purposes.
A 16×2 LCD module is a small screen that displays information on two lines, with 16 characters per line. This type of LCD module is commonly used in embedded systems, such as those built with the Arduino platform, to provide a simple and easy-to-read interface for displaying information to the user. The 16×2 LCD module connects to the Arduino through a set of interface pins and can be controlled using special library functions to display text, characters, and other data.
Hardware Components
You will require the following hardware for Button Count LCD with Arduino.
| S.no | Component | Value | Qty |
|---|---|---|---|
| 1. | Arduino UNO | – | 1 |
| 2. | USB Cable Type A to B | – | 1 |
| 3. | Button | – | 1 |
| 4. | LED | I2C | 1 |
| 5. | Power Adapter for Arduino | 9V | 1 |
| 6. | Jumper Wires | – | 1 |
Button Count LCD with Arduino
- Connect the push button switch to a digital input pin on the Arduino UNO, and the I2C LCD display module to the I2C pins (A4 for SDA and A5 for SCL) on the Arduino UNO.
- In the setup() function, start the serial communication using the Serial.begin() function, also initialize the LCD using the LiquidCrystal_I2C library by defining the I2C address and the number of columns and rows of the display.
#include <Wire.h>
#include <LiquidCrystal_I2C.h>
LiquidCrystal_I2C lcd(0x27,16,2); // set the LCD address to 0x27 for a 16 chars and 2 line display
void setup() {
  Serial.begin(9600);
  lcd.begin(); // start the LCD
  lcd.backlight(); // turn on the backlight
}
- In the loop() function, use the digitalRead() function to read the state of the push button. When the push button is pressed, the digitalRead() function returns a value of HIGH. A conditional statement is used to check the state of the button, and if the button is pressed, increment a variable counting the number of button presses.
int buttonPin = 2; // push button connected to digital pin 2
int buttonCount = 0; // variable to store the number of button presses
void loop() {
  if (digitalRead(buttonPin) == HIGH) { // check if the button is pressed
    buttonCount++; // increment the button press count
    delay(50); // debounce delay
  }
- Use the lcd.begin() and lcd.print() functions from the LiquidCrystal_I2C library to display the total number of push button counts on the LCD display.
lcd.clear(); // clear the LCD
lcd.setCursor(0,0); // set the cursor to the first column of the first row
lcd.print("Button Count:"); // print the label
lcd.print(buttonCount); //print the button count
- Upload the program to the Arduino UNO board, and open the serial monitor to verify that the push button count is incrementing correctly.
Schematic
Make connections according to the circuit diagram given below.
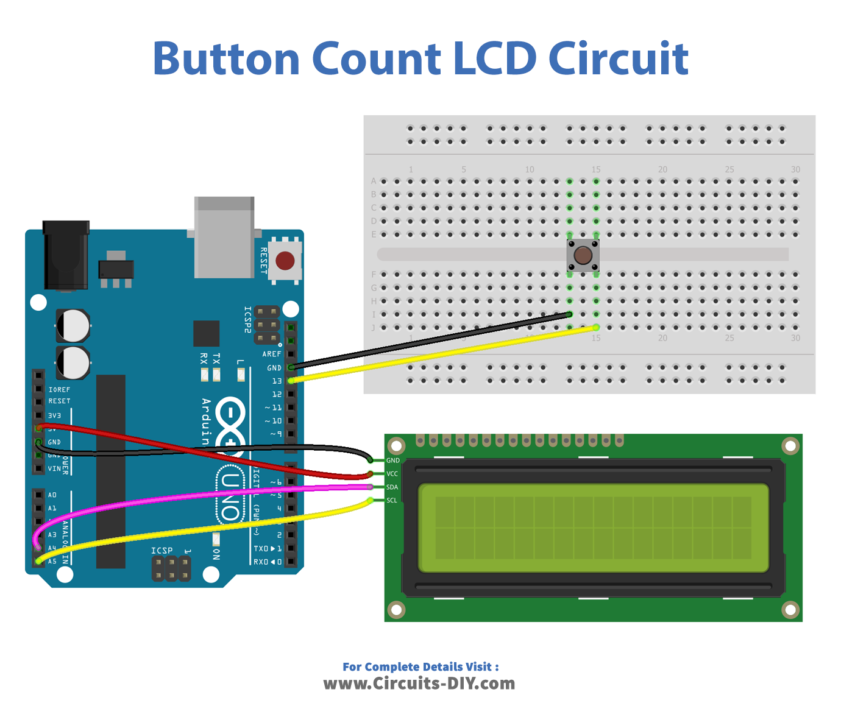
Wiring / Connections
| Arduino | LCD | Button |
|---|---|---|
| 5V | VCC | |
| GND | GND | GND (PIN1) |
| D13 | PIN2 | |
| A4 | SDA | |
| A5 | SCL |
Installing Arduino IDE
First, you need to install Arduino IDE Software from its official website Arduino. Here is a simple step-by-step guide on “How to install Arduino IDE“.
Installing Libraries
Before you start uploading a code, download and unzip the following libraries at /Progam Files(x86)/Arduino/Libraries (default), in order to use the sensor with the Arduino board. Here is a simple step-by-step guide on “How to Add Libraries in Arduino IDE“.
Code
Now copy the following code and upload it to Arduino IDE Software.
#include <LiquidCrystal_I2C.h>
#include <ezButton.h>

LiquidCrystal_I2C lcd(0x3F, 16, 2); // I2C address 0x3F, 16 column and 2 rows
ezButton button(13);  // create ezButton object that attach to pin 13;
unsigned long lastCount = 0;

void setup() {
  Serial.begin(9600);

  lcd.init();               // initialize the lcd
  lcd.backlight();          // open the backlight

  button.setDebounceTime(50); // set debounce time to 50 milliseconds
  button.setCountMode(COUNT_FALLING);
}

void loop() {
  button.loop(); // MUST call the loop() function first

  unsigned long count = button.getCount();
  if (lastCount != count) {
    Serial.println(count); // print count to Serial Monitor

    lcd.clear();
    lcd.setCursor(0, 0); // start to print at the first row
    lcd.print("Count: ");
    lcd.print(count);

    lastCount != count;
  }
}
Working Explanation
The setup() function initializes the Serial communication at a baud rate of 9600, initializes the LCD, turns on the backlight, sets the debounce time and count mode for the button, and attaches the button to pin 13.
The loop() function calls the button.loop() function to update the button’s state. It then checks if the button has been pressed (by checking if count is different from lastCount), and if so, it prints the count to the Serial Monitor and displays it on the LCD. The lastCount the variable is updated so that the code only prints the count when it changes.
Applications
- Input Counting
- User Interface
- Data Collection
- Event Tracking
- Menu Navigation
- User Input Interfacing
- Automation Control
- Game Design
- Electronic Voting Systems.
Conclusion.
We hope you have found this Button Count LCD Circuit very useful. If you feel any difficulty in making it feel free to ask anything in the comment section.