Overview
In today’s digitally connected world, the Internet of Things (IoT) has transformed the way we interact with our surroundings. From smart homes to industrial automation, IoT devices have become an integral part of our daily lives. Among these devices, the ESP32 microcontroller has gained immense popularity for its versatility and robust capabilities. One compelling application of the ESP32 is its ability to control AC appliances like fans remotely through a web interface.
In today’s tutorial, we are going to learn “How to Control AC Fan using ESP32 Web Server”.
ESP32 Web Server using Access Point (AP)
An ESP32 web server using the Access Point (AP) method is a network configuration and communication setup where the ESP32 microcontroller creates its own Wi-Fi network, acting as an Access Point, to which other devices can connect. In this configuration, the ESP32 essentially becomes a standalone Wi-Fi hotspot, allowing other devices to connect to it directly without the need for an existing Wi-Fi network.
PCBGOGO has offered high-quality PCBs and the best PCB assembly service all over the world since 2015. Discover an incredible offer that puts PCB prototyping within reach for just $1. Yes, you read that right – for only a dollar, you can bring your innovative ideas to life with a PCB prototype. Don’t miss out on this fantastic opportunity to turn your electronics projects into reality. Explore the campaign here: PCBGOGO $1 PCB Prototype and pave the way for your next big creation!
Hardware Components
You’ll need the following hardware components to get started:
| Components | Value / Model | Qty |
|---|---|---|
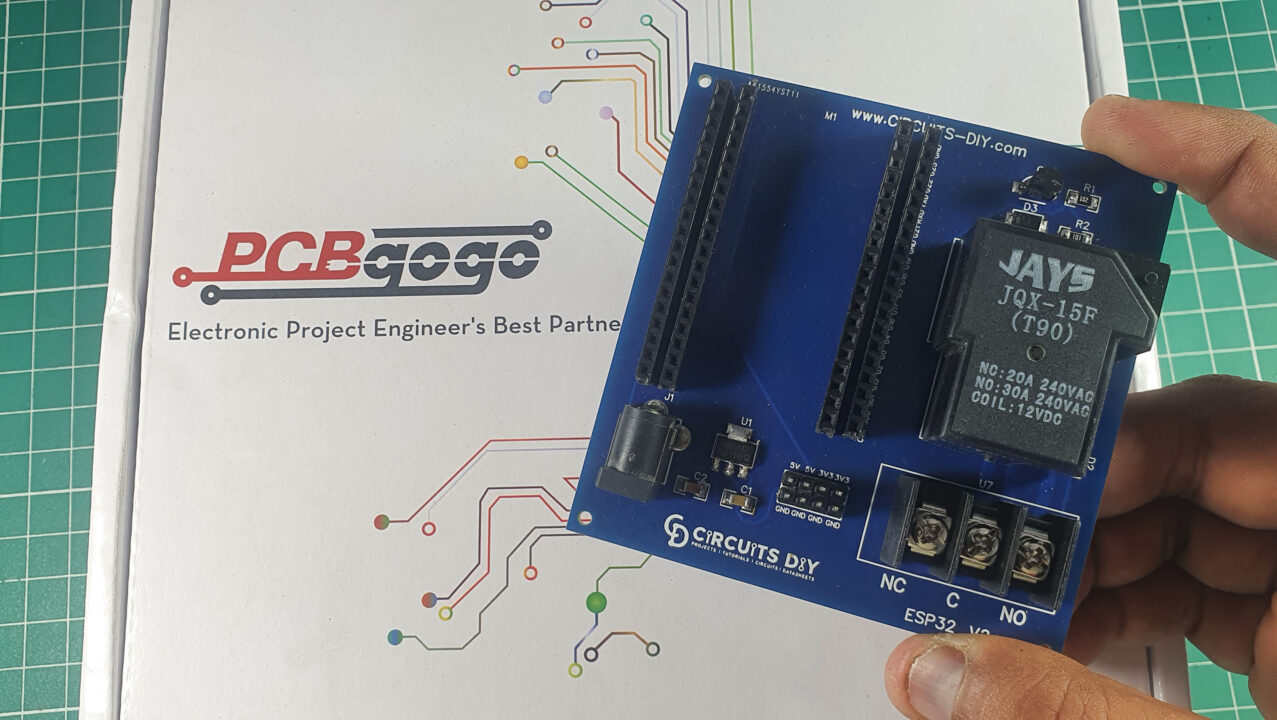
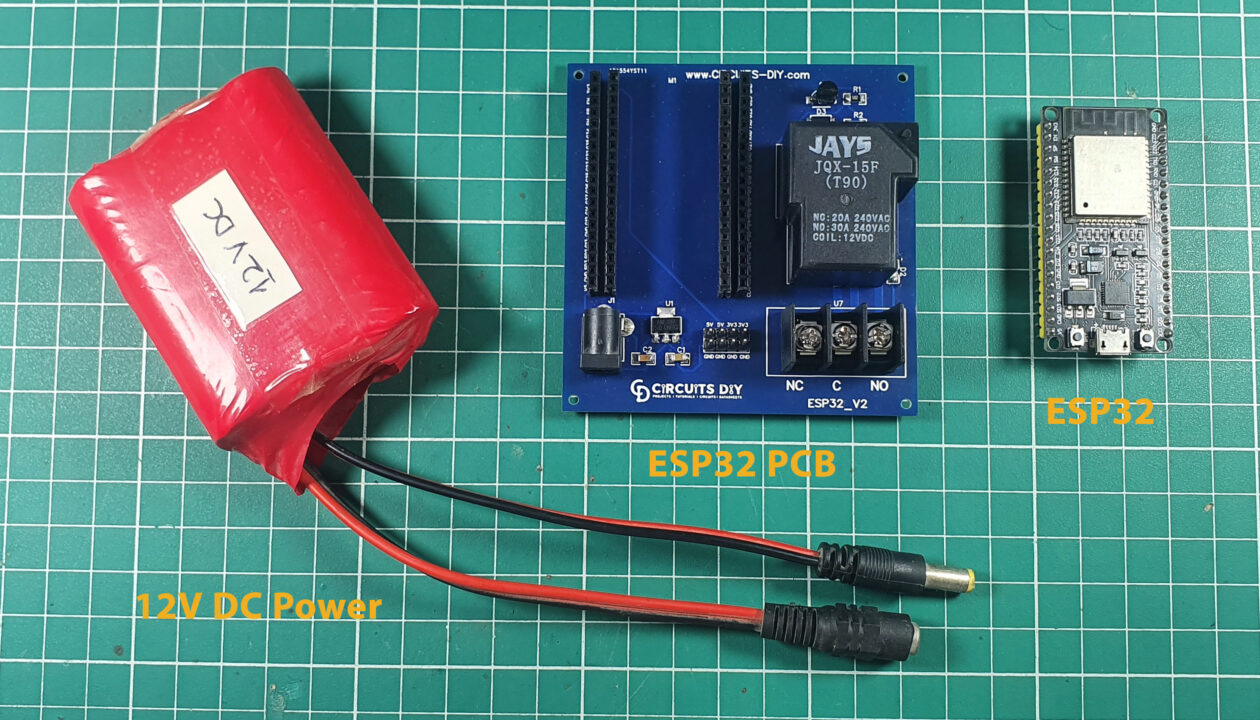
| ESP32 | WROOM | 1 |
| AC Fan | – | 1 |
| Relay | SLA 12V | 1 |
| 12 DC Power | – | 1 |
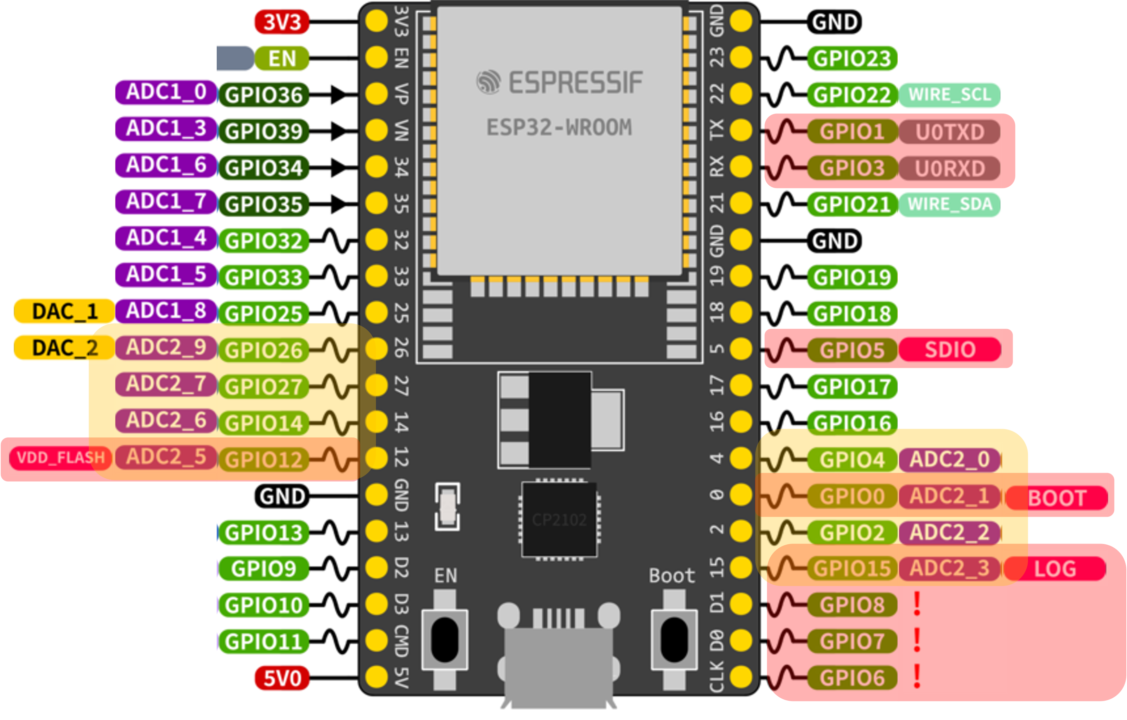
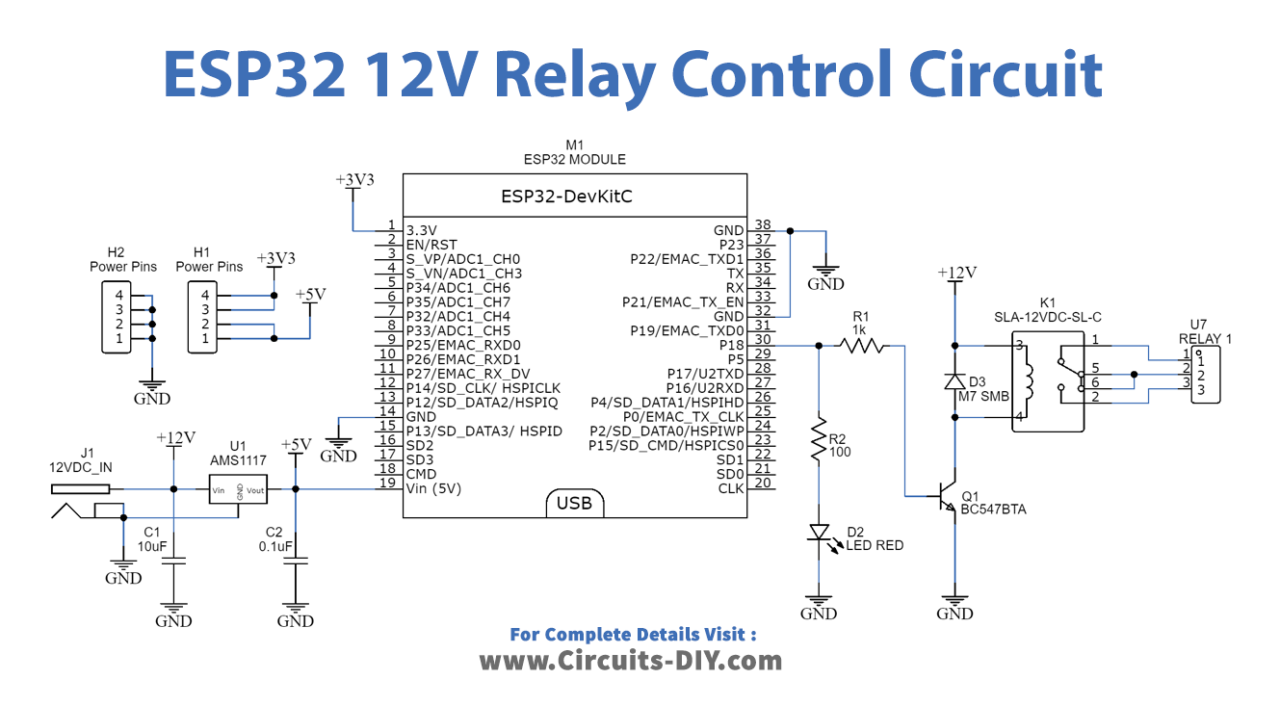
ESP32 Pinout
Steps-by-Step Guide
(1) Setting up Arduino IDE
Download Arduino IDE Software from its official site. Here is a step-by-step guide on “How to install Arduino IDE“.
(2) ESP32 in Arduino IDE
There’s an add-on that allows you to program the ESP32 using the Arduino IDE. Here is a step-by-step guide on “How to Install ESP32 on Arduino IDE“.
(3) Include Libraries
Before you start uploading a code, download and unzip the Webserver.h library at /Program Files(x86)/Arduino/Libraries (default). Here is a step-by-step guide on “How to Add Libraries in Arduino IDE“.
(4) Schematic
Make connections according to the circuit diagram given below.
(5) Uploading Code
Now copy the following code and upload it to Arduino IDE Software.
/* For Complete Details Visit
* https://www.circuits-diy.com/controlling-ac-fan-using-esp32-web-server/
*/
#include <WiFi.h>
#include <WebServer.h>
/* Put your SSID & Password */
const char* ssid = "ESP32 Fan Control"; // Enter SSID here
const char* password = "12345678"; // Enter Password here
/* Put IP Address details */
IPAddress local_ip(192,168,1,1);
IPAddress gateway(192,168,1,1);
IPAddress subnet(255,255,255,0);
WebServer server(80);
uint8_t FANpin = 18;
bool FANstatus = LOW;
void setup() {
Serial.begin(115200);
pinMode(FANpin, OUTPUT);
WiFi.softAP(ssid, password);
WiFi.softAPConfig(local_ip, gateway, subnet);
delay(100);
server.on("/", handle_OnConnect);
server.on("/FANon", handle_FANon);
server.on("/FANoff", handle_FANoff);
server.onNotFound(handle_NotFound);
server.begin();
Serial.println("HTTP server started");
}
void loop() {
server.handleClient();
if(FANstatus)
{digitalWrite(FANpin, HIGH);}
else
{digitalWrite(FANpin, LOW);}
}
void handle_OnConnect() {
FANstatus = LOW;
Serial.println("GPIO18 Status: OFF");
server.send(200, "text/html", SendHTML(FANstatus));
}
void handle_FANon() {
FANstatus = HIGH;
Serial.println("GPIO18 Status: ON");
server.send(200, "text/html", SendHTML(true));
}
void handle_FANoff() {
FANstatus = LOW;
Serial.println("GPIO18 Status: OFF");
server.send(200, "text/html", SendHTML(false));
}
void handle_NotFound(){
server.send(404, "text/plain", "Not found");
}
String SendHTML(uint8_t FANstat){
String ptr = "<!DOCTYPE html> <html>\n";
ptr +="<head><meta name=\"viewport\" content=\"width=device-width, initial-scale=1.0, user-scalable=no\">\n";
ptr +="<title>ESP32 Fan Control</title>\n";
ptr +="<style>html { font-family: Helvetica; display: inline-block; margin: 0px auto; text-align: center;}\n";
ptr +="body{margin-top: 50px;} h1 {color: #444444;margin: 50px auto 30px;} h3 {color: #444444;margin-bottom: 50px;}\n";
ptr +=".button {display: block;width: 80px;background-color: #3498db;border: none;color: white;padding: 13px 30px;text-decoration: none;font-size: 25px;margin: 0px auto 35px;cursor: pointer;border-radius: 4px;}\n";
ptr +=".button-on {background-color: #3498db;}\n";
ptr +=".button-on:active {background-color: #2980b9;}\n";
ptr +=".button-off {background-color: #34495e;}\n";
ptr +=".button-off:active {background-color: #2c3e50;}\n";
ptr +="p {font-size: 14px;color: #888;margin-bottom: 10px;}\n";
ptr +="</style>\n";
ptr +="</head>\n";
ptr +="<body>\n";
ptr +="<h1>ESP32 Fan Control</h1>\n";
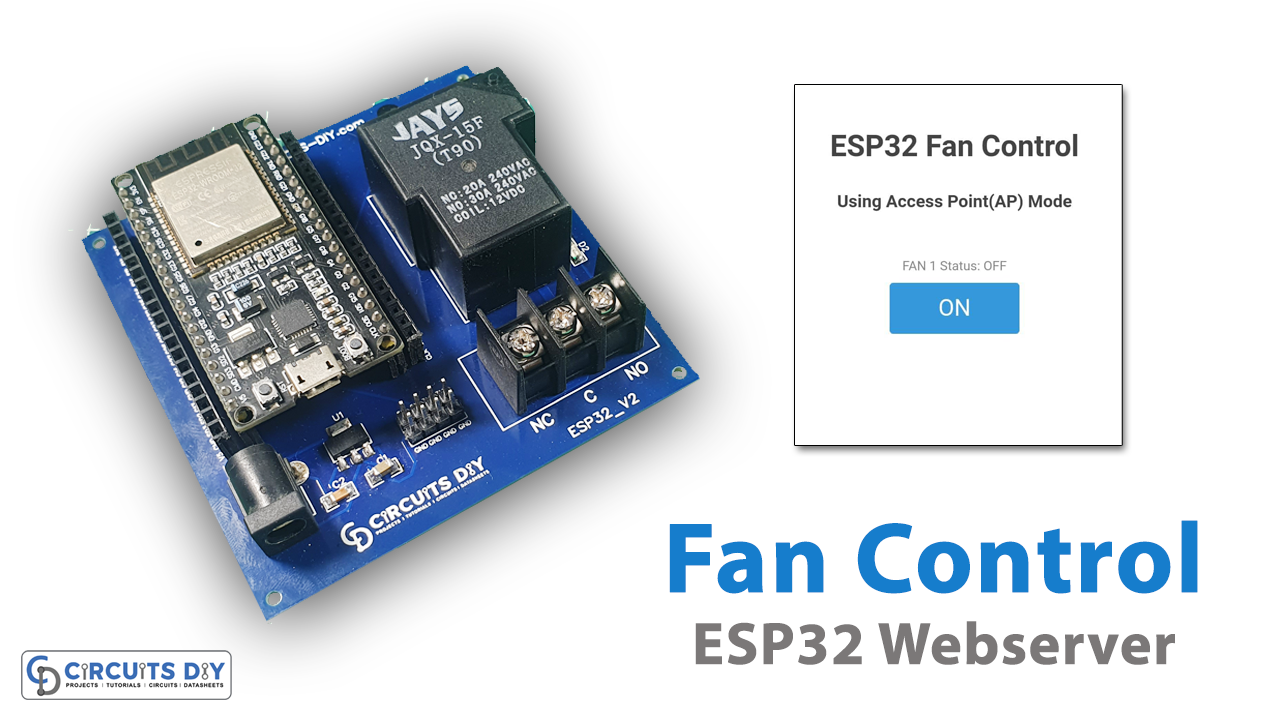
ptr +="<h3>Using Access Point(AP) Mode</h3>\n";
if(FANstat)
{ptr +="<p>FAN 1 Status: ON</p><a class=\"button button-off\" href=\"/FANoff\">OFF</a>\n";}
else
{ptr +="<p>FAN 1 Status: OFF</p><a class=\"button button-on\" href=\"/FANon\">ON</a>\n";}
ptr +="</body>\n";
ptr +="</html>\n";
return ptr;
}How code works
This code is for an ESP32-based project that creates a web server to control an AC fan. Here’s a short summary of what this code does:
#include <WiFi.h>
#include <WebServer.h>
These lines include the required libraries for Wi-Fi connectivity and web server functionality.
const char* ssid = "ESP32 Fan Control";  // Enter SSID here
const char* password = "12345678";   // Enter Password here
Here, you set the SSID and password for the ESP32’s Access Point (AP). Devices will use this SSID and password to connect to the ESP32’s Wi-Fi network.
IPAddress local_ip(192, 168, 1, 1);
IPAddress gateway(192, 168, 1, 1);
IPAddress subnet(255, 255, 255, 0);
These lines configure the local IP address, gateway, and subnet mask for the ESP32’s Access Point.
WebServer server(80);This line initializes a web server on port 80 (the default HTTP port).
uint8_t FANpin = 18;
bool FANstatus = LOW;
These lines set up a GPIO pin (pin 18) to control the fan, and a variable (FANstatus) to keep track of the fan’s state.
void loop() {
    // ...
}
The loop function continuously handles client requests and updates the fan’s state based on the FANstatus variable.
Request Handling Functions:
handle_OnConnect(): Handles the root (“/”) URL and sends an HTML page indicating the fan is off.handle_FANon(): Handles the “/FANon” URL, turns the fan on, and sends an HTML page indicating the fan is on.handle_FANoff(): Handles the “/FANoff” URL, turns the fan off, and sends an HTML page indicating the fan is off.handle_NotFound(): Handles unrecognized URLs and sends a 404 “Not Found” response.
String SendHTML(uint8_t FANstat) {
    // ...
}
This function generates an HTML page with buttons to control the fan’s state and displays the current fan status. It returns the HTML as a string.
These are the main parts of the code, and together they create a web server that allows you to control an AC fan through a web interface served by the ESP32 when it’s operating in Access Point mode.
Applications
- Monitor and manage renewable energy systems efficiently.
- Use sensors and IoT devices to gather data from solar panels, wind turbines, and other renewable sources.
- Access data remotely through a web or mobile app.
Conclusion
In conclusion, this application leverages the ESP32’s capabilities to create a user-friendly web interface for remotely controlling an AC fan. It offers the convenience of wireless fan control via a dedicated Access Point, making it suitable for IoT projects, home automation, and industrial applications where remote device control and monitoring are essential.
Related posts:
 How to Make Clap Switch Circuit using 555 Timer IC - Homemade
 Getting Started with ESP32 CAM & Video Streaming Over WiFi
 Automatic Night Light Sensor Using BC547 Transistors
 Weather Station using RYB080I Bluetooth Low Energy (BLE) Module with Arduino
 Automatic Street Night Light Circuit Using LDR | DIY Project
 Matrix Scrolling Weather Station & Clock