Introduction
Speed and directional control coding for a DC motor using an L298N motor driver and an Arduino UNO is a method of establishing control over the functionality of a DC motor by sending commands from an Arduino microcontroller to an L298N motor driver. The L298N motor driver is an integrated circuit (IC) that allows for the control of a DC motor’s speed and direction by adjusting the voltage and current supplied to the motor.
The following program allows for precise control of the DC motor’s speed and direction, providing a wide range of applications in robotics, automation, and other control systems.
Hardware Components
You will require the following hardware for Interfacing DC Motor with Arduino.
| S.no | Component | Value | Qty |
|---|---|---|---|
| 1. | Arduino UNO | – | 1 |
| 2. | USB Cable Type A to B | – | 1 |
| 3. | Motor Driver Module | L298N | 1 |
| 4. | DC Motor | – | 1 |
| 5. | Power Adapter | 12V | 1 |
| 6. | DC Power Jack | – | 1 |
| 7. | Power Adapter for Arduino | 9V | 1 |
| 8. | Jumper Wires | – | 1 |
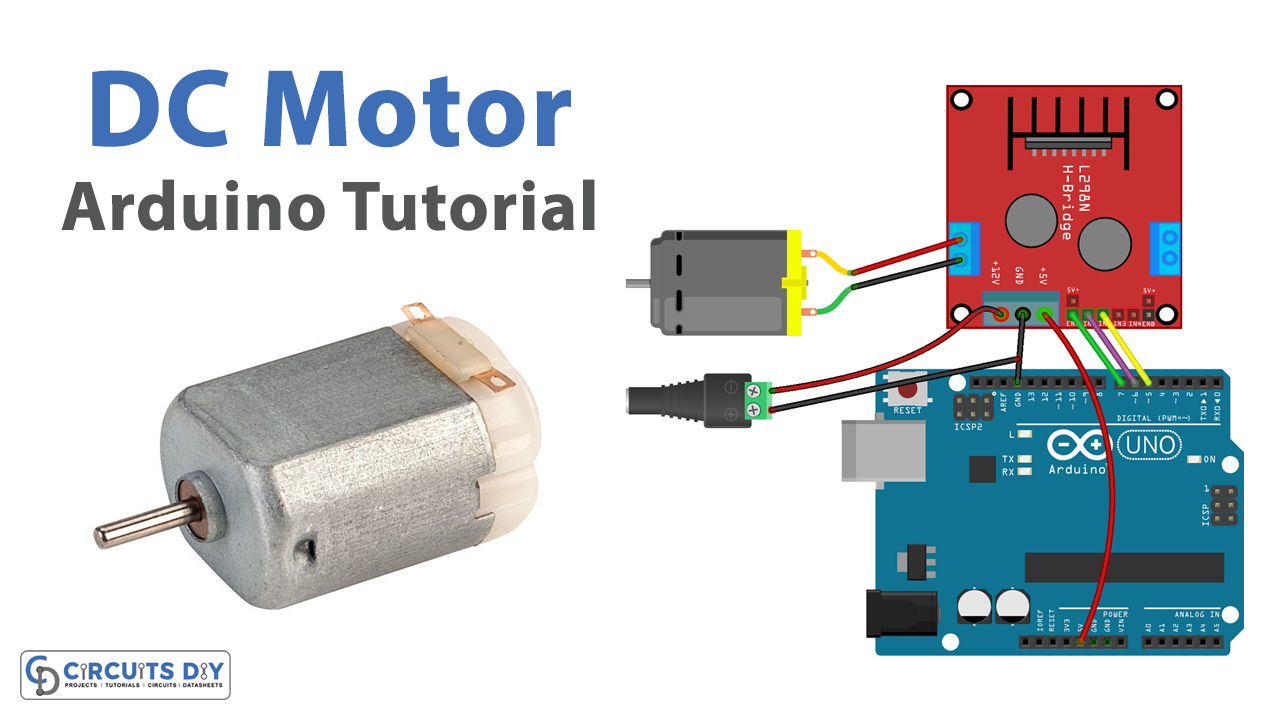
DC Motor with Arduino UNO
- Connect the DCM015 Miniature DC Motor to the L298N Motor Driver. Connect the positive wire of the motor to terminal 1, and the negative wire to terminal 2 on the motor driver.
- Connect the L298N Motor Driver to the Arduino UNO. Connect the ENA pin on the motor driver to digital pin 9 on the Arduino, IN1 pin to digital pin 8, IN2 pin to digital pin 7, and ENB pin to digital pin 10. Connect the 5V pin on the motor driver to the 5V pin on the Arduino, and the GND pin to GND.
- In the Arduino IDE, include the “Stepper.h” library at the beginning of the sketch.
#include <Stepper.h>
- Define the pins for the motor driver and the motor in the setup() function.
int motorPin1 = 8;
int motorPin2 = 7;
int enA = 9;
int enB = 10;
- In the setup() function, configure the pins for the motor driver as OUTPUTs using the pinMode() function.
pinMode(motorPin1, OUTPUT);
pinMode(motorPin2, OUTPUT);
pinMode(enA, OUTPUT);
pinMode(enB, OUTPUT);
- In the loop() function, use the digitalWrite() function to control the speed and direction of the motor. For example, to rotate the motor clockwise at a speed of 255, use the following code:
digitalWrite(motorPin1, HIGH);
digitalWrite(motorPin2, LOW);
analogWrite(enA, 255);
- To rotate the motor counterclockwise at a speed of 128, use the following code:
digitalWrite(motorPin1, LOW);
digitalWrite(motorPin2, HIGH);
analogWrite(enA, 128);
- Use a delay() function to prevent the program from rotating the motor too quickly.
delay(1000);
- Use the Serial.println() function to display the speed and direction of the motor on the serial monitor.
Serial.println("Motor rotating at 255 in clockwise direction");
- Upload the code to the Arduino board, open the serial monitor, and set the baud rate to 9600. You should see the status of the motor every time it rotates.
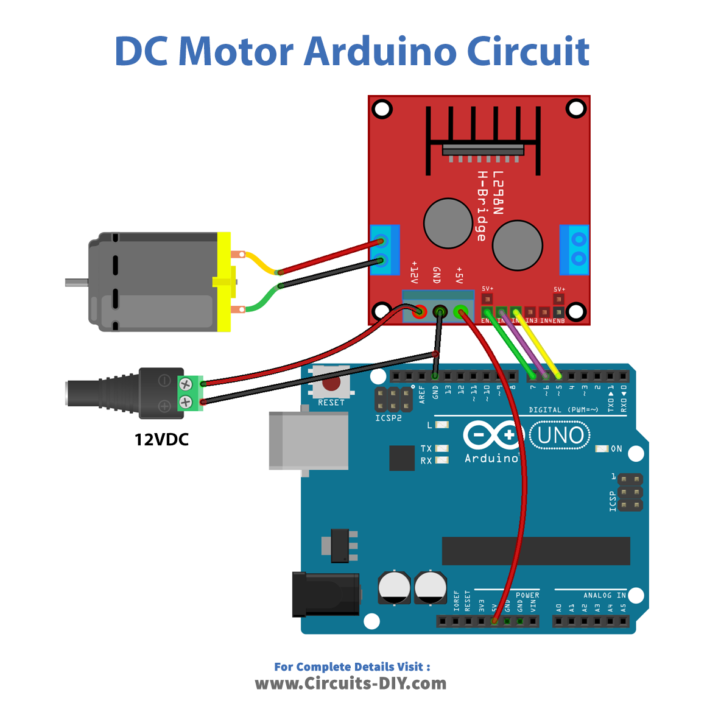
Schematic
Make connections according to the circuit diagram given below.
Wiring / Connections
| Arduino | L298N |
|---|---|
| 5V | OUT1 – Motor+ |
| GND | OUT2 – Motor- |
| D7 | EN1 |
| D6 | IN1 |
| D5 | IN2 |
Installing Arduino IDE
First, you need to install Arduino IDE Software from its official website Arduino. Here is a simple step-by-step guide on “How to install Arduino IDE“.
Code
Now copy the following code and upload it to Arduino IDE Software.
const int ENA_PIN = 7; // the Arduino pin connected to the EN1 pin L298N
const int IN1_PIN = 6; // the Arduino pin connected to the IN1 pin L298N
const int IN2_PIN = 5; // the Arduino pin connected to the IN2 pin L298N

// the setup function runs once when you press reset or power the board
void setup() {
  // initialize digital pins as outputs.
  pinMode(ENA_PIN, OUTPUT);
  pinMode(IN1_PIN, OUTPUT);
  pinMode(IN2_PIN, OUTPUT);
}

// the loop function runs over and over again forever
void loop() {
  digitalWrite(IN1_PIN, HIGH); // control motor A spins clockwise
  digitalWrite(IN2_PIN, LOW);  // control motor A spins clockwise

  for (int speed = 0; speed <= 255; speed++) {
    analogWrite(ENA_PIN, speed); // control the speed
    delay(10);
  }

  delay(1000); // rotate at maximum speed 1 seconds in in clockwise direction

  // change direction
  digitalWrite(IN1_PIN, LOW);   // control motor A spins anti-clockwise
  digitalWrite(IN2_PIN, HIGH);  // control motor A spins anti-clockwise

  delay(1000); // rotate at maximum speed 1 seconds in in anti-clockwise direction

  for (int speed = 255; speed >= 0; speed--) {
    analogWrite(ENA_PIN, speed); // control the speed
    delay(10);
  }

  delay(1000); // stop motor 1 second
}
Working Explanation
In the setup() function, the Arduino configures the pins for the motor driver as OUTPUTs using the pinMode() function. Then, in the loop() function, the Arduino uses the digitalWrite() function to control the speed and direction of the motor by sending digital signals to the L298N Motor Driver. The L298N Motor Driver receives these signals and adjusts the voltage and current supplied to the motor accordingly, thus controlling the speed and direction of the DC motor.
The Arduino uses the analogWrite() function to control the speed of the motor by sending analog signals to the L298N Motor Driver. The L298N Motor Driver receives these signals and adjusts the voltage and current supplied to the motor accordingly, thus controlling the speed of the DC motor.
Applications
- Robotics
- Automation
- Control systems
- Electric vehicles
- Industrial automation
- Robotics Education
- Home Automation
Conclusion
We hope you have found this DC Motor Arduino Circuit very useful. If you feel any difficulty in making it feel free to ask anything in the comment section.
Related posts:
 Arduino - Cooling System using DS18B20 Temperature Sensor
 Interfacing 315/433 MHz RF Transmitter-Receiver with Arduino
 XKC-Y26-V Non-Contact Liquid Level Sensor with Arduino
 Heating System - Arduino Tutorial
 SW-420 Vibration Sensor Module Interfacing with Arduino
 Control LED with Push Button - Arduino Tutorial