Introduction
Rapid climate shifts are a reality of our times. As a result, we can only adequately plan for an event or organize one after first checking the forecast. Thankfully, we no longer have to rely on gut feelings or guesswork; today’s technology allows us to check the weather from anywhere with a cell phone.
You should know, however, that without a portable weather station, it is impossible to get accurate soil temperature and humidity data. You might be wondering why it’s necessary to take soil readings. It may not be essential for you, but it is vital for farmers and agricultural purposes. Hence, a sensor called DHT22 is required to get those readings. Let’s dig into this article to learn How DHT22 Sensor Interface with Arduino UNO.
Connecting DHT22 Sensor with Arduino?
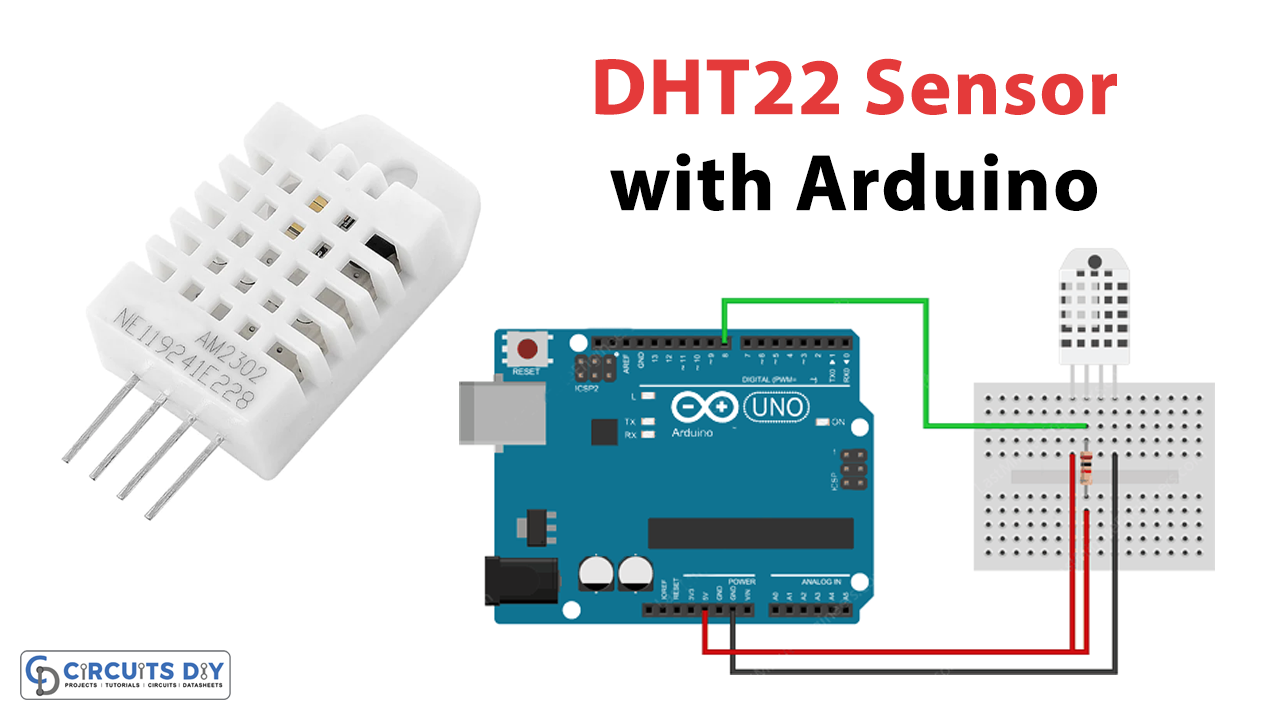
Using Arduino to connect DHT sensors is simple. It is simple to connect them to a breadboard. Connect the Arduino’s 5V supply to the VCC pin and the ground pin to the ground. To finish, connect the data pin to the digital pin.
The manufacturer already calibrates these sensors. You can immediately start measuring the relative humidity and temperature with only a few wires and some Arduino code.

Hardware Components
You will require the following hardware.
In the hardware section above, we have listed the required components. Once you get them, follow the following steps:
Schematic
Make connections according to the circuit diagram given below.

Wiring / Connections
| Arduino | DHT22 Sensor |
|---|---|
| 5V | VCC |
| D8 | DATA |
| COMMON | NC |
| GND | GND |
Installing Arduino IDE
First, you need to install Arduino IDE Software from its official website Arduino. Here is a simple step-by-step guide on “How to install Arduino IDE“.
Installing Libraries
Before you start uploading a code, download and unzip the following libraries at /Progam Files(x86)/Arduino/Libraries (default), in order to use the sensor with the Arduino board. Here is a simple step-by-step guide on “How to Add Libraries in Arduino IDE“.
Code
Now copy the following code and upload it to Arduino IDE Software.
#include <dht.h>
#define dataPin 8 // Defines pin number to which the sensor is connected
dht DHT; // Creats a DHT object

void setup()
{
	Serial.begin(9600);
}
void loop()
{
	//Uncomment whatever type you're using!
	int readData = DHT.read22(dataPin); // DHT22/AM2302
	//int readData = DHT.read11(dataPin); // DHT11

	float t = DHT.temperature; // Gets the values of the temperature
	float h = DHT.humidity; // Gets the values of the humidity

	// Printing the results on the serial monitor
	Serial.print("Temperature = ");
	Serial.print(t);
	Serial.print(" ");
	Serial.print((char)176);//shows degrees character
	Serial.print("C | ");
	Serial.print((t * 9.0) / 5.0 + 32.0);//print the temperature in Fahrenheit
	Serial.print(" ");
	Serial.print((char)176);//shows degrees character
	Serial.println("F ");
	Serial.print("Humidity = ");
	Serial.print(h);
	Serial.println(" % ");
	Serial.println("");

	delay(2000); // Delays 2 secods
}
Let’s Test It
The circuit must now be put to the test. Once the circuit is wired and the code is uploaded to Arduino, the temperature and humidity readings will appear on the serial monitor.
Working Explanation
Let’s dive into the code to understand the working.
- First, we include the DHT library in the code. After that, we build a DHT object and define the Arduino pin to which the Data pin of our sensor is attached. Afterwards, we print the value of the DHT.
- We initiate serial communication to the serial monitor during the void setup, where the code runs once.
- To read the DHT22, we use the function read22(dataPin) method within the void loop. The sensor’s Data pin is sent to this function as a parameter.
- DHT.temperature, DHT.humidity is used to get the temperature and humidity readings, respectively.
- The DHT object returns a temperature reading in degrees Celsius (°C). The code has a simple formula for converting to Fahrenheit (°F).
Applications
- Weather stations
- Agricultural devices
- Environmental monitoring devices
- Climate sensors, etc.
Conclusion
We hope you have found this How DHT22 Sensor Interface With Arduino UNO Circuit very useful. If you feel any difficulty making it feel free to ask anything in the comment section.