Introduction
Interfacing a pushbutton-controlled LED using an ESP32-WROOM is a simple yet important aspect of learning beginner electronics. This project essentially serves as a basic project that can be a foundation for more complex applications. So in today’s tutorial, we are going to understand how to interact with a pushbutton-controlled LED with an ESP32-WROOM microcontroller.
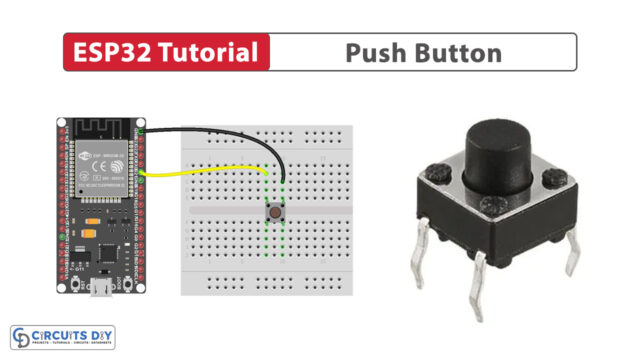
Button Control LED
A light-emitting diode is an electronic component that emits light when an electric current flows through it. The coupling of a pushbutton as a control mechanism allows for more precise control over the operations of the LED itself.
Hardware Components
To make this circuit, you’ll need the following hardware components to get started:
| Components | Value / Model | Qty |
|---|---|---|
| ESP32 | – | 1 |
| Push Button | – | 1 |
| LED | – | 1 |
| Resistor | 220Ω | 1 |
| Breadboard | – | 1 |
| Jumper Wires | – | 1 |
| DC Power for ESP32 | – | 1 |
Steps-by-Step Guide
(1) Setting up Arduino IDE
Download Arduino IDE Software from its official site. Here is a step-by-step guide on “How to install Arduino IDE“.
(2) ESP32 in Arduino IDE
There’s an add-on that allows you to program the ESP32 using the Arduino IDE. Here is a step-by-step guide on “How to Install ESP32 on Arduino IDE“.
(3) Schematic
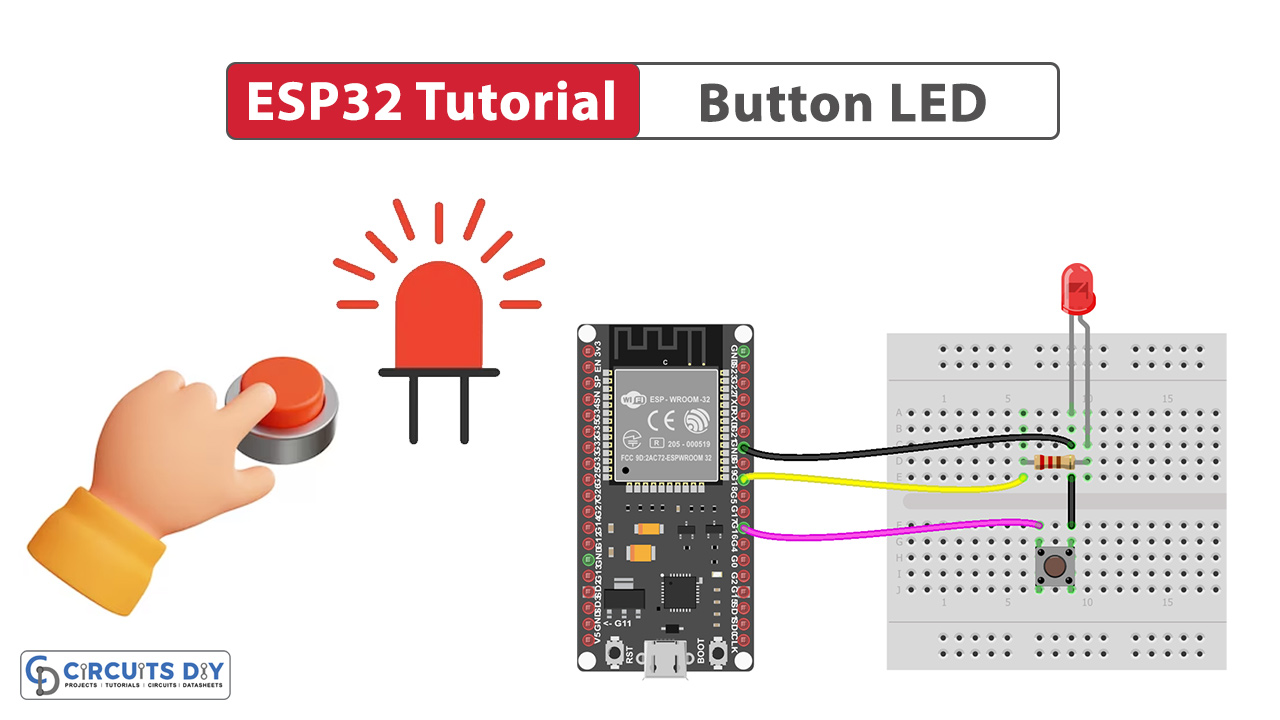
Make connections according to the circuit diagram given below.

Wiring / Connections
| ESP32 | Button | LED |
|---|---|---|
| GND | GND | GND |
| GIOP16 | Pin 1 | – |
| GIOP18 | – | LED + |
(4) Uploading Code
This code sets up an ESP32 microcontroller to control an LED based on the state of a button connected to GPIO pins 16 and 18, respectively. The button is configured as an input with a pull-up resistor, meaning it reads HIGH when not pressed and LOW when pressed. In the main loop, it continuously checks the button state turns on the LED when the button is pressed, and turns it off otherwise.
Now copy the following code and upload it to Arduino IDE Software.
#define BUTTON_PIN 16  // ESP32 pin GIOP16, which connected to button
#define LED_PIN    18  // ESP32 pin GIOP18, which connected to led

// variables will change:
int button_state = 0;   // variable for reading the button status

void setup() {
  // initialize the LED pin as an output:
  pinMode(LED_PIN, OUTPUT);
  // initialize the button pin as an pull-up input:
  // the pull-up input pin will be HIGH when the button is open and LOW when the button is pressed.
  pinMode(BUTTON_PIN, INPUT_PULLUP);
}

void loop() {
  // read the state of the button value:
  button_state = digitalRead(BUTTON_PIN);

  // control LED according to the state of button
  if (button_state == LOW)       // if button is pressed
    digitalWrite(LED_PIN, HIGH); // turn on LED
  else                           // otherwise, button is not pressing
    digitalWrite(LED_PIN, LOW);  // turn off LED
}