Introduction
If you have studied physics you have known that a gyroscope is a device generally used to measure the angular position. Mainly, used in the vehicles. If you are a gamer, then you must understand this term. Because some incredible mobile games used this to control the movement. Since it reduces the manual work of a player. Therefore, the mobile that uses the best gyroscopes is in high demand.
Hence, smartphones used the sensor to enable the gyroscope. Also, the gyroscopes may be of different kinds. But, in this tutorial, we will discuss the MPU6050 sensor. Thus, we are going to interface ” MPU-6050 Accelerometer Gyroscope Sensor with Arduino UNO
Working Principle of Accelerometer Gyroscope Sensor
The idea of Coriolis force is utilized in the sensor. Primarily, the sensor converts the rotational rate into an electrical signal. Further, it senses the angular velocity. Also, it detects the angular velocity generated by the sensor’s movement. Moreover, it detects the vibration that is generated by any external elements and converts it into electrical signals.
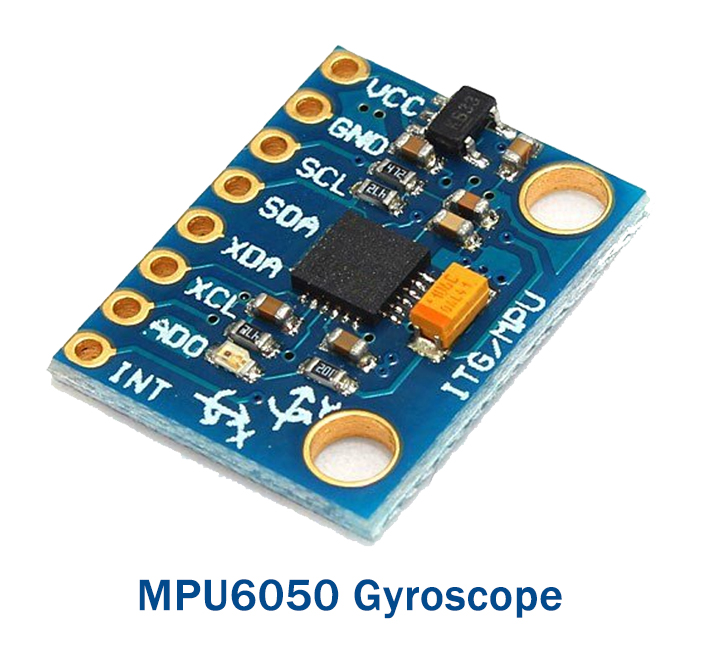
Specifications of MPU-6050
The MPU-6050 is the 3 axis gyroscope and 3 axis accelerometer. The gyroscope estimates the rotational gravity. While the accelerometer gauges gravitational creation. Thus, it calculates the acceleration over the X, Y, and Z-axis. Using the values of the accelerometer of this sensor, one can calculate the angles by trying trigonometry.
Hardware Required
| S.no | Component | Value | Qty |
|---|---|---|---|
| 1. | Arduino | UNO | 1 |
| 2. | USB Cable Type A to B | – | 1 |
| 3. | Jumper Wires | – | – |
| 4. | Accelerometer Gyroscope Sensor | MPU-6050 | – |
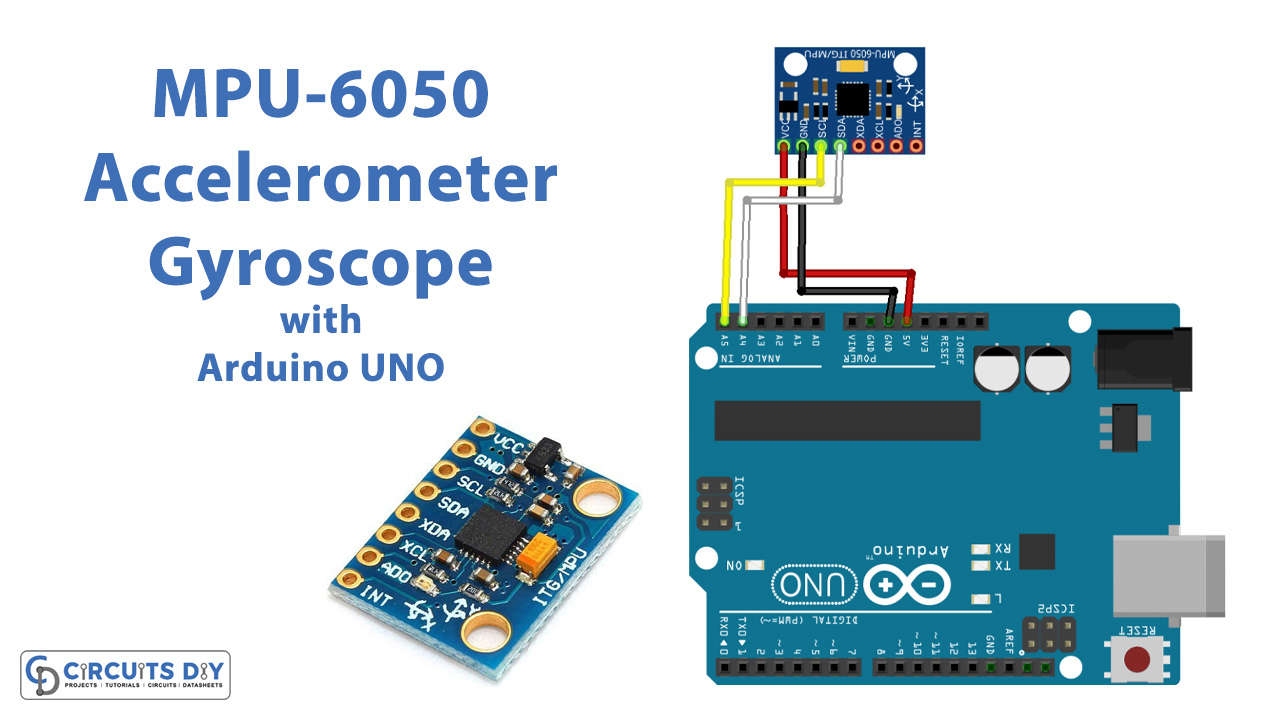
Circuit Diagram
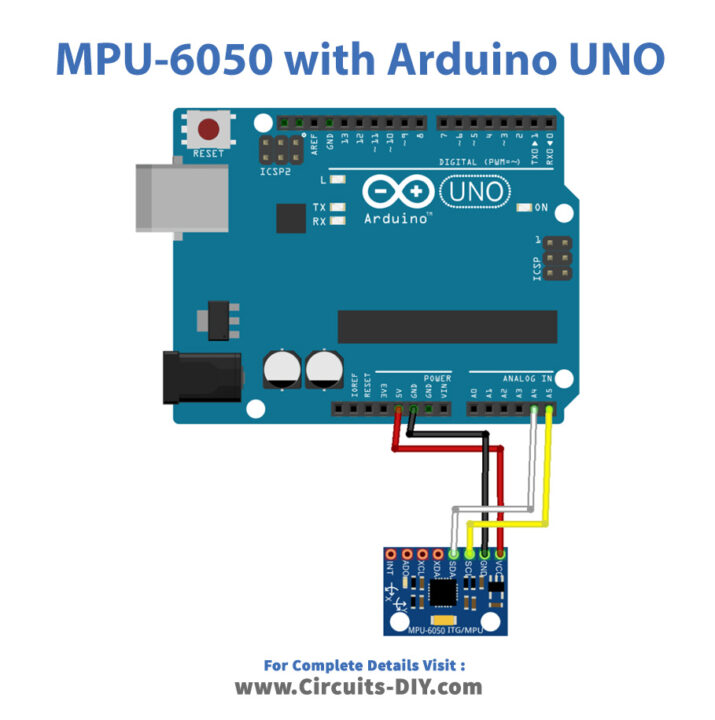
Connection Table
| Arduino | MPU-6050 Accelerometer Gyroscope Sensor |
|---|---|
| A5 | SCL |
| A4 | SDA |
| GND | GND |
| 5V | VCC |
Arduino Code
// Circuits DIY
 // For Complete Details Visit -> https://circuits-diy.com
#include <Adafruit_MPU6050.h>
#include <Adafruit_Sensor.h>
#include <Wire.h>

Adafruit_MPU6050 mpu;

void setup(void) {
  Serial.begin(115200);
  while (!Serial)
    delay(10); // will pause Zero, Leonardo, etc until serial console opens

  Serial.println("Adafruit MPU6050 test!");

  // Try to initialize!
  if (!mpu.begin()) {
    Serial.println("Failed to find MPU6050 chip");
    while (1) {
      delay(10);
    }
  }
  Serial.println("MPU6050 Found!");

  mpu.setAccelerometerRange(MPU6050_RANGE_8_G);
  Serial.print("Accelerometer range set to: ");
  switch (mpu.getAccelerometerRange()) {
  case MPU6050_RANGE_2_G:
    Serial.println("+-2G");
    break;
  case MPU6050_RANGE_4_G:
    Serial.println("+-4G");
    break;
  case MPU6050_RANGE_8_G:
    Serial.println("+-8G");
    break;
  case MPU6050_RANGE_16_G:
    Serial.println("+-16G");
    break;
  }
  mpu.setGyroRange(MPU6050_RANGE_500_DEG);
  Serial.print("Gyro range set to: ");
  switch (mpu.getGyroRange()) {
  case MPU6050_RANGE_250_DEG:
    Serial.println("+- 250 deg/s");
    break;
  case MPU6050_RANGE_500_DEG:
    Serial.println("+- 500 deg/s");
    break;
  case MPU6050_RANGE_1000_DEG:
    Serial.println("+- 1000 deg/s");
    break;
  case MPU6050_RANGE_2000_DEG:
    Serial.println("+- 2000 deg/s");
    break;
  }

  mpu.setFilterBandwidth(MPU6050_BAND_5_HZ);
  Serial.print("Filter bandwidth set to: ");
  switch (mpu.getFilterBandwidth()) {
  case MPU6050_BAND_260_HZ:
    Serial.println("260 Hz");
    break;
  case MPU6050_BAND_184_HZ:
    Serial.println("184 Hz");
    break;
  case MPU6050_BAND_94_HZ:
    Serial.println("94 Hz");
    break;
  case MPU6050_BAND_44_HZ:
    Serial.println("44 Hz");
    break;
  case MPU6050_BAND_21_HZ:
    Serial.println("21 Hz");
    break;
  case MPU6050_BAND_10_HZ:
    Serial.println("10 Hz");
    break;
  case MPU6050_BAND_5_HZ:
    Serial.println("5 Hz");
    break;
  }

  Serial.println("");
  delay(100);
}

void loop() {
  /* Get new sensor events with the readings */
  sensors_event_t a, g, temp;
  mpu.getEvent(&a, &g, &temp);

  /* Print out the values */
  Serial.print("Acceleration X: ");
  Serial.print(a.acceleration.x);
  Serial.print(", Y: ");
  Serial.print(a.acceleration.y);
  Serial.print(", Z: ");
  Serial.print(a.acceleration.z);
  Serial.println(" m/s^2");

  Serial.print("Rotation X: ");
  Serial.print(g.gyro.x);
  Serial.print(", Y: ");
  Serial.print(g.gyro.y);
  Serial.print(", Z: ");
  Serial.print(g.gyro.z);
  Serial.println(" rad/s");

  Serial.print("Temperature: ");
  Serial.print(temp.temperature);
  Serial.println(" degC");

  Serial.println("");
  delay(500);
}
Working Explanation
Firstly, connect the MPU-6050 Accelerometer Gyroscope Sensor with Arduino UNO. Secondly, Copy and paste the above code into your Arduino IDE. Upload the code in Arduino UNO. Begin the serial monitor at the baud rate of 115200. And, press the reset button. Move the sensor. Change its orientation. You can see the different readings of acceleration and rotation. There are also the readings of temperature on Serial Monitor.
Code Explanation
- First, download the libraries Adafruit_MPU6050 and Adafruit_Sensor. You can download the libraries from:
https://github.com/adafruit/Adafruit_MPU6050
- Include the libraries. And, define an Adafruit_MPU6050 object called mpu
- Further, the void setup, first, initialize the serial monitor by serial.begin( ). Then initialize the sensor by mpu.begin. After that set the accelerometer and gyroscope ranges by using setAccelerometerrange( ) and setGyrorange( ). Also, set the filter bandwidth by using setFilterBandwidth( )
- Further, in the void loop, there is a code to print the readings on the x, y, and z-axis. Similarly, there is a code to print angular velocity on the x, y, and z-axis. Finally, the code to print the readings of temperature.
Application and Uses
- Car navigation systems.
- Vehicle control.
- Gaming devices.
- Smartphones, etc.