Introduction
Guitar players always want their instruments to sound their best. A precision guitar tuner circuit can help you achieve that perfect pitch, making your playing sound even more impressive. But why spend hundreds of dollars on a store-bought tuner when you can build your own? With some knowledge and basic electronics skills, you can create a precision guitar tuner circuit that will have you strumming away in no time.
This guide will take you through the step-by-step process of building a guitar tuner circuit from scratch. From selecting the right components to putting everything together, we’ll ensure you have all the information you need to create a circuit that is accurate, reliable, and, most importantly, tunes your guitar perfectly every time.
So, read on to discover how you can build your very own precision guitar tuner circuit!
What actually is Precision Guitar Tuner Circuit?
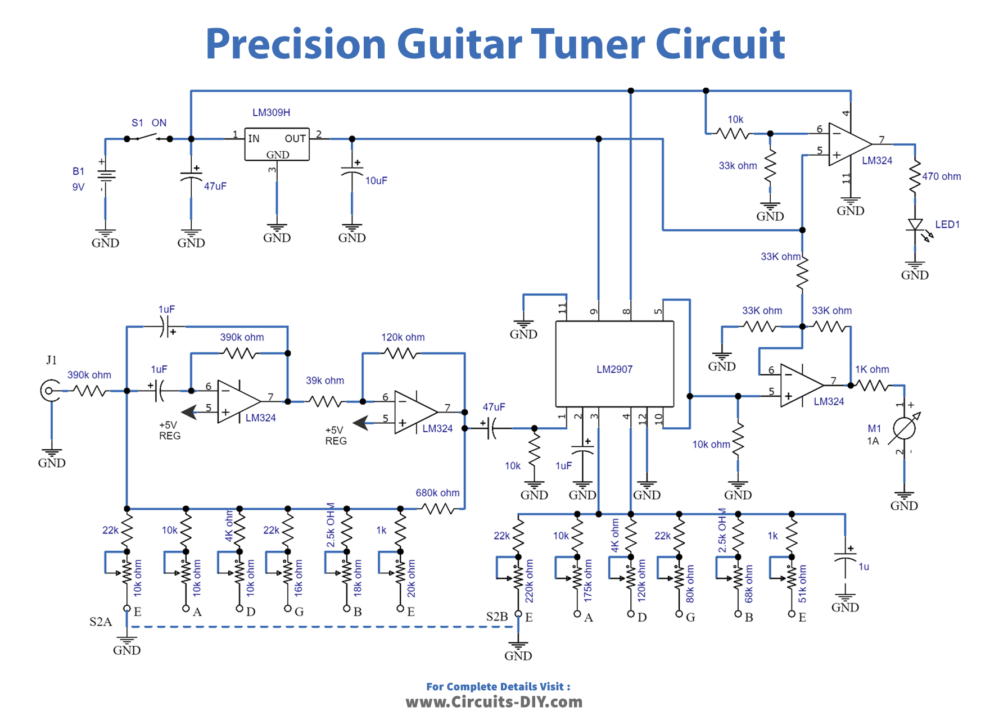
A Precision Guitar Tuner Circuit is a custom-built device that helps musicians tune their guitars accurately and efficiently. Unlike traditional tuning methods, a precision guitar tuner circuit uses electronic components to detect the exact frequency of the notes being played on the guitar. This makes it much easier to achieve the desired pitch, as the tuner can instantly display whether a string is in tune or not.
Precision Guitar Tuner Circuit
Battery and LED Mounting
You can mount a 9-volt battery on the front panel above the meter and use a small battery clip made of sheet metal to secure it. LED1 should not have its leads bent, and flexible wires with multiple colors should be soldered to it.
Advice on Component Substitution
It is advised not to substitute the capacitors C3, C4, and C6 with ceramic capacitors to maintain the accuracy of the circuit. For better testing consistency, metal film resistors may be substituted for those marked with an asterisk (*). LED1 should be secured to the front panel with a small amount of epoxy.
Calibration
The guitar tuner circuit should be calibrated using a precise audio frequency generator and an oscilloscope (or VOM).
Setup
To set up the guitar tuner circuit:
- Adjust the rotary switch to the desired string and set the audio oscillator to 165 Hz.
- Adjust the corresponding potentiometer for a precise meter reading at the middle of the scale.
- Repeat this process for the other five notes.
Working Explanation
This guitar tuner device tunes each guitar string to the desired wavelength. It runs on a 9-volt battery and has a 1 Hz resolution for high precision. A six-position rotary switch is used to select the string being tuned. The tuner has a phono jack to connect the guitar cord. The circuit includes a battery sensor that alerts the user when the battery needs to be replaced. The tuner uses an active bandpass filter to amplify the target frequency and ignore harmonics.
The circuit has six potentiometers and resistors to set the center frequency. The frequency-to-voltage device generates a DC voltage proportional to the input signal frequency. An operational amplifier with a gain of three drives a milliammeter representing a center scale frequency range of 10%. The IC U2C checks the battery’s terminal voltage, and IC U1 provides a steady voltage to IC U3 and IC U2B.
Conclusion
The guitar tuner circuit described in this article is an exact device that eliminates the need for manual tuning. With the right components and setup, the circuit can accurately tune a guitar with a 1 Hz resolution. Make sure to try this circuit, and for any queries, feel free to ask in the comment section. Happy learning!