Introduction
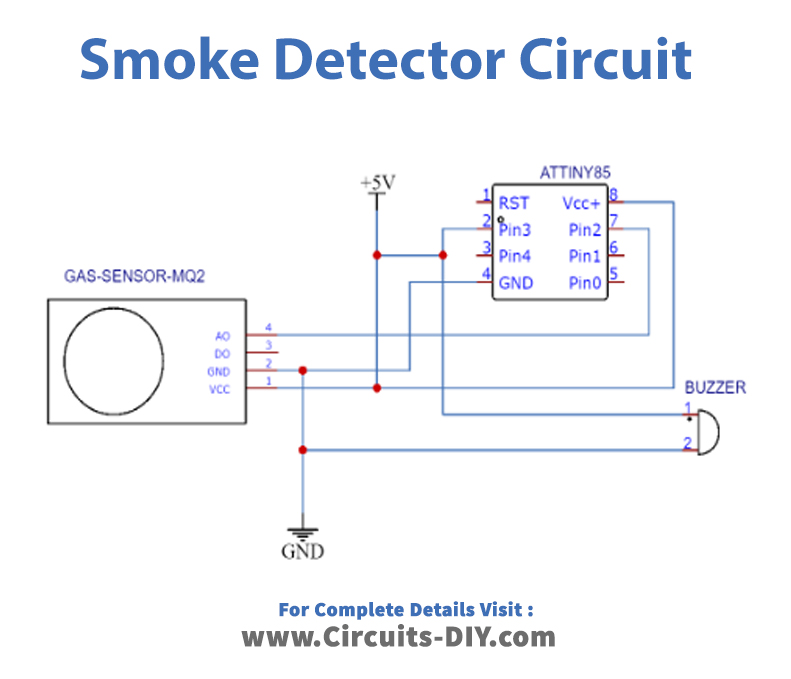
In this tutorial, we are going to make a Simple “Smoke Detector” Alarm using an ATtiny85 microcontroller. In a world with so much instability, we are always in danger of being caught by a fire, which may be harmful to both the environment and individuals. If we don’t take any safety precautions, the odds of being caught in a fire are substantially higher. As a result, a smoke detector should always be present to alert people to the presence of a fire, allowing them to take appropriate action to avoid any loss or damage. This circuit is simple and quick to construct, and it includes an MQ2 smoke that can sense any fire, smoke, or gas. For output, the buzzer is used as an indicator.
Talking about the MQ2 Sensor, two layers of steel surround the Sensor. The voltage is used as the output, dependent on the gas concentration. To put it another way, voltage is proportional to the amount of gas present. The voltage would be more prominent when the concentration of smoke is higher. Similarly, as the concentration decreases, the voltage drops.

JLCPCB is the foremost PCB prototype & manufacturing company in china, providing us with the best service we have ever experienced regarding (Quality, Price Service & Time).
Hardware Components
| S.no | Component | Value | Qty |
|---|---|---|---|
| 1. | IC | Attiny85 | 1 |
| 2. | Buzzer | 5v | 1 |
| 3. | Jumper Wires | – | – |
| 4. | Gas Smoke Sensor | MQ2 | 1 |
Smoke Detector Circuit
Arduino Code
#define MQ2pin (2)  // PB2 Of ATtiny85
float sensorValue;  // variable to store sensor value
int Buzzer = 3;     // PB3 Output Buzzer

void setup()
{
  pinMode(Buzzer, OUTPUT);
  delay(20000); // allow the MQ-6 to warm up
}

void loop()
{
  sensorValue = analogRead(MQ2pin); // read analog input pin 0

  if(sensorValue > 300) // Smoke Detected
  {
  digitalWrite(Buzzer,HIGH);
  delay(2000);
  digitalWrite(Buzzer,LOW);
  }

  delay(2000); // wait 2s for next reading
}
Working Explanation
Connect and interface MQ2 Gas Smoke Sensor with Arduino UNO using the schematic given above. Please copy the code mentioned above and paste it into your Arduino IDE. After that, upload the code in Arduino UNO. observe the readings on the Serial monitor. To examine the drastic changes in the readings, take the device to some smoky place. As a result, you can see the changes happening on the serial monitor.
Code Explanation
- To make the code, first, define the sensor pin. Define the variable sensor value that stores the float value of the sensor.
- In the void setup, initialize the serial monitor by using Serial. begin( ). Print the message ” Gas sensor warming up” by using Serial. Print( ). Give some delay to allow the sensor to warm up.
- In the void loop, read the analog input of Arduino using analogRead( ), and store that in the sensor value. Print sensor value using Serial.print( ). Formulate the condition that if the sensor value is greater than 300, it will print Smoke detected. after that give some delay to get the next readings.
Application and Uses
- It can be utilized in systems that monitor air quality.
- It can also be used in gas leak detection equipment.
- Also in the equipment that detects fires.
- This circuit can also be used by gas leak detectors in the home.
- This circuit might be used in an industrial combustible detector.
- One of its uses is portable gas detectors.
- You can use it in safety maintenance equipment.
- It may be employed in any safety-related equipment