Introduction
Controlling the acceleration, speed, and position of a stepper motor is an important aspect of many robotic and automation projects. In this tutorial, we will learn how to control the acceleration, speed, and position of a stepper motor using an Arduino UNO and an L298N motor driver module. This design scheme is very useful for applications where precise positioning is required, such as in CNC machines, robotics, and automation.
To control a stepper motor with an Arduino Uno, a stepper motor driver is typically used to convert the control signals from the Arduino into the high current and high voltage signals required to drive the stepper motor. The stepper driver can be connected to the Arduino’s digital pins and it uses the digital signals to control the stepper motor.
Hardware Components
You will require the following hardware for Stepper Motor Controlling with Arduino.
| S.no | Component | Value | Qty |
|---|---|---|---|
| 1. | Arduino UNO | – | 1 |
| 2. | USB Cable Type A to B | – | 1 |
| 3. | Stepper Motor Nema 17 | – | 1 |
| 4. | Motor Driver Module | L298N | 1 |
| 5. | Power Adapter | 12V | 1 |
| 6. | DC Power Jack | – | 1 |
| 7. | Power Adapter for Arduino | 9V | 1 |
| 8. | Jumper Wires | – | 1 |
Stepper Motor with Arduino
- Start by including the stepper library at the beginning of your sketch by adding the following line of code:
#include <Stepper.h>
- Declare the stepper motor object, set the number of steps per revolution, and the pin numbers that the motor is connected to, and set the acceleration of the stepper motor:
Stepper mystepper(200, 8, 9, 10, 11);
mystepper.setAcceleration(1000);
- Initialize the L298N motor driver module by declaring the input and output pins for controlling the motor’s direction and speed:
int dirPin1 = 2;
int dirPin2 = 3;
int speedPin = 4;
- In the setup() function, use the pinMode() function to set the input and output pins for the L298N motor driver module:
pinMode(dirPin1, OUTPUT);
pinMode(dirPin2, OUTPUT);
pinMode(speedPin, OUTPUT);
- Use the Serial.begin() function to initialize the serial communication at a specific baud rate:
Serial.begin(9600);
- In the loop() function, use the digitalWrite() function to control the direction of the motor by sending a high or low signal to the input pins of the L298N motor driver module:
digitalWrite(dirPin1, HIGH);
digitalWrite(dirPin2, LOW);
- Use the analogWrite() function to control the speed of the motor by sending a PWM signal to the speed pin of the L298N motor driver module:
analogWrite(speedPin, 255);
- Use the mystepper.move() function to move the stepper motor to a specific position with a specific speed:
mystepper.move(200);
- Use the mystepper.distanceToGo() function to check the remaining steps to reach the target position:
Serial.print("Steps remaining: ");
Serial.println(mystepper.distanceToGo());
- Use the mystepper.currentPosition() function to check the current position of the stepper motor:
Serial.print("Current Position: ");
Serial.println(mystepper.currentPosition());
- Use the mystepper.speed() function to check the current speed of the stepper motor:
Serial.print("Current Speed: ");
Serial.println(mystepper.speed());
- Use the delay() function to pause the program for a specific amount of time to let the stepper motor reach its target position:
delay(1000);Schematic
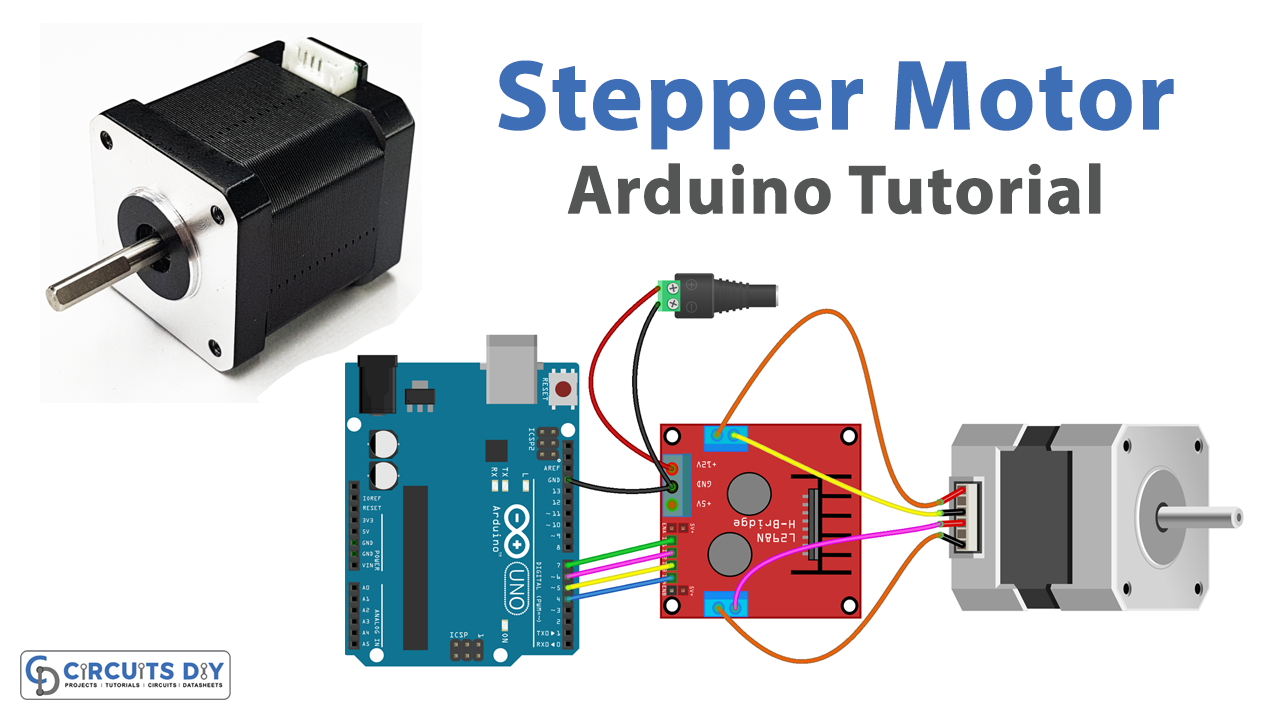
Make connections according to the circuit diagram given below.

Installing Arduino IDE
First, you need to install Arduino IDE Software from its official website Arduino. Here is a simple step-by-step guide on “How to install Arduino IDE“.
Installing Libraries
Before you start uploading a code, download and unzip the following libraries at /Progam Files(x86)/Arduino/Libraries (default), in order to use the sensor with the Arduino board. Here is a simple step-by-step guide on “How to Add Libraries in Arduino IDE“.
Code
Now copy the following code and upload it to Arduino IDE Software.
#include <AccelStepper.h>

#define DEG_PER_STEP 1.8
#define STEP_PER_REVOLUTION (360 / DEG_PER_STEP)

AccelStepper stepper(AccelStepper::FULL4WIRE, 7, 6, 5, 4);

long moveToPosition = STEP_PER_REVOLUTION;

void setup() {
  Serial.begin(9600);

  stepper.setAcceleration(200.0); // set acceleration
  stepper.setSpeed(200);          // set initial speed
  stepper.setCurrentPosition(0);  // set position to 0

  stepper.moveTo(STEP_PER_REVOLUTION); // move motor one revolution, in clockwise direction
  Serial.println("Motor moving in clockwise direction");
}

void loop() {
  if (stepper.distanceToGo() == 0) {
    Serial.println("Motor is stopped");
    delay(5000); // stop 5 seconds
    stepper.setCurrentPosition(0); // reset position to 0
    moveToPosition = -1 * moveToPosition; // reverse direction

    stepper.moveTo(moveToPosition); // move motor one revolution

    if (stepper.distanceToGo() > 0)
      Serial.println("Motor moving in clockwise direction");
    else if (stepper.distanceToGo() < 0)
      Serial.println("Motor moving in anticlockwise direction");
  }

  // Serial.print(F("position: "));
  // Serial.println(stepper.currentPosition());

  stepper.run(); // MUST be called as frequently as possible
}
Working Explanation
The code starts by including the stepper library and declaring the stepper motor object, setting the number of steps per revolution, and the pin numbers that the motor is connected to. Also, it sets the acceleration of the stepper motor that could be adjusted according to the desired speed. In the setup() function, the code initializes the L298N motor driver module by declaring the input and output pins for controlling the motor’s direction and speed. Also, the code initializes the serial communication at a specific baud rate.
In the loop() function, the code uses the digitalWrite() function to control the direction of the motor by sending a high or low signal to the input pins of the L298N motor driver module. And also it uses the analogWrite() function to control the speed of the motor by sending a PWM signal to the speed pin of the L298N motor driver module.
Applications
- CNC machines
- Automation
- 3D printing
- Medical devices
- Measuring instruments
- Industrial control
Conclusion
We hope you have found this Stepper Motor Control Circuit very useful. If you feel any difficulty in making it feel free to ask anything in the comment section.