Introduction
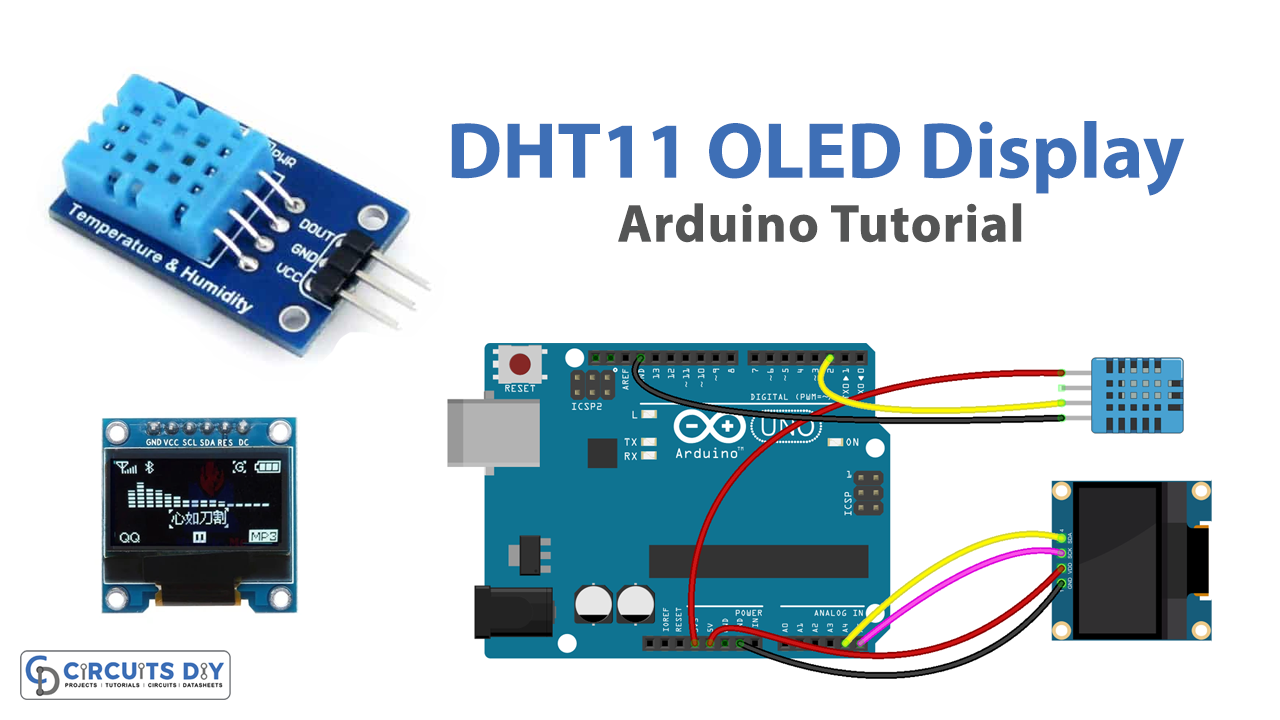
The process of interfacing a DHT11 temperature and humidity sensor with an SSD1306 OLED I2C 128X64 OLED Display module using an Arduino UNO microcontroller involves connecting two essential electronic components to the microcontroller, to create a real-time monitoring system. The DHT11 sensor reads the temperature and humidity values of the environment and sends this data to the OLED display. The OLED display, in turn, displays the temperature and humidity readings in a clear and easy-to-read format. This interfacing setup provides a convenient and effective way to keep track of the temperature and humidity of a specific environment, making it an ideal solution for a wide range of applications such as weather stations, greenhouse monitoring systems, and more.
The SSD1306 OLED I2C 128X64 OLED Display module is a small monochrome organic light-emitting diode (OLED) display that is controlled through an I2C interface. It has a display resolution of 128×64 pixels, and the SSD1306 is the controller chip that manages the display. It’s commonly used for display purposes in various electronics projects and is compact low power, and easily readable in low light conditions.
Hardware Components
You will require the following hardware for Temperature Humidity Sensor OLED Display with Arduino.
| S.no | Component | Value | Qty |
|---|---|---|---|
| 1. | Arduino UNO | – | 1 |
| 2. | USB Cable Type A to B | – | 1 |
| 3. | OLED Display 128×64 | SSD1306 I2C | 1 |
| 4. | Temperature and Humidity Sensor | DHT11 | 1 |
| 5. | Power Adapter for Arduino | 9V | 1 |
| 6. | Jumper Wires | – | 1 |
Temperature Humidity Sensor OLED with Arduino
- Install the required libraries: Adafruit SSD1306 and Adafruit DHT libraries. You can install these libraries from the Arduino IDE Library Manager.
- Include the required libraries in your code:
#include <Wire.h>
#include <Adafruit_SSD1306.h>
#include <Adafruit_Sensor.h>
#include <DHT.h>
- Define the OLED display object:
#define OLED_RESET 4
Adafruit_SSD1306 display(OLED_RESET);
- Initialize the DHT11 sensor and define its pin number:
#define DHTPIN 2
#define DHTTYPE DHT11
DHT dht(DHTPIN, DHTTYPE);
- Define variables for storing the temperature and humidity readings:
float t;
float h;
- In the setup() function, initialize the OLED display and the serial communication:
void setup() {
  display.begin(SSD1306_SWITCHCAPVCC, 0x3C);
  display.clearDisplay();
  display.display();
  Serial.begin(9600);
  dht.begin();
}
- In the loop() function, read the temperature and humidity values from the DHT11 sensor and display them on the OLED display:
void loop() {
  h = dht.readHumidity();
  t = dht.readTemperature();
  display.clearDisplay();
  display.setTextSize(1);
  display.setCursor(0,0);
  display.println("Temp: " + String(t) + " C");
  display.println("Humidity: " + String(h) + " %");
  display.display();
  delay(2000);
}
- Upload the code to the Arduino UNO microcontroller and open the Serial Monitor to see the temperature and humidity readings.
Schematic
Make connections according to the circuit diagram given below.
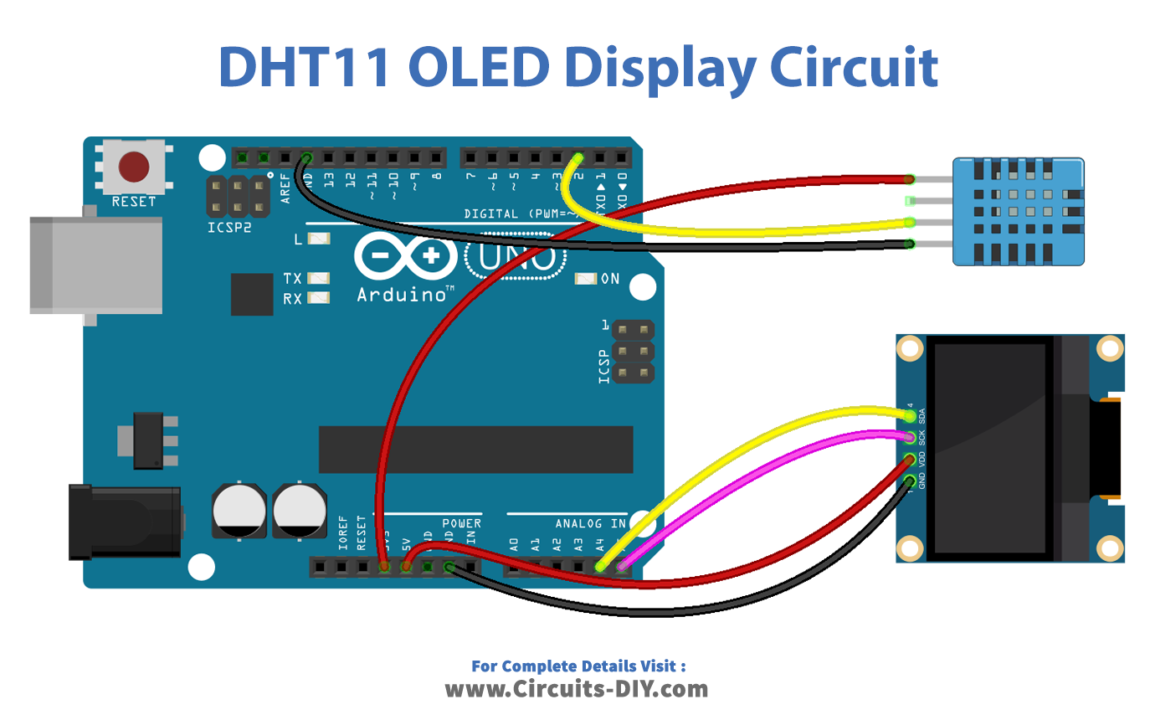
Wiring / Connections
| Arduino | Humidity Sensor | OLED |
|---|---|---|
| 3V3 | VCC | |
| GND | GND | GND |
| D2 | DATA | |
| 5V | VCC | |
| A4 | SDA | |
| A5 | SCL |
Installing Arduino IDE
First, you need to install Arduino IDE Software from its official website Arduino. Here is a simple step-by-step guide on “How to install Arduino IDE“.
Installing Libraries
Before you start uploading a code, download and unzip the following libraries at /Program Files(x86)/Arduino/Libraries (default), in order to use the sensor with the Arduino board. Here is a simple step-by-step guide on “How to Add Libraries in Arduino IDE“.
Code
Now copy the following code and upload it to Arduino IDE Software.
#include <Wire.h>
#include <Adafruit_GFX.h>
#include <Adafruit_SSD1306.h>
#include <DHT.h>

#define SCREEN_WIDTH 128 // OLED display width,  in pixels
#define SCREEN_HEIGHT 64 // OLED display height, in pixels

#define DHTPIN 2 // pin connected to DHT11 sensor
#define DHTTYPE DHT11

Adafruit_SSD1306 oled(SCREEN_WIDTH, SCREEN_HEIGHT, &Wire, -1); // create SSD1306 display object connected to I2C
DHT dht(DHTPIN, DHTTYPE);

String displayString;

void setup() {
  Serial.begin(9600);

  // initialize OLED display with address 0x3C for 128x64
  if (!oled.begin(SSD1306_SWITCHCAPVCC, 0x3C)) {
    Serial.println(F("SSD1306 allocation failed"));
    while (true);
  }

  delay(2000);         // wait for initializing
  oled.clearDisplay(); // clear display

  oled.setTextSize(2);      // text size
  oled.setTextColor(WHITE); // text color
  oled.setCursor(0, 10);    // position to display

  dht.begin();              // initialize DHT11 the temperature and humidity sensor

  displayString.reserve(10); // to avoid fragmenting memory when using String
}

void loop() {
  float humi  = dht.readHumidity();    // read humidity
  float tempC = dht.readTemperature(); // read temperature

  // check if any reads failed
  if (isnan(humi) || isnan(tempC)) {
    displayString = "Failed";
  } else {
    displayString  = String(tempC, 1); // one decimal places
    displayString += "°C";
    displayString += String(humi, 1); // one decimal places
    displayString += "%";
  }

  Serial.println(displayString);    // print the temperature in Celsius to Serial Monitor
  oledDisplayCenter(displayString); // display temperature and humidity on OLED
}

void oledDisplayCenter(String text) {
  int16_t x1;
  int16_t y1;
  uint16_t width;
  uint16_t height;

  oled.getTextBounds(text, 0, 0, &x1, &y1, &width, &height);

  // display on horizontal and vertical center
  oled.clearDisplay(); // clear display
  oled.setCursor((SCREEN_WIDTH - width) / 2, (SCREEN_HEIGHT - height) / 2);
  oled.println(text); // text to display
  oled.display();
}
Working Explanation
The code starts with including the necessary libraries for the OLED display and DHT11 sensor. The OLED display and DHT11 sensor are defined using the Adafruit_SSD1306 and DHT classes, respectively. The DHT11 sensor is connected to the Arduino UNO on digital pin 2.
The setup function initializes the Serial Monitor and the OLED display sets the text size and color and defines the cursor position. The DHT11 sensor is also initialized in the setup function. The loop function reads the temperature and humidity data from the DHT11 sensor and stores it in a string. The temperature and humidity data is then printed on the Serial Monitor and displayed on the OLED display in the center. The oledDisplayCenter function is used to clear the OLED display, calculate the center position of the text to display and print the text on the OLED display.
Applications
- Environmental monitoring
- Indoor climate control
- Agriculture monitoring
- Weather monitoring stations
- HVAC systems
- Greenhouse temperature and humidity control
- Home automation
- Humidor control
- Warehouse temperature and humidity control
Conclusion.
We hope you have found this Temperature Humidity Sensor OLED Circuit very useful. If you feel any difficulty in making it feel free to ask anything in the comment section.
Related posts:
 How to Interface 2 DC Motors Via Bluetooth with Arduino UNO
 Interfacing ADS1232 High Precision 24-Bit ADC with Arduino
 WS2812B Addressable RGB LED Interfacing with Arduino
 Interfacing A3967 Stepper Motor Driver with Arduino
 Micro SD Card - Arduino Tutorial
 Interfacing DS3231 Precision RTC Module with Arduino