Introduction
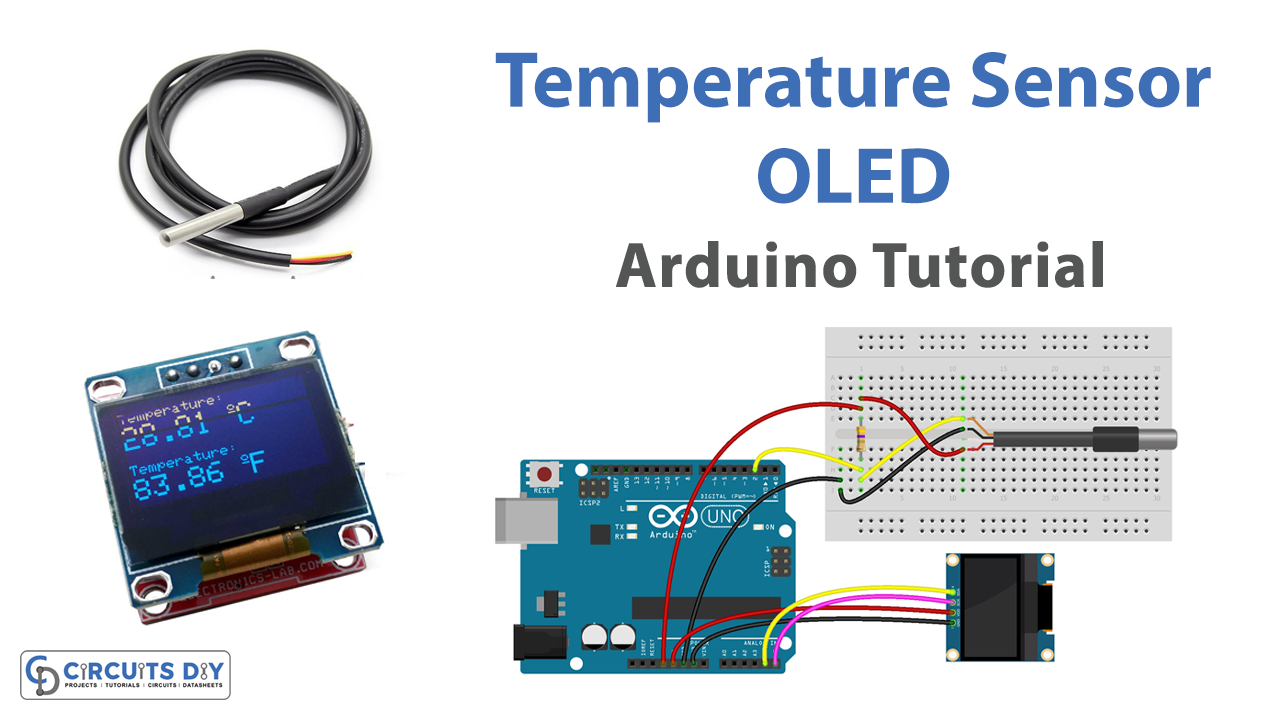
Combining digital electronics, programming, and data visualization, interfacing a DS18B20 temperature sensor module with an SSD1306 OLED I2C 128×64 display using an Arduino UNO microcontroller is an exciting and educational project. This project allows you to create a real-time temperature monitoring system that can be utilized in a variety of applications such as weather stations, HVAC systems, and more. The DS18B20 temperature sensor provides precise temperature readings in degrees Celsius, while the SSD1306 OLED display acts as a visual interface for the temperature data.
The DS18B20 is a digital temperature sensor that measures temperature and outputs the data in digital form. It is a small, inexpensive device that is widely used in various temperature-sensing applications. The DS18B20 temperature sensor uses a 1-Wire interface, which allows multiple sensors to be connected to the same bus while maintaining unique addresses for each sensor. This makes it ideal for use in applications where multiple temperature readings are required, such as in weather stations or HVAC systems.
Hardware Components
You will require the following hardware for Temperature Sensor OLED with Arduino.
| S.no | Component | Value | Qty |
|---|---|---|---|
| 1. | Arduino UNO | – | 1 |
| 2. | USB Cable Type A to B | – | 1 |
| 3. | OLED Display 128×64 | SSD1306 I2C | 1 |
| 4. | Temperature Sensor | DS18B20 | 1 |
| 5. | Power Adapter for Arduino | 9V | 1 |
| 6. | Resistor | 4.7kΩ | 1 |
| 7. | Breadboard | – | 1 |
| 8. | Jumper Wires | – | 1 |
Temperature Sensor OLED with Arduino
- Include the required libraries:
#include <OneWire.h>
#include <DallasTemperature.h>
#include <Wire.h>
#include <Adafruit_GFX.h>
#include <Adafruit_SSD1306.h>
OneWire.hthe library is used to communicate with the DS18B20 temperature sensor using the OneWire protocol.DallasTemperature.hthe library is used to read the temperature data from the DS18B20.Wire.hthe library is used for I2C communication between the OLED display and the Arduino.Adafruit_GFX.handAdafruit_SSD1306.hlibraries are used to control and display data on the SSD1306 OLED display.
- Define the OLED display I2C address and pin numbers:
#define OLED_ADDRESS 0x3C
#define OLED_SDA 4
#define OLED_SCL 15
#define OLED_RST 16
- Create objects for the DS18B20 temperature sensor and the OLED display:
OneWire oneWire(2);
DallasTemperature sensors(&oneWire);
Adafruit_SSD1306 display(OLED_ADDRESS, OLED_SDA, OLED_SCL, OLED_RST);
oneWireis an object of theOneWireclass that is used to communicate with the DS18B20 temperature sensor. TheOneWireclass constructor takes the pin number of the data line as a parameter. In this case, the data line is connected to digital pin 2 of the Arduino.sensorsis an object of theDallasTemperatureclass that is used to read temperature data from the DS18B20. TheDallasTemperatureclass constructor takes a pointer to theOneWireobject as a parameter.displayis an object of theAdafruit_SSD1306class that is used to control and display data on the OLED display. TheAdafruit_SSD1306class constructor takes the I2C address, SDA pin number, SCL pin number, and reset the pin number of the OLED display as parameters.
- Set up the OLED display in the
setupfunction:
void setup() {
  display.begin(SSD1306_SWITCHCAPVCC, 0x3C);
  display.clearDisplay();
  display.setTextSize(1);
  display.setTextColor(WHITE);
  display.display();
  sensors.begin();
}
display.begininitializes the OLED display and sets the power supply mode toSSD1306_SWITCHCAPVCC.display.clearDisplayclears the display buffer.display.setTextSizesets the text size to 1, which is the default size.display.setTextColorsets the text color to white.display.displayupdates the display with the data in the buffer.sensors.begininitializes the DS18B20 temperature sensor.
- Read temperature data and display it on the OLED display in the
loopfunction:
void loop() {
  sensors.requestTemperatures();
  float temperatureC = sensors.getTempCByIndex(0);
  float temperatureF = (temperatureC * 9 / 5) + 32;

  display.clearDisplay();
  display.setCursor(0,0);
  display.print("Temperature");
  display.setCursor(0,15);
  display.print(temperatureC);
  display.print((char)223);
  display.print("C");
  display.setCursor(0,30);
  display.print(temperatureF);
  display.print((char)223);
  display.print("F");
  display.display();
  delay(1000);
}
sensors.requestTemperaturesrequests temperature data from the DS18B20 temperature sensor.sensors.getTempCByIndexretrieves the temperature data in degrees Celsius. ThegetTempCByIndexfunction takes the index of the device as a parameter. In this case, since we only have one DS18B20 temperature sensor, we pass 0 as the index.temperatureFcalculates the temperature in degrees Fahrenheit using the formula(temperatureC * 9 / 5) + 32.display.clearDisplayclears the display buffer.display.setCursorsets the cursor position for the next character to be printed.display.printdisplays the text on the OLED display. Theprintfunction takes a string or a character as a parameter.display.displayupdates the display with the data in the buffer.delaywaits for the specified time in milliseconds. In this case, it waits for 1000 milliseconds, or 1 second.
Schematic
Make connections according to the circuit diagram given below.
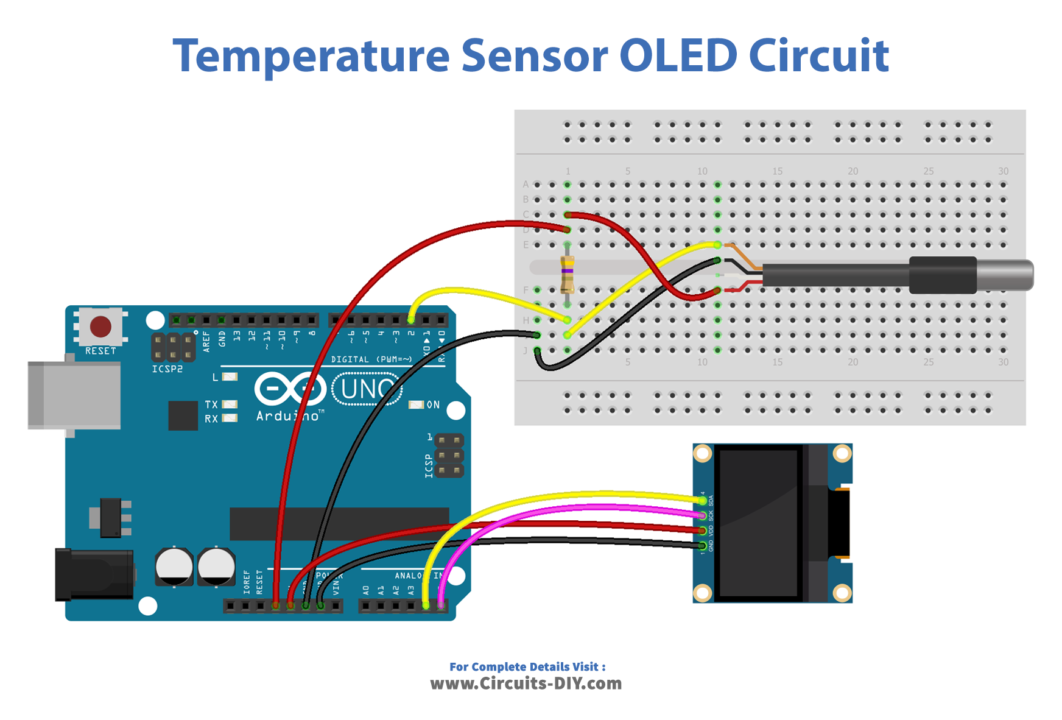
Wiring / Connections
| Arduino | Sensor | |
|---|---|---|
| 5V | VCC | |
| GND | GND | GND |
| A4 | SDA | |
| A5 | SCL | |
| 3V3 | VCC | |
| D2 | ANALOG OUT |
Installing Arduino IDE
First, you need to install Arduino IDE Software from its official website Arduino. Here is a simple step-by-step guide on “How to install Arduino IDE“.
Installing Libraries
Before you start uploading a code, download and unzip the following libraries at /Progam Files(x86)/Arduino/Libraries (default), in order to use the sensor with the Arduino board. Here is a simple step-by-step guide on “How to Add Libraries in Arduino IDE“.
Code
Now copy the following code and upload it to Arduino IDE Software.
#include <Wire.h>
#include <Adafruit_GFX.h>
#include <Adafruit_SSD1306.h>
#include <OneWire.h>
#include <DallasTemperature.h>

#define SCREEN_WIDTH 128 // OLED display width,  in pixels
#define SCREEN_HEIGHT 64 // OLED display height, in pixels

#define SENSOR_PIN 2 // Arduino pin connected to DS18B20 sensor's DQ pin

Adafruit_SSD1306 oled(SCREEN_WIDTH, SCREEN_HEIGHT, &Wire, -1); // create SSD1306 display object connected to I2C
OneWire oneWire(SENSOR_PIN);         // setup a oneWire instance
DallasTemperature tempSensor(&oneWire); // pass oneWire to DallasTemperature library

String tempString;

void setup() {
  Serial.begin(9600);

  // initialize OLED display with address 0x3C for 128x64
  if (!oled.begin(SSD1306_SWITCHCAPVCC, 0x3C)) {
    Serial.println(F("SSD1306 allocation failed"));
    while (true);
  }

  delay(2000);         // wait for initializing
  oled.clearDisplay(); // clear display

  oled.setTextSize(2);          // text size
  oled.setTextColor(WHITE);     // text color
  oled.setCursor(0, 10);        // position to display

  tempSensor.begin();     // initialize the sensor
  tempString.reserve(10); // to avoid fragmenting memory when using String
}

void loop() {
  tempSensor.requestTemperatures();             // send the command to get temperatures
  float tempCelsius = tempSensor.getTempCByIndex(0);  // read temperature in Celsius

  tempString  = String(tempCelsius, 2); // two decimal places
  tempString += "°C";

  Serial.println(tempString); // print the temperature in Celsius to Serial Monitor
  oledDisplayCenter(tempString);
}

void oledDisplayCenter(String text) {
  int16_t x1;
  int16_t y1;
  uint16_t width;
  uint16_t height;

  oled.getTextBounds(text, 0, 0, &x1, &y1, &width, &height);

  // display on horizontal and vertical center
  oled.clearDisplay(); // clear display
  oled.setCursor((SCREEN_WIDTH - width) / 2, (SCREEN_HEIGHT - height) / 2);
  oled.println(text); // text to display
  oled.display();
}
Working Explanation
The setup() function in the code initializes the environment and set up the communication between the devices. It sets up the OLED display, initializes the temperature sensor, and configures the communication between the OLED display and the microcontroller.
The loop() function is called repeatedly in an infinite loop and is used to execute the main logic of the program. It reads the temperature data from the DS18B20 temperature sensor, converts the temperature data to either Celsius or Fahrenheit and displays the converted temperature data on the SSD1306 OLED display.
Applications
- Home automation
- Environmental monitoring
- Medical devices
- Industrial processes
- Agricultural applications
- DIY projects
- Testing and debugging.
Conclusion.
We hope you have found this Temperature Sensor OLED Circuit very useful. If you feel any difficulty in making it feel free to ask anything in the comment section.