Introduction
We live in a modern era where we use mobile devices as music players, news sources, podcast listeners, etc. But, in the past, everyone listened to their local FM radio station for the latest music and news. While this practice is beginning to fade as more people rely on streaming media, radios still serve a crucial purpose. Since the radio frequencies that stations send out constantly change, you need an FM receiver circuit to turn them into sounds you can hear.
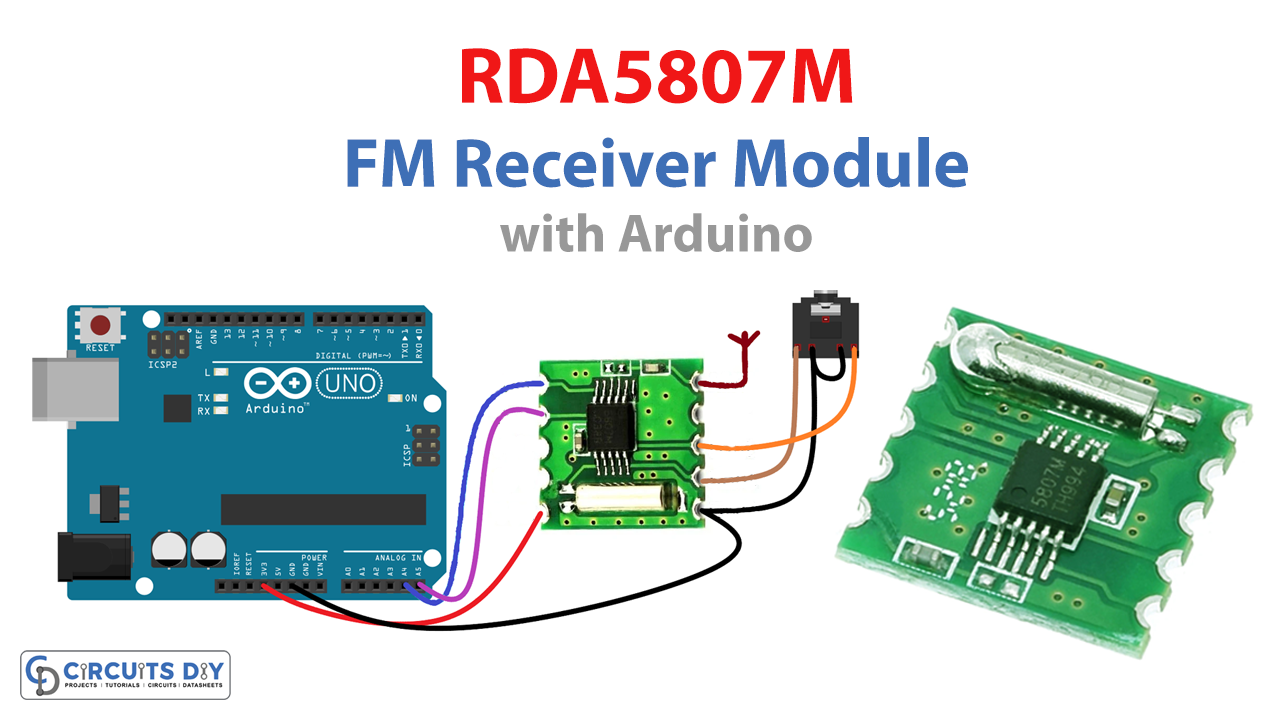
So, this tutorial is about Arduino RDA5807M FM Receiver. The RDA5807M FM Receiver is simply one of a few simple electronic parts used in the building of this circuit. They may be found easily online for a very cheap price.
What is Arduino RDA5807M FM Receiver?
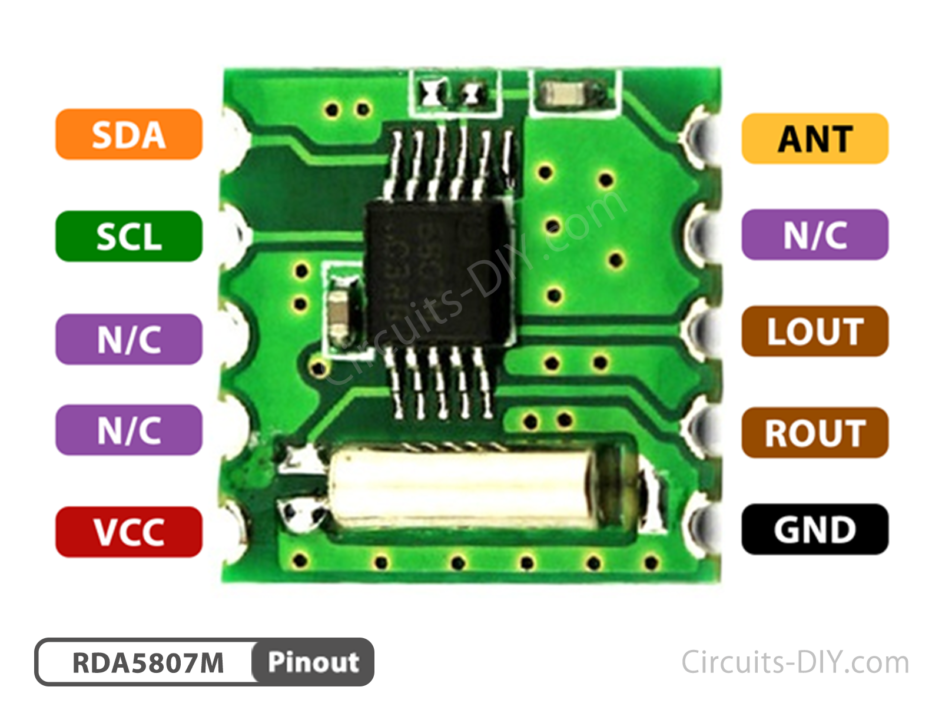
The RDA5807M is the newest single-chip broadcast FM stereo radio tuner. It has fully integrated synthesizers, IF selectivity, RDS/RBDS decoders, and MPX decoders. The tuner is manufactured using CMOS, supports many interfaces, and has the lowest possible need for an external component. This RDA5807M receiver, when interfaced with Arduino, named as Arduino RDA5807M FM Receiver
Hardware Components
You will require the following hardware for the Arduino RDA5807M FM Receiver.
| S.no | Components | Value | Qty |
|---|---|---|---|
| 1 | Arduino | UNO | 1 |
| 2 | FM Receiver | RDA5807M | 1 |
| 3 | Audio Jack Female Connector | 3.5 | 1 |
| 4 | Breadboard | – | 1 |
| 5 | Jumper Wires | – | 1 |
In the hardware section above, you’ll find a list of all the electronic components you need to make an Arduino RDA5807M FM Receiver. Once you have all of them, you need to proceed with the steps that are listed below:
Schematic
Make connections according to the circuit diagram given below.
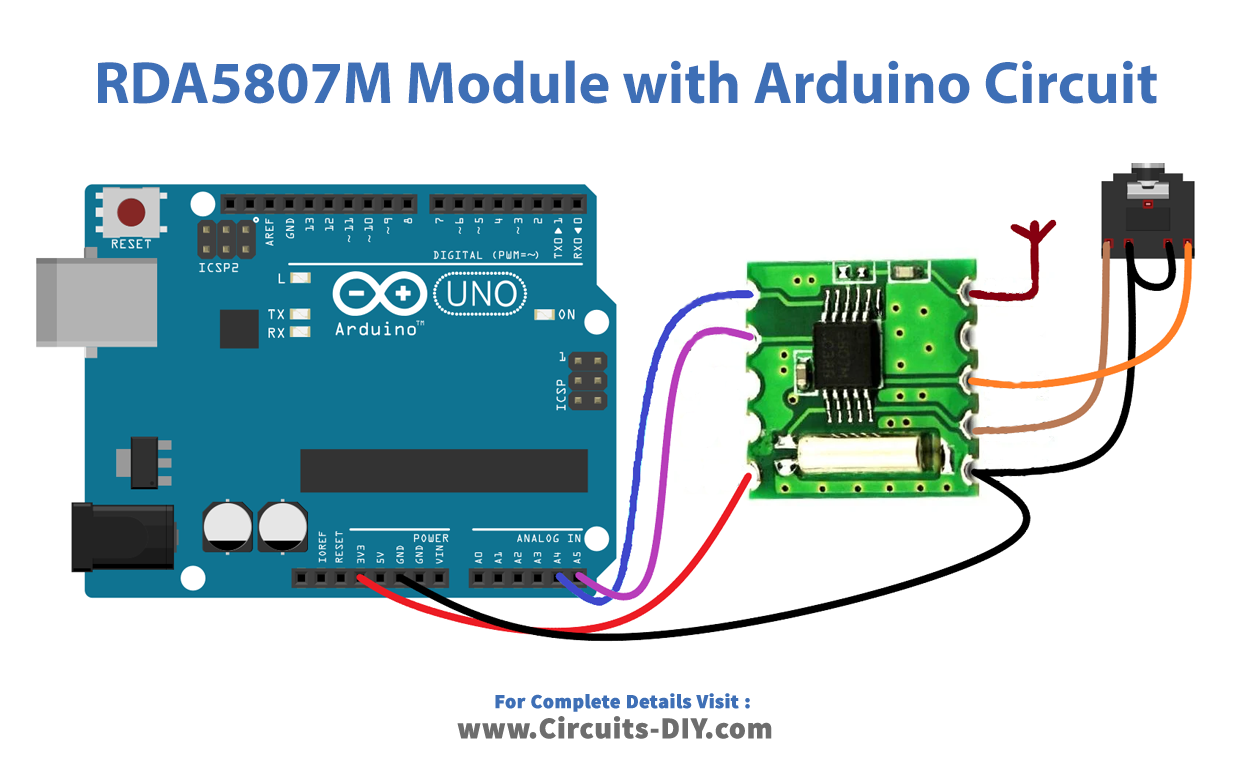
Wiring / Connections
| Arduino | RDA5807M FM Receiver | 3.5 Audio Jack Female |
|---|---|---|
| GND | GND | GND |
| 3.3V | Vcc | |
| A4 | SDA | |
| A5 | SCL | |
| R | R | |
| L | L |
Installing Arduino IDE
First, you need to install Arduino IDE Software from its official website Arduino. Here is a simple step-by-step guide on “How to install Arduino IDE“.
Installing Libraries
Before you start uploading a code, download and unzip the following libraries at /Progam Files(x86)/Arduino/Libraries (default), in order to use the sensor with the Arduino board. Here is a simple step-by-step guide on “How to Add Libraries in Arduino IDE“.
Code
Now copy the following code and upload it to Arduino IDE Software.
/*
/// \author Matthias Hertel, http://www.mathertel.de
/// \copyright Copyright (c) 2014 by Matthias Hertel.\n
/// This work is licensed under a BSD style license. See http://www.mathertel.de/License.aspx
/// More documentation and source code is available at http://www.mathertel.de
ArduinoExample code for RDA5807M Arduino FM receiver.
Compiled&Tested by Riyaz
*/

#include <Arduino.h>
#include <Wire.h>
#include <radio.h>
#include <RDA5807M.h>
#define FIX_BAND     RADIO_BAND_FM    //Radio Band -FM
#define FIX_STATION  10050            //Station Tuned = 100.50 MHz.
#define FIX_VOLUME   5               //Audio Volume Level 5.

RDA5807M radio;

void setup() {

  Serial.begin(57600);
  Serial.println("FM Radio");
  delay(200);
  radio.init();
  radio.debugEnable();
  radio.setBandFrequency(FIX_BAND, FIX_STATION);
  radio.setVolume(FIX_VOLUME);
  radio.setMono(false);
  radio.setMute(false);
}

void loop() {
  char s[12];
  radio.formatFrequency(s, sizeof(s));
  Serial.print("Station:");
  Serial.println(s);
  Serial.print("Radio:");
  radio.debugRadioInfo();
  Serial.print("Audio:");
  radio.debugAudioInfo();
  delay(3000);
}
Let’s Test It
When the circuit is connected and the code is uploaded to the Arduino, testing may begin. Once power is applied to the Arduino, the circuit becomes activated. The serial monitor will show the results.
Working Explanation
- We first include the required libraries. Because without them, code won’t work. We also define some variables, which we will use further in the code.
- Now comes the void setup; here, we initialize the serial monitor and the sensor. We then set some parameters like volume and band frequency.
- In the void loop, we give the code to run once. By this code, you could receive the information and print that on the serial monitor.
Applications
- Radar
- Two-way radio communication systems
- Music synthesis
- Some video-transmission systems.
Conclusion
We hope you have found this Arduino RDA5807M FM Receiver Circuit very useful. If you feel any difficulty in making it feel free to ask anything in the comment section.