Introduction
The Ultrasonic Range Finder using an Arduino UNO and a 16×2 LCD display is a fascinating project that combines electronics and programming to create a device that can measure distances using sound waves and display the results on an LCD screen. This project is a great way to learn about the basics of Arduino programming and electronic circuits while also developing practical skills that can be used in a wide range of applications. Whether you are interested in robotics, or automation, or just want to learn something new, this project is an excellent starting point that can help you build a foundation for future projects.
Ultrasonic range finders are electronic devices that use sound waves to determine the distance between the sensor and an object. They work by emitting high-frequency sound waves that travel through the air and bounce off any objects in their path. The sensor then detects the reflected sound waves and measures the time it takes for them to return to the sensor.
Hardware Components
You will require the following hardware for the Ultrasonic Range Finder.
| Components | Value | Qty |
|---|---|---|
| Arduino UNO | – | 1 |
| Ultrasonic Sensor | HCSR04 | 1 |
| I2C Display | – | 1 |
| 16×2 LCD | – | 1 |
| Breadboard | – | 1 |
| Jumper Wires | – | 1 |
Code Explanation
- Include the required libraries:
#include <Wire.h>
#include <LiquidCrystal_I2C.h>
The Wire.h the library is used for I2C communication and the LiquidCrystal_I2C.h library is used to control the LCD screen.
- Create an LCD object and define the pins:
LiquidCrystal_I2C lcd(0x27, 16, 2);
This creates an lcd object that is used to control the LCD screen. The first argument, 0x27, is the I2C address of the LCD module. The second and third arguments specify the number of columns and rows on the LCD.
- Define the trigger and echo pins of the ultrasonic sensor:
const int trigPin = 9;
const int echoPin = 10;
The trigPin is the pin that sends out a short pulse to trigger the ultrasonic sensor, while the echoPin is the pin that receives the pulse after it bounces back from an obstacle.
- Declare variables to store the duration and distance:
long duration;
int distanceCm, distanceInch;
The duration variable stores the time taken for the sound wave to travel back and forth between the sensor and the obstacle, while the distanceCm and distanceInch variables store the distance measured in centimeters and inches, respectively.
- Initialize the LCD screen, start serial communication, and set pin modes:
void setup() {
  lcd.init();
  lcd.backlight();
  Serial.begin(9600);
  pinMode(trigPin, OUTPUT);
  pinMode(echoPin, INPUT);
}
The lcd.init() function initializes the LCD screen, while lcd.backlight() turns on the backlight. Serial.begin(9600) starts the serial communication with a baud rate of 9600. pinMode() sets the trigPin as an output and the echoPin as an input.
- Measure the distance using the ultrasonic sensor:
void loop() {
  digitalWrite(trigPin, LOW);
  delayMicroseconds(2);
  digitalWrite(trigPin, HIGH);
  delayMicroseconds(10);
  digitalWrite(trigPin, LOW);
  duration = pulseIn(echoPin, HIGH);
  distanceCm = duration * 0.034 / 2;
  distanceInch = duration * 0.0133 / 2;
}
The digitalWrite() function sends a short pulse to the trigPin to trigger the ultrasonic sensor. delayMicroseconds() waits for a short period before setting the trigPin back to low. The pulseIn() function measures the duration of the sound wave and stores it in the duration variable. The distance is then calculated in centimeters and inches using the formulas distanceCm = duration * 0.034 / 2 and distanceInch = duration * 0.0133 / 2, respectively.
- Display the distance on the LCD screen and serial monitor:
void loop() {
  // Previous code ...

  Serial.println("Distance: ");
  Serial.println(distanceCm);
  lcd.setCursor(0, 0);
  lcd.print("Distance: ");
  lcd.print(distanceCm);
  lcd.print(" cm ");
}
The Serial.println() function prints the distance value in centimeters to the serial monitor. The lcd.setCursor() function sets the cursor position on the LCD screen and prints the distance in centimeters using the lcd.print() function.
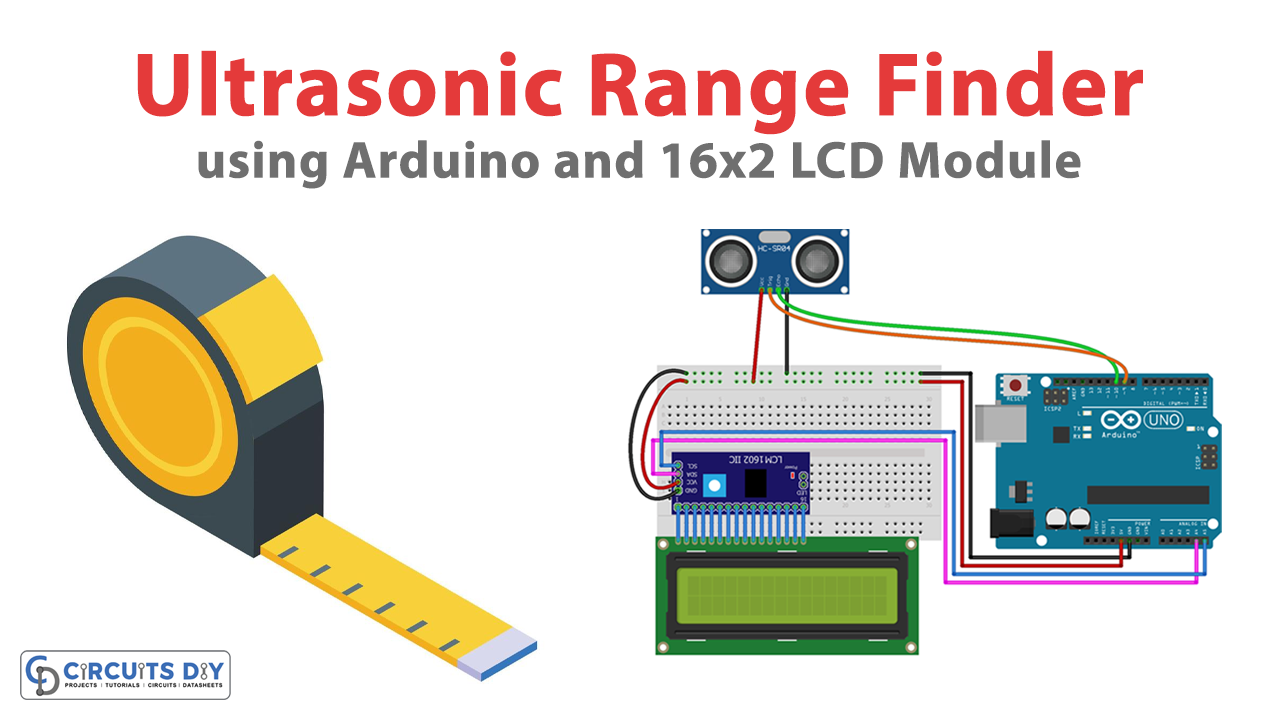
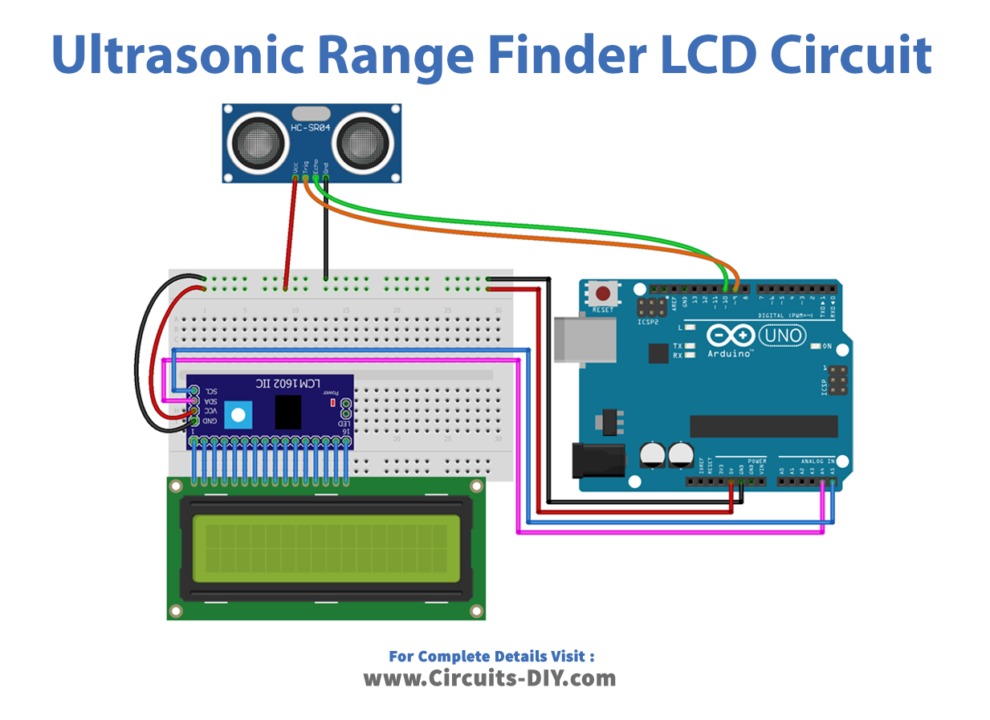
Schematic
Make connections according to the circuit diagram given below.
Installing Arduino IDE
First, you need to install Arduino IDE Software from its official website Arduino. Here is a simple step-by-step guide on “How to install Arduino IDE“.
Installing Libraries
Before you start uploading a code, download and unzip the following libraries at /Program Files(x86)/Arduino/Libraries (default), in order to use the sensor with the Arduino board. Here is a simple step-by-step guide on “How to Add Libraries in Arduino IDE“.
Code
Now copy the following code and upload it to Arduino IDE Software.
 #include <Wire.h>
 #include <LiquidCrystal_I2C.h>
 LiquidCrystal_I2C lcd(0x27,16,2);
 const int trigPin = 9;
 const int echoPin = 10;
 long duration;
 int distanceCm, distanceInch;
 void setup()
 {
 lcd.init();
 lcd.backlight();
 Serial.begin(9600);
 pinMode(trigPin, OUTPUT);
 pinMode(echoPin, INPUT);
 }
 void loop() {
 digitalWrite(trigPin, LOW);
 delayMicroseconds(2);
 digitalWrite(trigPin, HIGH);
 delayMicroseconds(10);
 digitalWrite(trigPin, LOW);
 duration = pulseIn(echoPin, HIGH);
 distanceCm= duration*0.034/2;
 distanceInch = duration*0.0133/2;
 Serial.println("Distance: ");
 Serial.println(distanceCm);
 lcd.setCursor(0,0); // Sets the location at which subsequent text written to the LCD will be displayed
 lcd.print("Distance: "); // Prints string "Distance" on the LCD
 lcd.print(distanceCm); // Prints the distance value from the sensor
 lcd.print(" cm ");
 }
Working Explanation
The code starts by including the required libraries: Wire.h for I2C communication and LiquidCrystal_I2C.h for controlling the LCD screen. It then initializes the LCD screen with the address 0x27, 16 columns and 2 rows. Next, the code defines two constants: trigPin and echoPin, which are connected to the trigger and echo pins of the ultrasonic sensor, respectively. It also declares variables to store the duration of the sound wave and the distance measured in centimeters and inches.
In the setup() function, the LCD screen is initialized, the serial communication is started with a baud rate of 9600, and the trigger and echo pins are set as output and input, respectively. The loop() function repeatedly sends a short pulse to the trigger pin, which sends out a sound wave. The echo pin then receives the sound wave after it bounces back from an obstacle. The duration of the sound wave is measured using the pulseIn() function, which calculates the time taken for the sound wave to travel back and forth between the sensor and the obstacle.
The distance is then calculated in centimeters and inches using the formula distanceCm = duration * 0.034 / 2 and distanceInch = duration * 0.0133 / 2, respectively. The values are then printed to the serial monitor and displayed on the LCD screen. The LCD cursor is first set to the top-left corner using the setCursor() function. The string “Distance: ” is then printed using the print() function, followed by the distance value in centimeters and the unit “cm”. This process repeats continuously, allowing the distance to be updated in real-time on the LCD screen.
Applications
- Obstacle detection
- Parking assistance
- Distance measurement
- Liquid level measurement
- Security systems
- Medical imaging
- Flow measurement
Related posts:
 LM35 Temperature Sensor - Arduino Tutorial
 Send Receive SMS & Call with SIM900 GSM Shield
 Interface Nokia 5110 Graphic LCD Display with Arduino
 Door Sensor with Piezo Buzzer - Arduino Tutorial
 Interfacing MPR121 Capacitive Touch Sensor Module with Arduino
 Arduino - Cooling System using DS18B20 Temperature Sensor