Introduction
Controlling the temperature of a space or an environment is a critical task in many fields of engineering, such as HVAC systems, industrial process control, and home automation. One of the most effective ways to control temperature is by regulating the airflow in the space. This is where the use of a 12V DC fan comes in. In order to automate the control of the fan based on temperature, an Arduino microcontroller, a DS18B20 temperature sensor, and a 5V SPDT relay can be used.
The DS18B20 temperature sensor is a digital thermometer that can measure temperatures in a range of -55°C to +125°C with a resolution of 9 to 12 bits. The Arduino microcontroller reads the temperature value from the sensor and compares it to a pre-defined threshold temperature value. This system provides an efficient and automated way of controlling the fan based on temperature, ensuring a comfortable and safe environment for the users.
Hardware Components
You will require the following hardware for making a Cooling System using DS18B20 Temperature Sensor with Arduino.
| S.no | Component | Value | Qty |
|---|---|---|---|
| 1. | Arduino | UNO | 1 |
| 2. | USB Cable Type A to B | – | 1 |
| 3. | Temperature Sensor | DS18B20 | 1 |
| 4. | Relay | – | 1 |
| 5. | Cooling Fan | 12V | 1 |
| 6. | DC Power Jack | – | 1 |
| 7. | Power Adaptekr for Arduino | 9V | 1 |
| 8. | Resistor | 4.7KΩ | 1 |
| 9. | Power Adapter | 12V | 1 |
| 10. | Jumper Wires | – | 1 |
DS18B20 Cooling System with Arduino
- Start by including the necessary libraries for the OneWire and the DallasTemperature at the beginning of your code:
#include <OneWire.h>
#include <DallasTemperature.h>
- Define the pin number for the relay, the temperature sensor, and the threshold temperature value in your code:
const int relayPin = 3;
const int tempSensorPin = 2;
const float thresholdTemp = 25; // Threshold temperature value in Celsius
- Create an instance of the OneWire and DallasTemperature library
OneWire oneWire(tempSensorPin);
DallasTemperature sensors(&oneWire);
- In the setup() function, initialize the serial communication, set the relay pin as an output, and start the temperature sensor:
void setup() {
  Serial.begin(9600); // Initialize serial communication
  pinMode(relayPin, OUTPUT); // Set relay pin as output
  sensors.begin();
}
- In the loop() function, read the temperature value from the DS18B20 sensor and compare it to the threshold temperature value. If the temperature is above the threshold, turn on the relay and print the status on the serial monitor. If the temperature is below the threshold, turn off the relay and print the status on the serial monitor:
void loop() {
  sensors.requestTemperatures();
  float temperature = sensors.getTempCByIndex(0); // Read temperature value
  if (temperature > thresholdTemp) {
    digitalWrite(relayPin, HIGH); // Turn on relay
    Serial.println("Fan On: Temperature above threshold");
  } else {
    digitalWrite(relayPin, LOW); // Turn off relay
    Serial.println("Fan Off: Temperature below threshold");
  }
  delay(1000); // Wait for 1 second before repeating the loop
}
Schematic
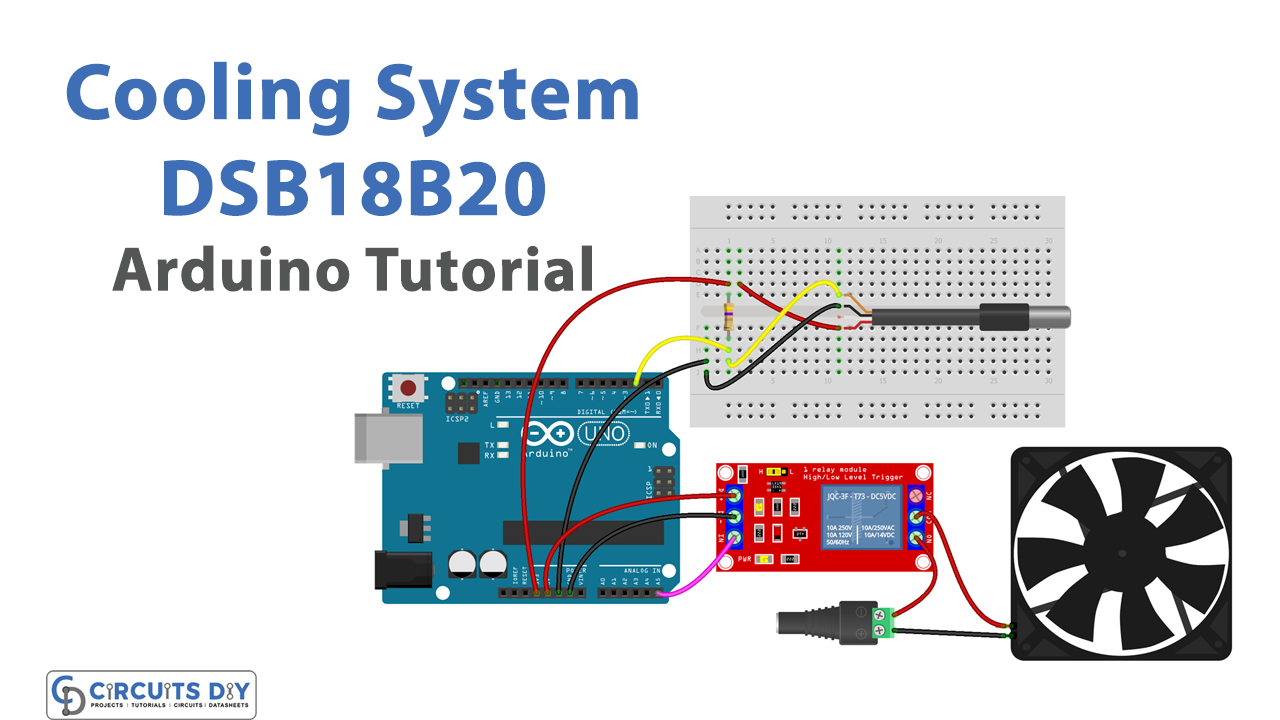
Make connections according to the circuit diagram given below.

Wiring / Connections
| Arduino | Temperature Sensor | Relay |
|---|---|---|
| 3v3 | VCC | |
| GND | GND | GND |
| D2 | DATA | |
| A5 | INP | |
| 5V | VCC |
Installing Arduino IDE
First, you need to install Arduino IDE Software from its official website Arduino. Here is a simple step-by-step guide on “How to install Arduino IDE“.
Installing Libraries
Before you start uploading a code, download and unzip the following libraries at /Progam Files(x86)/Arduino/Libraries (default), in order to use the sensor with the Arduino board. Here is a simple step-by-step guide on “How to Add Libraries in Arduino IDE“.
Code
Now copy the following code and upload it to Arduino IDE Software.
#include <OneWire.h>
#include <DallasTemperature.h>
const int TEMP_THRESHOLD_UPPER = 25; // upper threshold of temperature, change to your desire value
const int TEMP_THRESHOLD_LOWER = 20; // lower threshold of temperature, change to your desire value

const int SENSOR_PIN    = 2; // Arduino pin connected to DS18B20 sensor's DQ pin
const int RELAY_FAN_PIN = A5; // Arduino pin connected to relay which connected to fan

OneWire oneWire(SENSOR_PIN);         // setup a oneWire instance
DallasTemperature sensors(&oneWire); // pass oneWire to DallasTemperature library

float temperature;    // temperature in Celsius

void setup()
{
  Serial.begin(9600); // initialize serial
  sensors.begin();    // initialize the sensor
  pinMode(RELAY_FAN_PIN, OUTPUT); // initialize digital pin as an output
}

void loop()
{
  sensors.requestTemperatures();             // send the command to get temperatures
  temperature = sensors.getTempCByIndex(0);  // read temperature in Celsius

  if(temperature > TEMP_THRESHOLD_UPPER){
    Serial.println("The fan is turned on");
    digitalWrite(RELAY_FAN_PIN, HIGH); // turn on
  } else if(temperature < TEMP_THRESHOLD_LOWER){
    Serial.println("The fan is turned off");
    digitalWrite(RELAY_FAN_PIN, LOW); // turn on
  }

  delay(500);
}
Working Explanation
In the setup() function, the microcontroller initializes the serial communication, sets the relay pin as an output and starts the temperature sensor. This allows the microcontroller to send data to the serial monitor and to control the relay.
In the loop() function, the microcontroller reads the temperature value from the DS18B20 sensor and compares it to the threshold temperature value. If the temperature is above the threshold, the microcontroller activates the relay by setting the relay pin to a high state and it prints the status on the serial monitor. If the temperature is below the threshold, the microcontroller deactivates the relay by setting the relay pin to a low state and it prints the status on the serial monitor.
Applications
- HVAC Systems
- Industrial Process Control
- Home Automation
- Greenhouses
- Data Centers
- Laboratories
Conclusion.
We hope you have found this Cooling System using DS18B20 Temperature Sensor Circuit very useful. If you feel any difficulty in making it feel free to ask anything in the comment section.