Introduction
As simple electrical switches with many applications, relays are not often associated with “fun.” But still, relays can be utilized in inventive ways, such in do-it-yourself electronics projects, where we can use them to control the operation of lights, motors, and other equipment. One of the most entertaining and intriguing features of relays is the fact that we can use them to automate and regulate a wide range of activities.
Relays are also used because they can cut off one circuit from another. This keeps electronic devices from getting damaged. Overall, a relay is often helpful in controlling and switching electrical circuits. There may be some situations where it is not strictly necessary to have one, but in most cases, it is.
We will do a 5V Dual Channel Relay Module Interfacing with Arduino to understand the relay more. So, let’s jump right into the article.
What is a Relay Module?
In the field of electronics, relays are one of the components that just cannot be overlooked. A relay uses an electromagnet to open and close its contacts to regulate the flow of electricity. It usually has a coil of wire and one or more contacts to connect or disconnect the two circuits. Control systems often utilize relay modules when a low-power signal is required to control a circuit. Since relay modules can switch several loads, they are frequently employed in automation applications.
For many purposes and functions, relays are critical. Relays are often used to switch a high-power circuit with a low-power signal. Because of this, a microcontroller or other tiny control device can manage a circuit that would be too powerful to handle.

Hardware Components
You will require the following hardware for the Relay Module.
| S.no | Components | Value | Qty |
|---|---|---|---|
| 1 | Arduino | UNO | 1 |
| 2 | 2-Channel Relay Module | 5V | 1 |
| 3 | Bulb | – | 1 |
| 4 | Switch | – | 1 |
| 5 | Breadboard | – | 1 |
| 6 | Jumper Wires | – | 1 |
Once you have all the components, you need to follow the given steps:
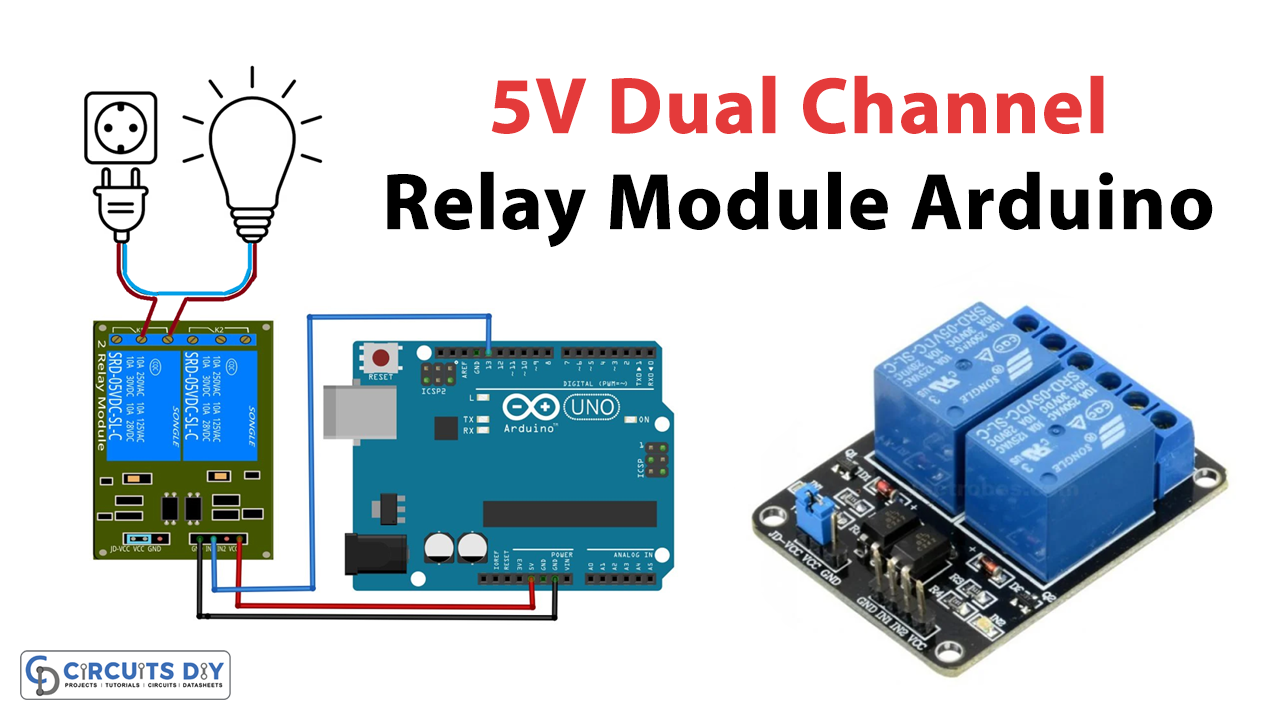
Schematic
Make connections according to the circuit diagram given below.

Wiring / Connections
| Relay Module | Arduino Uno |
|---|---|
| IN1 | D13 |
| GND | GND |
| VCC | 5V |
Installing Arduino IDE
First, you need to install Arduino IDE Software from its official website Arduino. Here is a simple step-by-step guide on “How to install Arduino IDE“.
Code
Now copy the following code and upload it to Arduino IDE Software.
//the relays connect to
int IN1 = 13;

#define ON   0
#define OFF  1
void setup()
{
  relay_init();//initialize the relay
}

void loop() {
  relay_SetStatus(ON);//turn on RELAY_1
  delay(2000);//delay 2s
  relay_SetStatus(OFF);//turn off RELAY_1
  delay(2000);//delay 2s
}
void relay_init(void)//initialize the relay
{
  //set all the relays OUTPUT
  pinMode(IN1, OUTPUT);
  relay_SetStatus(OFF); //turn off all the relay
}
//set the status of relays
void relay_SetStatus( unsigned char status_1)
{
  digitalWrite(IN1, status_1);

}
Let’s Test It
It’s now time to test the circuit. Once you upload the code, you observe the relay turning on and off.
Working Explanation
- First, we name the pin that is connected to digital pin 13.
- In the void setup, the relay_init() function initializes the relay by setting its pin as an output and turning it off.
- In the void loop(), we used the relay_SetStatus() repeatedly to turn the relay on and off, with a two-second delay between each call.
- The relay_init() and relay_SetStatus() functions are defined codes that initialize and control the relay.
The program initializes the relay by calling the relay_init() function, which sets the relay’s pin as an output and turns it off. The code then enters the main loop, where it repeatedly turns the relay on for two seconds, turns it off for two seconds, and repeats. This causes the electrical device connected to the relay to turn on and off.
Applications
- Automobiles.
- Washing machines
- Refrigerators
- Industrial control systems
- Electrical appliances, etc
Conclusion
We hope you have found this 5V Dual Channel Relay Module Interfacing with Arduino Circuit very useful. If you feel any difficulty making it feel free to ask anything in the comment section.