Introduction
The market for gesture sensing and recognition is growing. This is partly because technology is improving. In the real world, proximity and gesture sensors are helpful to humans because they provide the help that we may use to control equipment. They let us engage with our surroundings without needing to touch anything, which makes them helpful for enabling impaired individuals to switch on and off their devices. We can also use them in safety and security devices for security purposes. Hence, to understand these sensors better, in this tutorial, we will make “APDS9960 Proximity, Gesture and Ambient Light Sensor Interfacing with Arduino.”
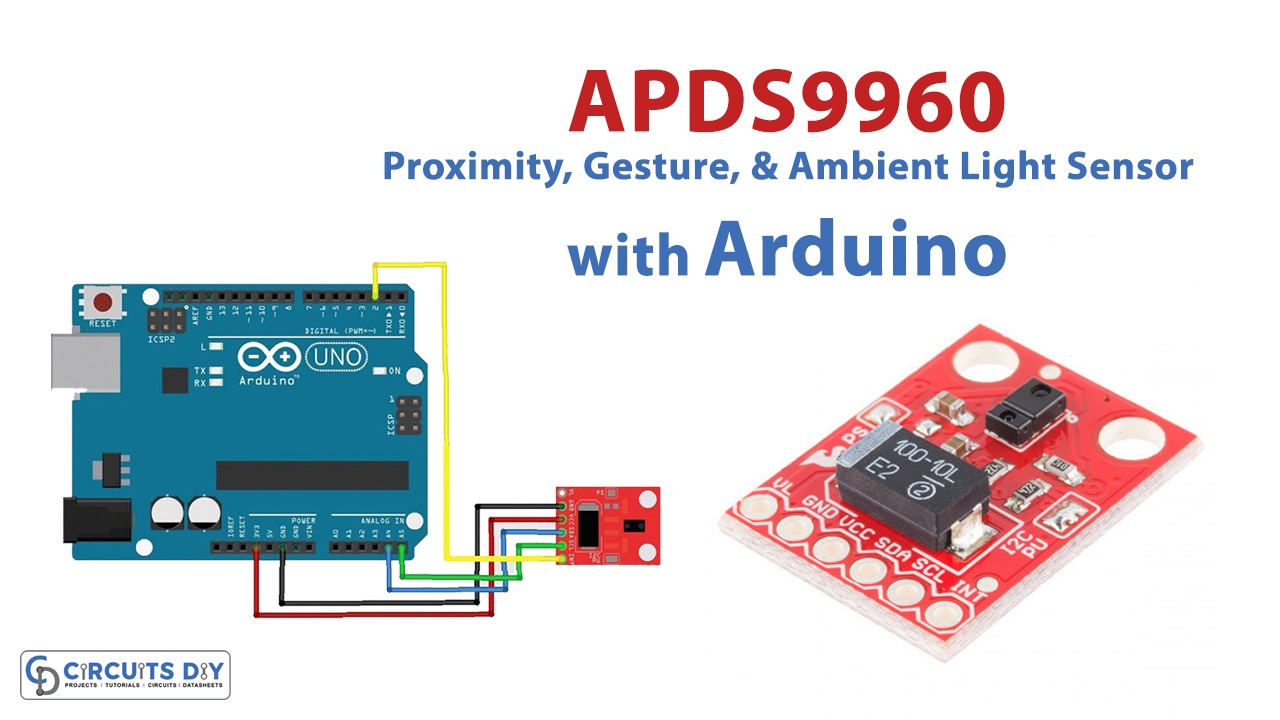
This tutorial will walk you through interfacing an APDS9960 proximity, gesture, and ambient light sensor with an Arduino board. The sensor’s output will be shown on the serial monitor of the software for the Arduino.
What is APDS9960 Proximity?
The APDS-9960 is a sensor that can be used for various detecting purposes, including detecting gestures, detecting ambient light, sensing RGB colors, and sensing the distance between two objects.
The APDS9960 is equipped with an infrared (IR) LED and driver, in addition to four directional photodiodes that detect the reflected IR radiation from the LED. Because it has a proximity detection capability, it can measure the distance between an item and the front of the sensor with an 8-bit resolution. This distance can be as much as a few centimeters.
Hardware Components
You will require the following hardware for the APDS9960 Proximity Sensor.
Steps Interfacing APDS9960 with Arduino
APDS9960 Proximity, Gesture, and Ambient Light Sensor Interfacing with Arduino require very few components listed above in the hardware section. Once you have got the components, follow the following steps:
Schematic
Make connections according to the circuit diagram given below.

Wiring / Connections
| Arduino | APDS9960 Sensor |
|---|---|
| 3.3V | VCC |
| GND | GND |
| A4 | SDA |
| A5 | SCL |
| D2 | INT |
Installing Arduino IDE
First, you must install the Arduino IDE software from its official website, Arduino. Here is a simple step-by-step guide on “How to install Arduino IDE“.
Installing Libraries
Before you start uploading a code, download and unzip the following libraries at /Progam Files(x86)/Arduino/Libraries (default) in order to use the sensor with the Arduino board. Here is a simple step-by-step guide on “How to Add Libraries in Arduino IDE“.
Code
Now copy the following code and upload it to Arduino IDE Software.
#include <Wire.h>
#include <SparkFun_APDS9960.h>

// Pins
#define APDS9960_INT    2  // Needs to be an interrupt pin
#define LED_PIN         13 // LED for showing interrupt

// Constants
#define LIGHT_INT_HIGH  1000 // High light level for interrupt
#define LIGHT_INT_LOW   10   // Low light level for interrupt

// Global variables
SparkFun_APDS9960 apds = SparkFun_APDS9960();
uint16_t ambient_light = 0;
uint16_t red_light = 0;
uint16_t green_light = 0;
uint16_t blue_light = 0;
int isr_flag = 0;
uint16_t threshold = 0;

void setup() {

  // Set LED as output
  pinMode(LED_PIN, OUTPUT);
  pinMode(APDS9960_INT, INPUT);

  // Initialize Serial port
  Serial.begin(9600);
  Serial.println();
  Serial.println(F("-------------------------------------"));
  Serial.println(F("SparkFun APDS-9960 - Light Interrupts"));
  Serial.println(F("-------------------------------------"));

  // Initialize interrupt service routine
  attachInterrupt(0, interruptRoutine, FALLING);

  // Initialize APDS-9960 (configure I2C and initial values)
  if ( apds.init() ) {
    Serial.println(F("APDS-9960 initialization complete"));
  } else {
    Serial.println(F("Something went wrong during APDS-9960 init!"));
  }

  // Set high and low interrupt thresholds
  if ( !apds.setLightIntLowThreshold(LIGHT_INT_LOW) ) {
    Serial.println(F("Error writing low threshold"));
  }
  if ( !apds.setLightIntHighThreshold(LIGHT_INT_HIGH) ) {
    Serial.println(F("Error writing high threshold"));
  }

  // Start running the APDS-9960 light sensor (no interrupts)
  if ( apds.enableLightSensor(false) ) {
    Serial.println(F("Light sensor is now running"));
  } else {
    Serial.println(F("Something went wrong during light sensor init!"));
  }

  // Read high and low interrupt thresholds
  if ( !apds.getLightIntLowThreshold(threshold) ) {
    Serial.println(F("Error reading low threshold"));
  } else {
    Serial.print(F("Low Threshold: "));
    Serial.println(threshold);
  }
  if ( !apds.getLightIntHighThreshold(threshold) ) {
    Serial.println(F("Error reading high threshold"));
  } else {
    Serial.print(F("High Threshold: "));
    Serial.println(threshold);
  }

  // Enable interrupts
  if ( !apds.setAmbientLightIntEnable(1) ) {
    Serial.println(F("Error enabling interrupts"));
  }

  // Wait for initialization and calibration to finish
  delay(500);
}

void loop() {

  // If interrupt occurs, print out the light levels
  if ( isr_flag == 1 ) {

    // Read the light levels (ambient, red, green, blue) and print
    if (  !apds.readAmbientLight(ambient_light) ||
          !apds.readRedLight(red_light) ||
          !apds.readGreenLight(green_light) ||
          !apds.readBlueLight(blue_light) ) {
      Serial.println("Error reading light values");
    } else {
      Serial.print("Interrupt! Ambient: ");
      Serial.print(ambient_light);
      Serial.print(" R: ");
      Serial.print(red_light);
      Serial.print(" G: ");
      Serial.print(green_light);
      Serial.print(" B: ");
      Serial.println(blue_light);
    }

    // Turn on LED for a half a second
    digitalWrite(LED_PIN, HIGH);
    delay(500);
    digitalWrite(LED_PIN, LOW);

    // Reset flag and clear APDS-9960 interrupt (IMPORTANT!)
    isr_flag = 0;
    if ( !apds.clearAmbientLightInt() ) {
      Serial.println("Error clearing interrupt");
    }

  }
}

void interruptRoutine() {
  isr_flag = 1;
}
Let’s Test It
It’s now time to test the circuit. Once you upload the code, the circuit will detect any gesture and print the type of gesture on the serial monitor.
Working Explanation
To understand how it works, you need to explore the code a little:
- In the code, we first include the necessary libraries. After that, we define the Arduino pins we utilize in the circuit. Following that, we define the variables for the interrupt. We then also define some global variables.
- We declared the status of the above-defined Arduino pins in the void setup using the PinMode function. We then initialize the serial monitor by using the function Serial.begin. To print sentences or phrases on serail monitor, we use the Serial.println. After that, we initialize the interrupt service by using the function attachInterrupt. We give conditions to initialize the sensor, set a high and low-level interrupt threshold, read the interrupt threshold, and enable interrupts. After that, we give a little delay to wait for calibration to finish.
- In a void loop, we give the conditions to print the light levels and turn on the LED pin. In the end, we give the function to reset the flag and clear the APDS-9960 interrupt.
When an object within a specific range makes a gesture, the object reflects the IR signal sent by the LED. The photodiodes pick up that signal, and that’s how it knows how fast an object is moving and how far away it is.
With this information, the sensor can figure out what gesture was made. The sensor has different channels that use IR and UV blocking filters and a data converter to find the light that is red, blue, green, or clear.
Applications
- Smartphones
- LCDs
- RGB monitors
- Robotics devices
- Medical Equipment
Conclusion
We hope you find this APDS9960 Proximity, Gesture, and Ambient Light Sensor Interfacing with Arduino Circuit useful. If you feel any difficulty in making it feel free to ask anything in the comment section.