Introduction
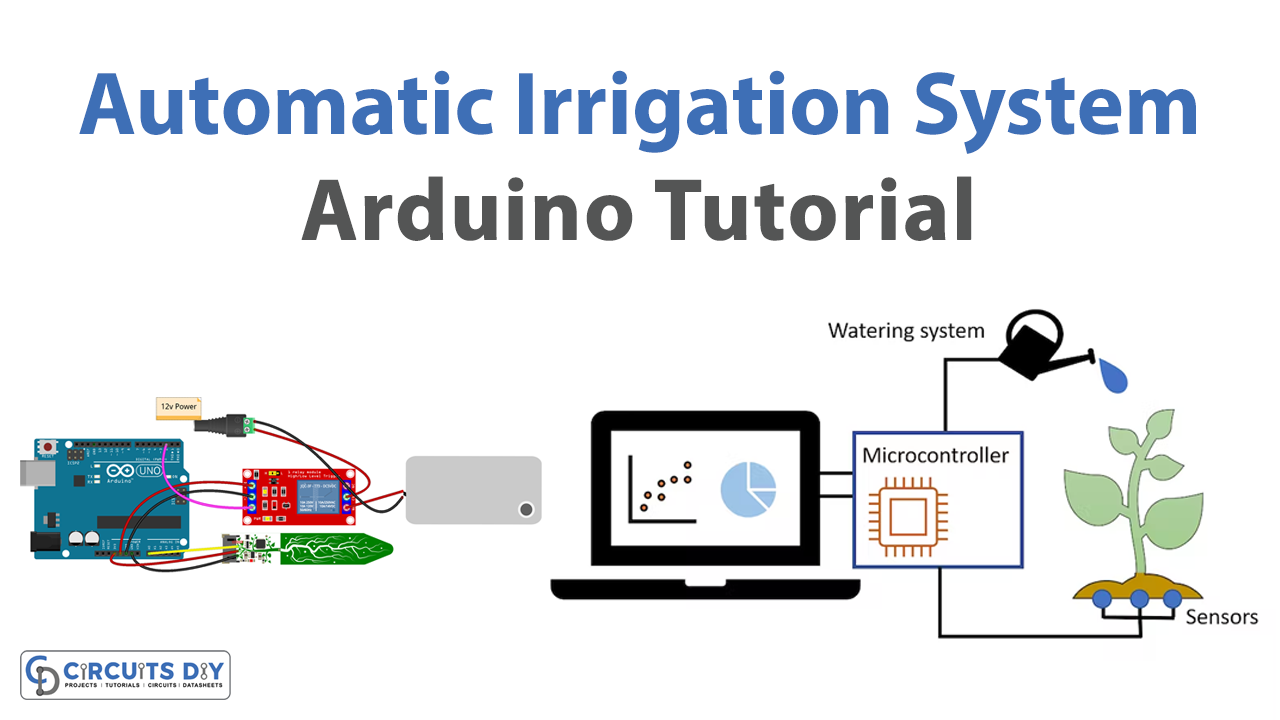
An automatic water irrigation system using an FC-28 soil hygrometer module and a 12V DC diaphragm water pump controlled by an Arduino UNO microcontroller is a setup that allows for the monitoring of soil moisture levels and the automatic watering of plants or crops based on the readings. The FC-28 soil hygrometer module measures the soil moisture level and sends this data to the Arduino UNO. The Arduino then uses this data to determine if the water pump should be turned on or off. The 12V DC diaphragm water pump is connected to the Arduino UNO through a 5V SPDT relay, which acts as a switch to control the flow of electricity to the pump.
A 12V diaphragm water pump is a type of pump that uses a flexible diaphragm to compress and pump fluid. This type of pump is commonly used in agricultural and horticultural applications for irrigation, as well as in various other applications where a compact, low-power, and self-priming pump is required.
Hardware Components
You will require the following hardware for Automatic Irrigation System with Arduino.
| S.no | Component | Value | Qty |
|---|---|---|---|
| 1. | Arduino UNO | – | 1 |
| 2. | USB Cable Type A to B | – | 1 |
| 3. | Capacitive Soil Moisture Sensor | – | 1 |
| 4. | Relay | – | 1 |
| 5. | Pump | 12V | 1 |
| 6. | Vinyl Tube | – | 1 |
| 7. | DC Power Jack | – | 1 |
| 8. | Power Adapter for Arduino | 9V | 1 |
| 9. | Power Adapter | 12V- | 1 |
| 10. | Jumper Wires | – | 1 |
Automatic Irrigation System with Arduino
- Connect the FC-28 soil hygrometer module to the Arduino UNO. Connect the Vcc pin to 5V, GND to GND, Echo to digital pin 8, and Trig to digital pin 7.
- Connect the 5V SPDT relay to the Arduino UNO. Connect the control pin of the relay to digital pin 13, and connect the relay to the 12V DC diaphragm water pump.
- Open the Arduino IDE and create a new sketch.
- Define the pins for the FC-28 soil hygrometer module and the 5V SPDT relay in the setup() function:
const int trigPin = 7;
const int echoPin = 8;
const int relayPin = 13;

void setup() {
  Serial.begin(9600);
  pinMode(trigPin, OUTPUT);
  pinMode(echoPin, INPUT);
  pinMode(relayPin, OUTPUT);
}
- In the loop() function, measure the soil moisture level using the FC-28 soil hygrometer module and turn on the water pump if the moisture level is below a certain threshold:
void loop() {
  long duration, distance;
  digitalWrite(trigPin, LOW);
  delayMicroseconds(2);
  digitalWrite(trigPin, HIGH);
  delayMicroseconds(10);
  digitalWrite(trigPin, LOW);
  duration = pulseIn(echoPin, HIGH);
  distance = (duration / 2) / 29.1;
  if (distance >= 20) {
    digitalWrite(relayPin, LOW);
    Serial.println("Water pump is ON");
  } else {
    digitalWrite(relayPin, HIGH);
    Serial.println("Water pump is OFF");
  }
  delay(1000);
}
- Upload the code to the Arduino UNO microcontroller.
- Open the Serial Monitor to monitor the status of the water pump. If the soil moisture level is below the threshold, the water pump will turn on, and if the soil moisture level is above the threshold, the water pump will turn off. The status of the water pump will be printed on the serial monitor.
Schematic
Make connections according to the circuit diagram given below.

Wiring / Connections
| Arduino | Soil Moisture Sensor | Relay |
|---|---|---|
| 3V3 | VCC | |
| GND | GND | GND |
| 5V | VCC | |
| D2 | INP | |
| A0 | AOUT |
Installing Arduino IDE
First, you need to install Arduino IDE Software from its official website Arduino. Here is a simple step-by-step guide on “How to install Arduino IDE“.
Code
Now copy the following code and upload it to Arduino IDE Software.
#define RELAY_PIN    2  // Arduino pin that connects to relay
#define MOISTURE_PIN A0 // Arduino pin that connects to AOUT pin of moisture sensor

#define THRESHOLD 100 // CHANGE YOUR THRESHOLD HERE

void setup() {
  Serial.begin(9600);
  pinMode(RELAY_PIN, OUTPUT);
}

void loop() {
  int value = analogRead(MOISTURE_PIN); // read the analog value from sensor

  if (value < THRESHOLD) {
    Serial.print("The soil is DRY => turn pump ON");
    digitalWrite(RELAY_PIN, HIGH);
  } else {
    Serial.print("The soil is WET => turn pump OFF");
    digitalWrite(RELAY_PIN, LOW);
  }

  Serial.print(" (");
  Serial.print(value);
  Serial.println(")");

  delay(500);
}
Working Explanation
the setup() function is used to initialize the pins used for the relay, the FC-28 sensor and the serial communication. This involves setting the pin modes, initializing the serial communication, and any other required setup.
the loop() function is used to regularly read the moisture level from the FC-28 soil hygrometer module, compare it to a predefined threshold, and if the moisture level is below the threshold, the relay would be activated to turn on the 12V DC diaphragm water pump. The status of the pump and the moisture level readings would then be sent to the serial monitor for monitoring and debugging purposes.
Applications
- Irrigating crops in large-scale agriculture fields.
- Watering lawns and gardens.
- Maintaining golf courses and parks.
- Irrigating greenhouses and nurseries.
- Regulating the water supply to indoor plants in offices, homes, and public spaces.
- Minimizing water waste and maximizing the efficiency of water usage.
Conclusion.
We hope you have found this Automatic Irrigation System Circuit very useful. If you feel any difficulty in making it feel free to ask anything in the comment section.