Introduction
The ability to measure and display temperature is an important aspect in many applications, ranging from weather monitoring to industrial control systems. The DS18B20 temperature sensor and the 16×2 Arduino LCD module are popular components for this task, and interfacing them with an Arduino UNO microcontroller makes it possible to build a compact, low-cost, and highly customizable temperature monitoring system. In this setup, the DS18B20 temperature sensor measures the ambient temperature and sends the readings to the Arduino UNO microcontroller, which processes the data and displays it on the 16×2 Arduino LCD module.
The DS18B20 is a digital temperature sensor that can measure temperature in a range of -55°C to +125°C with a resolution of 0.5°C. It uses a 1-Wire interface, which means that multiple DS18B20 temperature sensors can be connected to a single digital pin of a microcontroller and identified individually. The sensor can be powered from a data line, making it ideal for remote temperature sensing applications where a power supply is not available or where long cables are used. The DS18B20 is widely used in hobby electronics, home automation, and industrial control systems for measuring temperature in a variety of environments.
Hardware Components
You will require the following hardware for Temperature Sensor LCD with Arduino.
| S.no | Component | Value | Qty |
|---|---|---|---|
| 1. | Arduino UNO | – | 1 |
| 2. | USB Cable Type A to B | – | 1 |
| 3. | LED | I2C | 1 |
| 4. | Temperature Sensor | DS18B20 | 1 |
| 5. | Power Adapter for Arduino | 9V | 1 |
| 6. | Resistor | 4.7kΩ | 1 |
| 7. | Breadboard | – | 1 |
| 8. | Jumper Wires | – | 1 |
Temperature Sensor LCD with Arduino
- Include libraries:
#include <OneWire.h>
#include <DallasTemperature.h>
#include <LiquidCrystal.h>
Here, we include the OneWire, DallasTemperature, and LiquidCrystal libraries to use the functions and classes defined in these libraries.
- Define the data pin for the DS18B20:
#define ONE_WIRE_BUS 2
Here, we define the data pin for the DS18B20 sensor and assign it the value 2, meaning it is connected to digital pin 2 on the Arduino board.
- Create an instance of the OneWire class:
OneWire oneWire(ONE_WIRE_BUS);
Here, we create an instance of the OneWire class and pass it the data pin defined earlier, which is used to communicate with the DS18B20 sensor.
- Create an instance of the DallasTemperature class:
DallasTemperature sensors(&oneWire);
Here, we create an instance of the DallasTemperature class and pass it to the oneWire instance, which is used to access the temperature readings from the DS18B20 sensor.
- Initialize the LCD:
LiquidCrystal lcd(12, 11, 5, 4, 3, 2);
Here, we create an instance of the LiquidCrystal class and pass it to the pins used by the LCD module. RS is connected to digital pin 12, RW is connected to GND, EN is connected to digital pin 11, and data pins (D4 to D7) are connected to digital pins 5 to 2.
- Setup function:
void setup(void)
{
  // Start up the library
  sensors.begin();

  // set up the LCD's number of columns and rows:
  lcd.begin(16, 2);

  // Print a message to the LCD.
  lcd.print("Temperature: ");
}
- Loop function:
void loop(void)
{
  // request temperature readings from all devices
  sensors.requestTemperatures();

  // Get the temperature in Celsius
  float tempC = sensors.getTempCByIndex(0);

  // Clear the screen and print the temperature
  lcd.setCursor(0, 1);
  lcd.print("                ");
  lcd.setCursor(0, 1);
  lcd.print(tempC);
  lcd.print((char)223); //degree symbol
  lcd.print("C");

  delay(1000);
}
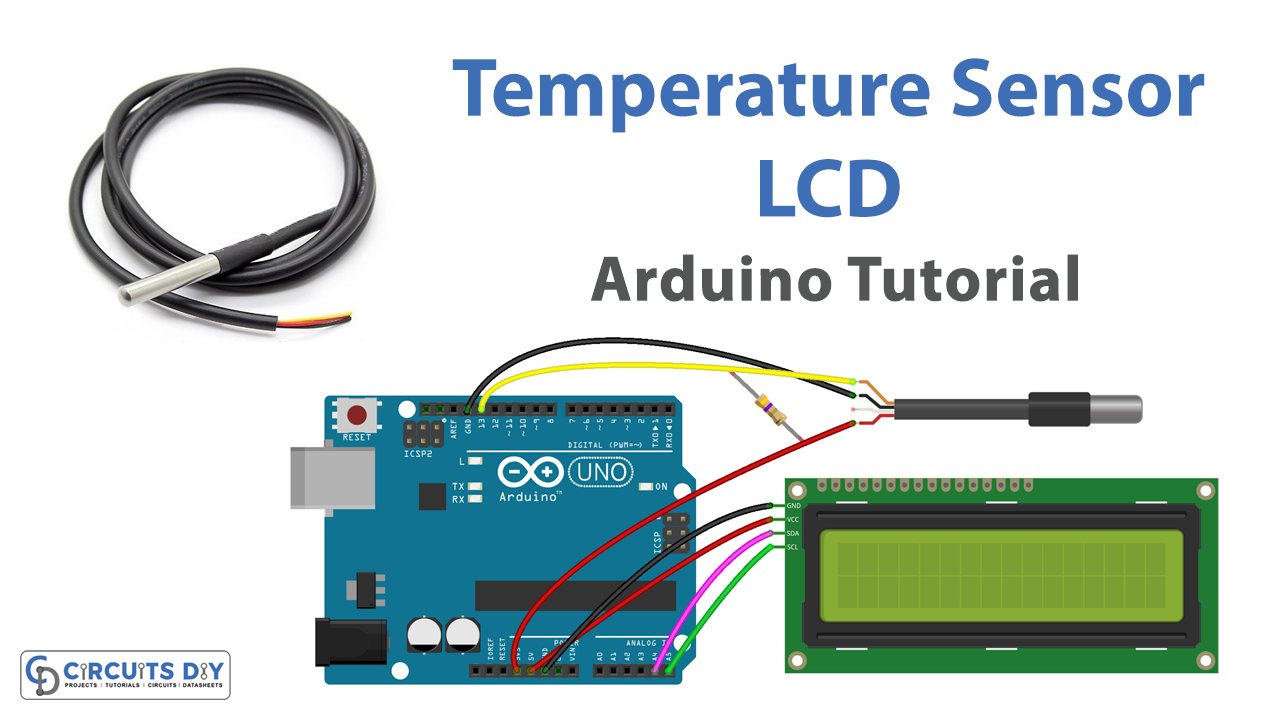
Schematic
Make connections according to the circuit diagram given below.
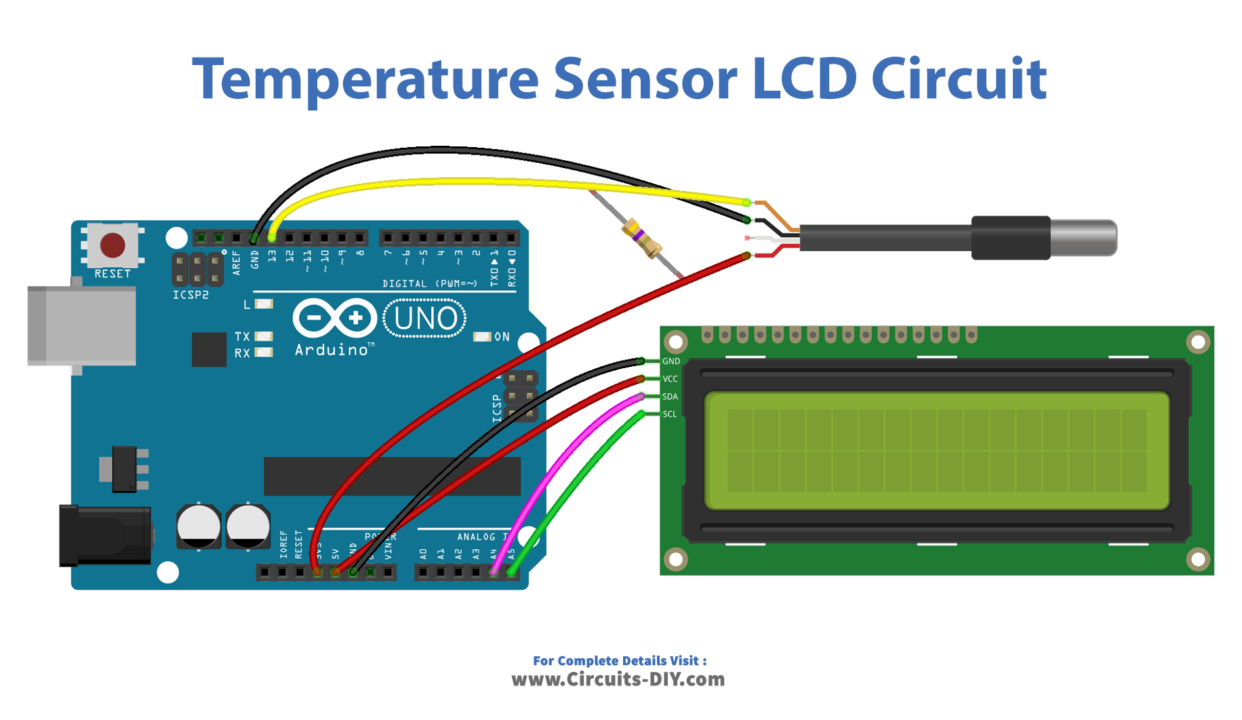
Wiring / Connections
| Arduino | 16×2 LCD | Temperature Sensor |
|---|---|---|
| 5V | VCC | |
| GND | GND | GND |
| A4 | SDA | |
| A5 | SCL | |
| 3V3 | VCC | |
| D13 | ANALOG OUT |
Installing Arduino IDE
First, you need to install Arduino IDE Software from its official website Arduino. Here is a simple step-by-step guide on “How to install Arduino IDE“.
Installing Libraries
Before you start uploading a code, download and unzip the following libraries at /Progam Files(x86)/Arduino/Libraries (default), in order to use the sensor with the Arduino board. Here is a simple step-by-step guide on “How to Add Libraries in Arduino IDE“.
Code
Now copy the following code and upload it to Arduino IDE Software.
#include <OneWire.h>
#include <DallasTemperature.h>
#include <LiquidCrystal_I2C.h>

const int SENSOR_PIN = 13; // Arduino pin connected to DS18B20 sensor's DQ pin

OneWire oneWire(SENSOR_PIN);         // setup a oneWire instance
DallasTemperature sensors(&oneWire); // pass oneWire to DallasTemperature library
LiquidCrystal_I2C lcd(0x3F, 16, 2);  // I2C address 0x27, 16 column and 2 rows

float tempCelsius;    // temperature in Celsius
float tempFahrenheit; // temperature in Fahrenheit

void setup()
{
  sensors.begin();    // initialize the sensor
  lcd.init();         // initialize the lcd
  lcd.backlight();    // open the backlight
}

void loop()
{
  sensors.requestTemperatures();             // send the command to get temperatures
  tempCelsius = sensors.getTempCByIndex(0);  // read temperature in Celsius
  tempFahrenheit = tempCelsius * 9 / 5 + 32; // convert Celsius to Fahrenheit

  lcd.clear();
  lcd.setCursor(0, 0);       // start to print at the first row
  lcd.print(tempCelsius);    // print the temperature in Celsius
  lcd.print((char)223);      // print ° character
  lcd.print("C");
  lcd.setCursor(0, 1);       // start to print at the second row
  lcd.print(tempFahrenheit); // print the temperature in Fahrenheit
  lcd.print((char)223);      // print ° character
  lcd.print("F");

  delay(500);
}
Working Explanation
In the setup function, we call the sensors.begin() function to start the DallasTemperature library and the lcd.begin(16, 2) function to initialize the LCD module with 16 columns and 2 rows. Then, we print the message “Temperature: ” on the first line of the LCD.
In the loop function, we call the sensors.requestTemperatures() function to request the temperature readings from all devices and sensors.getTempCByIndex(0) function to get the temperature in Celsius. Then, we clear the second line of the LCD and print the temperature value along with the degree symbol and “C” to indicate the units. Finally, we add a delay of 1000 milliseconds to allow the temperature to update every second.
Applications
- Environmental monitoring
- HVAC control
- Temperature logging
- Food and beverage temperature control
- Laboratory and industrial temperature control
- Refrigeration and cooling control
- Weather Monitoring
Conclusion.
We hope you have found this Temperature Sensor LCD Circuit very useful. If you feel any difficulty in making it feel free to ask anything in the comment section.