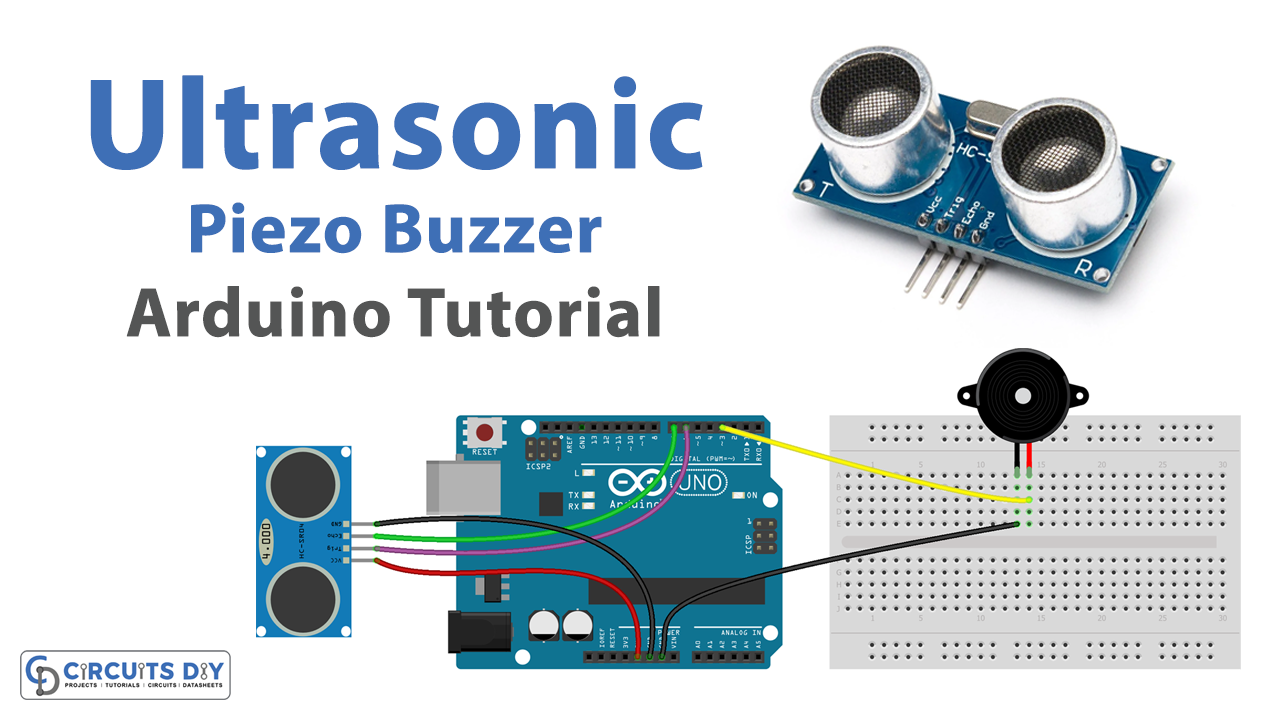
Introduction
The HC-SR04 ultrasonic sensor-controlled piezoelectric buzzer is a versatile and cost-effective system that can be used in a variety of applications such as object detection, obstacle avoidance, and proximity sensing. The system combines the capabilities of an HC-SR04 ultrasonic sensor, an Arduino microcontroller, and a piezoelectric buzzer to create a powerful and easy-to-use system that can be customized to suit a wide range of needs.
The HC-SR04 ultrasonic sensor is a device that can measure the distance to an object using ultrasonic sound waves. It works by emitting a high-frequency sound (ultrasonic wave) and measuring the time it takes for the sound to bounce back (echo) to the sensor. The sensor then calculates the distance to the object based on the time it took for the sound to return.
Hardware Components
You will require the following hardware for Ultrasonic Sensor Piezo Buzzer with Arduino.
| S.no | Component | Value | Qty |
|---|---|---|---|
| 1. | Arduino UNO | – | 1 |
| 2. | USB Cable Type A to B | – | 1 |
| 3. | Ultrasonic Sensor | – | 1 |
| 4. | Piezo Buzzer | – | 1 |
| 5. | Power Adapter for Arduino | 9V | 1 |
| 6. | Breadboard | – | 1 |
| 7. | Jumper Wires | – | 1 |
Ultrasonic Sensor Piezo Buzzer with Arduino
- Connect the VCC pin of the HC-SR04 sensor to the 5V pin of the Arduino Uno. Connect the GND pin of the sensor to GND on the Arduino.
- Connect the TRIG pin of the sensor to pin 12 on the Arduino and the ECHO pin to pin 11.
- Connect the positive pin of the piezoelectric buzzer to pin 9 on the Arduino and the negative pin to GND.
- In the Arduino IDE, create a new sketch and include the following library:
#include <Ultrasonic.h>
- Define the trig and echo pins, and create an Ultrasonic object.
const int trigPin = 12;
const int echoPin = 11;
Ultrasonic ultrasonic(trigPin, echoPin);
- In the setup() function, initialize the serial communication and set the pin mode of the piezoelectric buzzer to output.
Serial.begin(9600);
pinMode(9, OUTPUT);
- In the loop() function, use the distance() method to get the distance in cm and store it in a variable.
long distance = ultrasonic.distance();
- Use an if-else statement to control the piezoelectric buzzer. For example, if the distance is less than 20 cm, turn on the buzzer and print the distance to the serial monitor.
if (distance < 20) {
  digitalWrite(9, HIGH);
  Serial.println("Distance: " + String(distance) + " cm");
} else {
  digitalWrite(9, LOW);
}
- Use Serial.flush() to clear the serial buffer, and delay(100) to prevent the program from sending too many requests to the sensor at once.
Serial.flush();
delay(100);
10. Upload the code to the Arduino board, open the serial monitor, and set the baud rate to 9600, you should see the distance in centimeters being printed every 100ms. If the distance is less than 20cm the piezoelectric buzzer will be turned on and if the distance is more than 20cm it will be turned off.
Schematic
Make connections according to the circuit diagram given below.
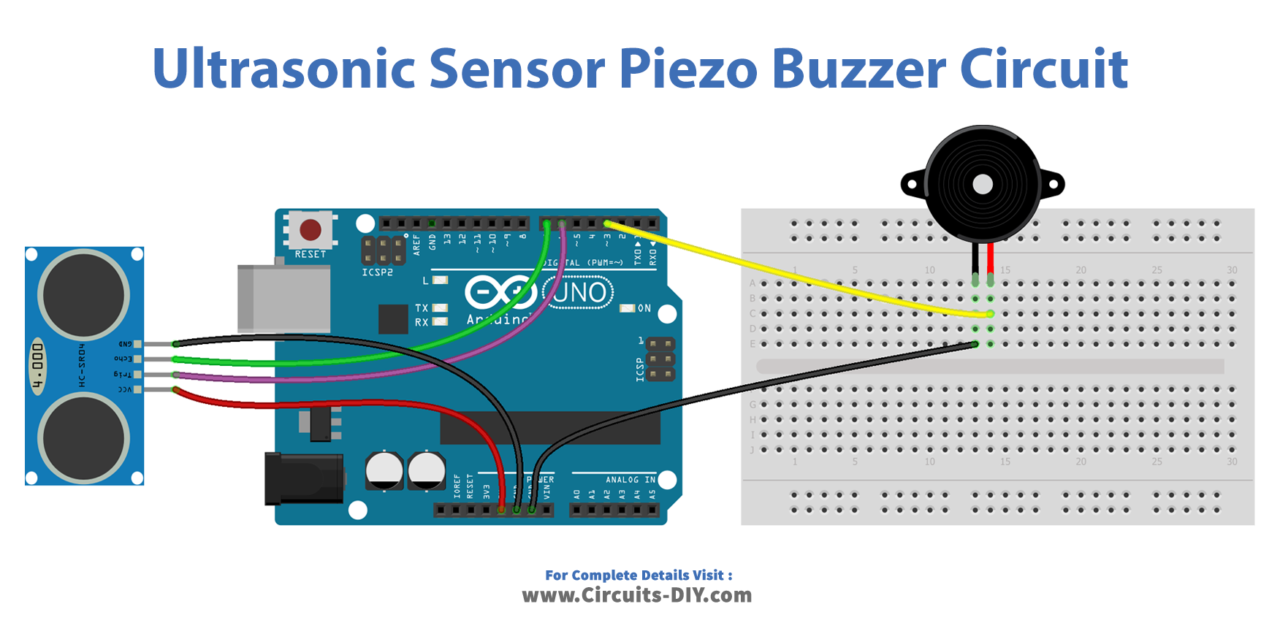
Wiring / Connections
| Arduino | Ultrasonic Sensor | Buzzer |
|---|---|---|
| 5V | VCC | |
| GND | GND | GND |
| D3 | VCC | |
| D6 | TRIG | |
| D7 | ECHO |
Installing Arduino IDE
First, you need to install Arduino IDE Software from its official website Arduino. Here is a simple step-by-step guide on “How to install Arduino IDE“.
Code
Now copy the following code and upload it to Arduino IDE Software.
const int TRIG_PIN   = 6; // Arduino pin connected to Ultrasonic Sensor's TRIG pin
const int ECHO_PIN   = 7; // Arduino pin connected to Ultrasonic Sensor's ECHO pin
const int BUZZER_PIN = 3; // Arduino pin connected to Piezo Buzzer's pin
const int DISTANCE_THRESHOLD = 50; // centimeters

// variables will change:
float duration_us, distance_cm;

void setup() {
  Serial.begin (9600);         // initialize serial port
  pinMode(TRIG_PIN, OUTPUT);   // set arduino pin to output mode
  pinMode(ECHO_PIN, INPUT);    // set arduino pin to input mode
  pinMode(BUZZER_PIN, OUTPUT); // set arduino pin to output mode
}

void loop() {
  // generate 10-microsecond pulse to TRIG pin
  digitalWrite(TRIG_PIN, HIGH);
  delayMicroseconds(10);
  digitalWrite(TRIG_PIN, LOW);

  // measure duration of pulse from ECHO pin
  duration_us = pulseIn(ECHO_PIN, HIGH);
  // calculate the distance
  distance_cm = 0.017 * duration_us;

  if(distance_cm < DISTANCE_THRESHOLD)
    digitalWrite(BUZZER_PIN, HIGH); // turn on Piezo Buzzer
  else
    digitalWrite(BUZZER_PIN, LOW);  // turn off Piezo Buzzer

  // print the value to Serial Monitor
  Serial.print("distance: ");
  Serial.print(distance_cm);
  Serial.println(" cm");

  delay(500);
}
Working Explanation
The first step in the code is to include the necessary libraries, in this case, the Ultrasonic library, which allows the Arduino to interact with the HC-SR04 sensor. Then the trig and echo pins are defined, and an Ultrasonic object is created.
In the setup() function, the serial communication is initialized with a baud rate of 9600, and the pin mode of the piezoelectric buzzer is set to output. In the loop() function, the distance() method is used to get the distance in cm from the sensor and store it in a variable. Then an if-else statement is used to control the piezoelectric buzzer. For example, if the distance is less than 20 cm, the buzzer is turned on and the distance is printed to the serial monitor. If the distance is more than 20 cm, the buzzer is turned off.
Applications
- Obstacle avoidance
- Proximity sensing
- Distance measurement
- Security systems
- Automatic door openers
- Automated guided vehicles
Conclusion.
We hope you have found this Ultrasonic Sensor Piezo Buzzer Circuit very useful. If you feel any difficulty in making it feel free to ask anything in the comment section.
Related posts:
 Micro SD Card - Arduino Tutorial
 LSM303 Triple-Axis Accelerometer Magnetometer Module with Arduino
 APDS9960 Proximity, Gesture, and Ambient Light Sensor Interfacing with Arduino
 Automatic Plant Watering Project using Arduino
 Automatic Gate Open Using Arduino and HC SR04
 Interfacing Inductive Proximity Sensor LJ12A3-4-Z/BX with Arduino