Introduction
An automatic plant irrigation system using an Arduino UNO, ultrasonic sensors, 12V water pumps, and soil moisture sensors is a highly efficient and effective system designed to automate the process of watering plants. It employs modern technology to accurately measure the water level in the reservoir and moisture level in the soil, and automatically water the plants when needed.
This system can greatly simplify the process of plant care while providing optimal water conditions for plant growth and health. With this system, plant owners can be assured that their plants receive the appropriate amount of water, reducing the risks of over or under-watering, and ultimately resulting in healthy and vibrant plants.
Hardware Components
You will require the following hardware Automatic Plant Irrigation System.
| Components | Value | Qty |
|---|---|---|
| Arduino UNO | – | 1 |
| Ultrasonic Sensor | HC-SR04 | 1 |
| Soil Moisture Sensor | – | 1 |
| LCD Display | 16X2 | 1 |
| Potentiometer | 10k | 1 |
| Motors | – | 3 |
| Battery | 9v | 1 |
| Breadboard | – | 1 |
| Jumper Wires | – | 1 |
Code Explanation
- Define the necessary variables and pins:
const int trigPin = 9;
const int echoPin = 10;
long duration;
int distanceCm, distanceInch;

#include <LiquidCrystal.h>

const int rs =8 , en = 7, d4 = 3, d5 = 4, d6 = 5, d7 = 6;
LiquidCrystal lcd(rs, en, d4, d5, d6, d7);
This code defines the pins used for the ultrasonic sensor, LCD screen, and the variables used for distance calculations.
- Set the pin modes in the setup() function:
void setup() {
  pinMode(A0, INPUT);
  pinMode(A1, INPUT);
  pinMode(A2, INPUT);
  pinMode(2, OUTPUT);
  pinMode(11, OUTPUT);
  pinMode(12, OUTPUT);
  pinMode(trigPin, OUTPUT);
  pinMode(echoPin, INPUT);
  lcd.begin(16, 2);
}
This code sets the pin modes for the analog inputs, digital outputs, and the ultrasonic sensor pins.
- Read the sensor data and calculate distance in the loop() function:
void loop() {
  digitalWrite(trigPin, LOW);
  delayMicroseconds(2);
  digitalWrite(trigPin, HIGH);
  delayMicroseconds(10);
  digitalWrite(trigPin, LOW);
  duration = pulseIn(echoPin, HIGH);
  distanceCm= duration*0.034/2;
  distanceInch = duration*0.0133/2;
  int soil_moisture = analogRead(A0);
  int soil_moisture_2 = analogRead(A1);
  int soil_moisture_3 = analogRead(A2);
}
This code reads the analog inputs for soil moisture levels and uses the ultrasonic sensor to measure distance in centimeters.
- Calculate the percentage of soil moisture and distance in centimeters:
int z= map(soil_moisture, 0, 1023, 100, 0);
int z_2= map(soil_moisture_2, 0, 1023, 100, 0);
int z_3= map(soil_moisture_3, 0, 1023, 100, 0);
int a = map(distanceCm, 0, 17, 20, 0);
This code maps the analog readings to a percentage of soil moisture and maps the distance reading to a value between 0 and 20 cm.
- Display the sensor data on the LCD screen:
lcd.clear();
lcd.setCursor(0, 0);
lcd.print("SM1");
lcd.setCursor(0, 1);
lcd.print(z);
lcd.setCursor(3, 1);
lcd.print("%");
lcd.setCursor(6, 0);
lcd.print("SM2");
lcd.setCursor(6, 1);
lcd.print(z_2);
lcd.setCursor(9, 1);
lcd.print("%");
lcd.setCursor(13, 0);
lcd.print("SM3");
lcd.setCursor(12, 1);
lcd.print(z_3);
lcd.setCursor(15, 1);
lcd.print("%");
delay(300);
This code clears the LCD screen and displays the soil moisture percentages and water level on the screen. The delay() function is used to pause the loop for a short period of time before the next iteration.
- Control the output pins based on sensor readings:
if(soil_moisture>500)
{
digitalWrite(2,LOW);
}
else
{
digitalWrite(2,HIGH);
}
if(soil_moisture_2>280)
{
digitalWrite(11,LOW);
}
else
{
digitalWrite(11,HIGH);
}
if(soil_moisture_3>700)
{
digitalWrite(12,LOW);
}
else
{
digitalWrite(12,HIGH);
}
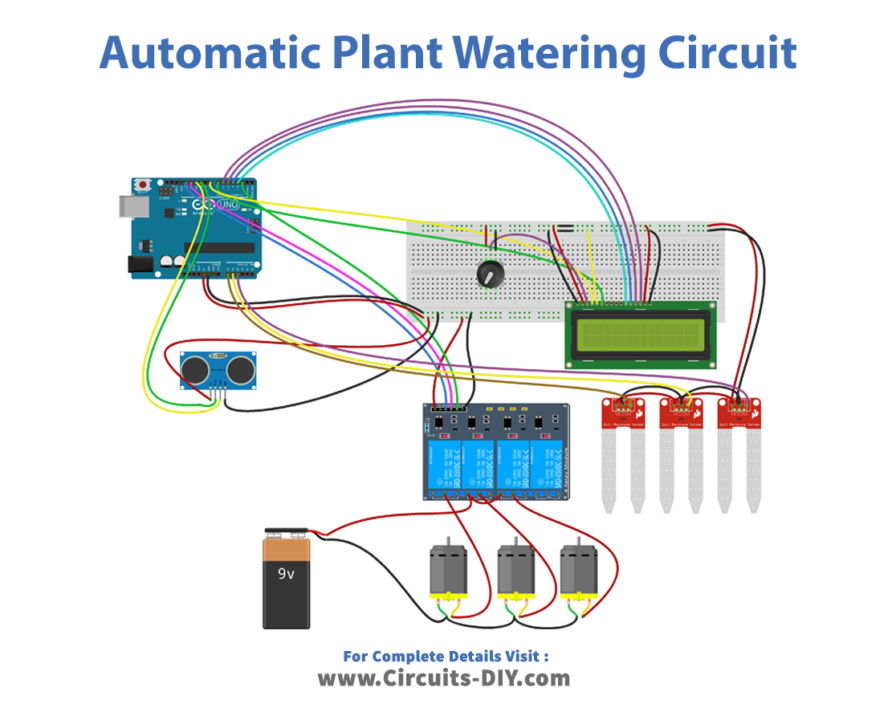
}Schematic
Make connections according to the circuit diagram given below.
Installing Arduino IDE
First, you need to install Arduino IDE Software from its official website Arduino. Here is a simple step-by-step guide on “How to install Arduino IDE“.
Installing Libraries
Before you start uploading a code, download and unzip the following libraries at /Progam Files(x86)/Arduino/Libraries (default), in order to use the sensor with the Arduino board. Here is a simple step-by-step guide on “How to Add Libraries in Arduino IDE“.
Code
Now copy the following code and upload it to Arduino IDE Software.
const int trigPin = 9;
 const int echoPin = 10;
 long duration;
 int distanceCm, distanceInch;

 #include <LiquidCrystal.h>

// initialize the library by associating any needed LCD interface pin
// with the arduino pin number it is connected to
const int rs =8 , en = 7, d4 = 3, d5 = 4, d6 = 5, d7 = 6;
LiquidCrystal lcd(rs, en, d4, d5, d6, d7);

 void setup() {
  // put your setup code here, to run once:

pinMode(A0, INPUT);
pinMode(A1, INPUT);
pinMode(A2, INPUT);
Serial.begin(9600);
pinMode(2, OUTPUT);
pinMode(11, OUTPUT);
pinMode(12, OUTPUT);
pinMode(trigPin, OUTPUT);
   pinMode(echoPin, INPUT);
   lcd.begin(16, 2);
}
void loop() {
  // put your main code here, to run repeatedly:
digitalWrite(trigPin, LOW);
   delayMicroseconds(2);
   digitalWrite(trigPin, HIGH);
   delayMicroseconds(10);
   digitalWrite(trigPin, LOW);
   duration = pulseIn(echoPin, HIGH);
   distanceCm= duration*0.034/2;
   distanceInch = duration*0.0133/2;
int soil_moisture = analogRead(A0);
int soil_moisture_2 = analogRead(A1);
int soil_moisture_3 = analogRead(A2);
Serial.print(soil_moisture);
Serial.print("      ");
Serial.print(soil_moisture_2);
Serial.print("      ");
Serial.println(soil_moisture_3);

int z= map(soil_moisture, 0, 1023, 100, 0);
int z_2= map(soil_moisture_2, 0, 1023, 100, 0);
int z_3= map(soil_moisture_3, 0, 1023, 100, 0);
//Serial.print(z);
//Serial.print(" %");
//Serial.print("   ");
 //Serial.print("Distance: ");
 int a = map(distanceCm, 0, 17, 20, 0);
   //Serial.print(distanceCm);
   //Serial.println(" Cm");
   lcd.clear();
   lcd.setCursor(0, 0);
    lcd.print("SM1");
    lcd.setCursor(0, 1);
   lcd.print(z);
   lcd.setCursor(3, 1);
   lcd.print("%");
    lcd.setCursor(6, 0);
    lcd.print("SM2");
    lcd.setCursor(6, 1);
   lcd.print(z_2);
   lcd.setCursor(9, 1);
   lcd.print("%");
    lcd.setCursor(13, 0);
    lcd.print("SM3");
    lcd.setCursor(12, 1);
   lcd.print(z_3);
   lcd.setCursor(15, 1);
   lcd.print("%");
   delay(300);
    lcd.clear();
   lcd.setCursor(0, 0);
   lcd.print("WATER LEVEL");
   lcd.setCursor(12, 0);
   lcd.print(a);
   lcd.setCursor(14, 0);
   lcd.print("Cm");

 delay(300);

if(soil_moisture>500)
{
  digitalWrite(2,LOW);
  }
  else
  {
    digitalWrite(2,HIGH);
  }
if(soil_moisture_2>280)
{
  digitalWrite(11,LOW);
  }
  else
  {
    digitalWrite(11,HIGH);
  }
  if(soil_moisture_3>700)
{
  digitalWrite(12,LOW);
  }
  else
  {
    digitalWrite(12,HIGH);
  }
}
Working Explanation
The code starts with initializing the pins for the ultrasonic sensor (trigPin and echoPin) and the LCD screen. It then enters the loop() function which repeats indefinitely. Inside the loop, the code first reads the distance from the ultrasonic sensor and converts it to both centimeters and inches. It then reads the analog input values from three soil moisture sensors connected to pins A0, A1, and A2. The soil moisture values are mapped to a percentage between 0 and 100 using the map() function.
The code then displays the soil moisture values on the LCD screen, along with labels indicating which sensor corresponds to which value. The water level is also displayed on the LCD screen in centimeters. Finally, the code uses conditional statements to turn on or off three digital output pins (2, 11, and 12) based on the soil moisture readings. If the soil moisture reading is above a certain threshold for a given sensor, the corresponding output pin is turned off, otherwise, it is turned on.
Applications
- Efficient water usage
- Increased crop yield
- Time-saving
- Remote monitoring and control
- Customizable irrigation schedules