In this tutorial, we are going to make a “Reverse Car Parking Sensor Circuit”.
Let’s say, we have a tiny space for parking vehicles and need to take the reverse. So it is important, that we can do it without any damage. Here is a very helpful and effective solution given as a prototype. It displays the distance from any object and warns when it hits the wall or the object and must pause. This circuit is very convenient for the parking detector. The required components for this circuit, are the ultrasonic sensor ranging module HC-SR04, Arduino nano board, and a buzzer.
Here by interfacing these elements, we can build a car reverse parking sensor circuit. This circuit works effectively over all obstacles and gives a sensing range of 2cm to 400cm. The HC-SR04 requires only 5V and has minimum functional terminals. This car parking assistant can protect your car from any damage, during reverse parking. It indicates the distance of the car from any object and raises an alarm when it reaches close to the wall or the object, where needs to be stopped.
Hardware Required
| S.no | Components | Value | Qty |
|---|---|---|---|
| 1. | Arduino Nano | – | 1 |
| 2. | Module | HC-SR04 | 1 |
| 3. | Buzzer | – | 1 |
| 4. | Connecting wires | – | 1 |
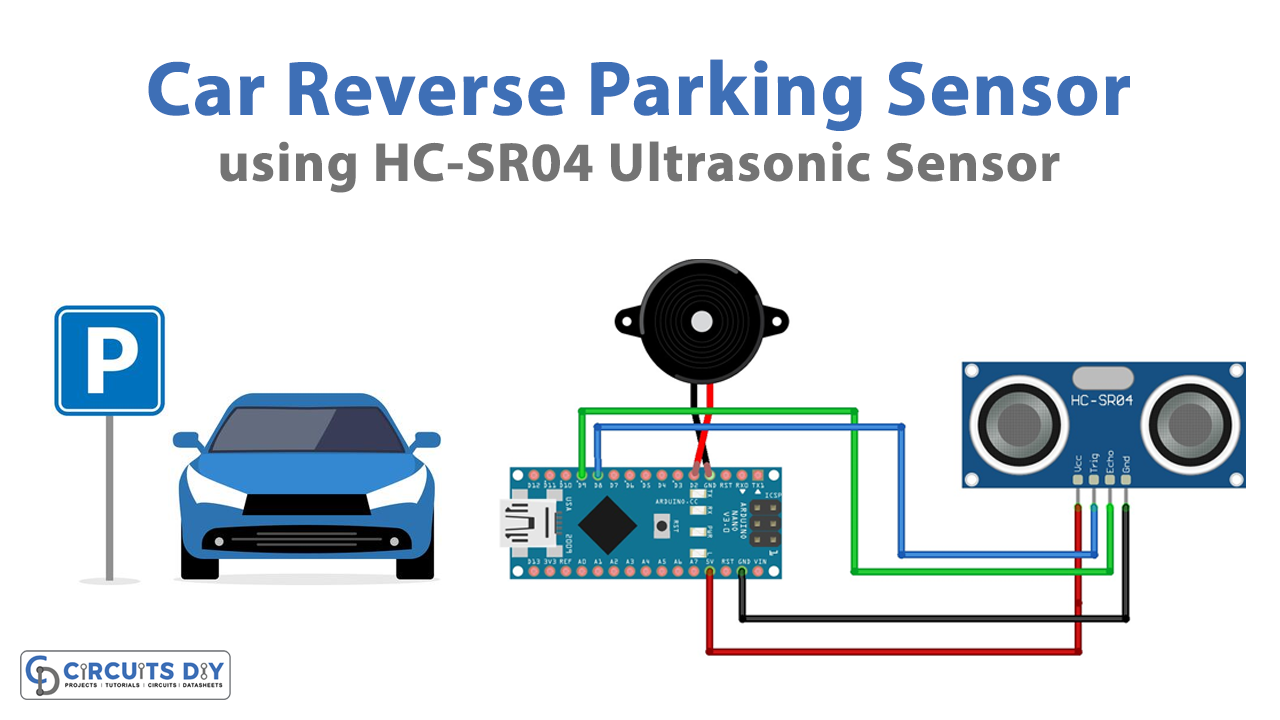
Circuit Diagram

Arduino Code
This code is built to detect obstacles within a 100cm range, and you can vary this range up to 400cm depending on your need.
/*
HC-SR04 Ping distance sensor
VCC to arduino 5v GND to arduino GND
Echo to Arduino pin 9 Trig to Arduino pin 8
Buzzer +ve to Arduino pin 2 and GND to GND
Original code sourced from theorycircuit.com
Some code and wiring inspired by arduino.cc
*/

#define trigPin 8
#define echoPin 9
#define Buzzer 2

void setup() {
Serial.begin (9600);
pinMode(trigPin, OUTPUT);
pinMode(echoPin, INPUT);
pinMode(Buzzer, OUTPUT);

}

void loop() {

digitalWrite(trigPin, LOW);
delayMicroseconds(2);
digitalWrite(trigPin, HIGH);
delayMicroseconds(10);
digitalWrite(trigPin, LOW);

duration = pulseIn(echoPin, HIGH);

distance = (duration/2) / 29.1;

if (distance < 100)
{
digitalWrite(Buzzer,HIGH); //less than 100cm then buzzer will produce beep sound

}
else {
digitalWrite(Buzzer,LOW);
}

if (distance >= 300 || distance <= 0)
{
Serial.println("Out of range");
}
else {
Serial.print(distance);
Serial.println(" cm");
}
delay(500);
}
Working Explanation
The main parts of the circuit are Arduino nano and ultrasonic sensor HC-SR04. Here the HC-SR04 has two modules, including an ultrasonic transmitter, receiver, and inbuilt control circuit. This sensor gives signals when it detects an object. It sends eight 40 kHz signals and detects whether there is a pulse signal back, if any signal back presents this sensor gives a high level out. Here connect the +5V supply from the Arduino nano board to the +Vcc of the ultrasonic sensor, connect Gnd to Gnd of the ultrasonic sensor, and after that connect the trig pin to D8 and Echo pin to D9 of Arduino nano. As per the circuit and Arduino code, connect the buzzer to D2 and GND. For uploading the Arduino sketch, use a separate 9V battery to power the Arduino board through the Vin pin. This circuit gives output through the buzzer, if any object detects near the car it makes a sound. Enclose all the elements with a suitable plastic case, and make it open to the ultrasonic sensor modules and buzzer. Attach the plastic case to the center part of the vehicle.
Applications
- This circuit can be used in automobiles to park the vehicle safely.
- We can use this circuit to measure the distance.