Introduction
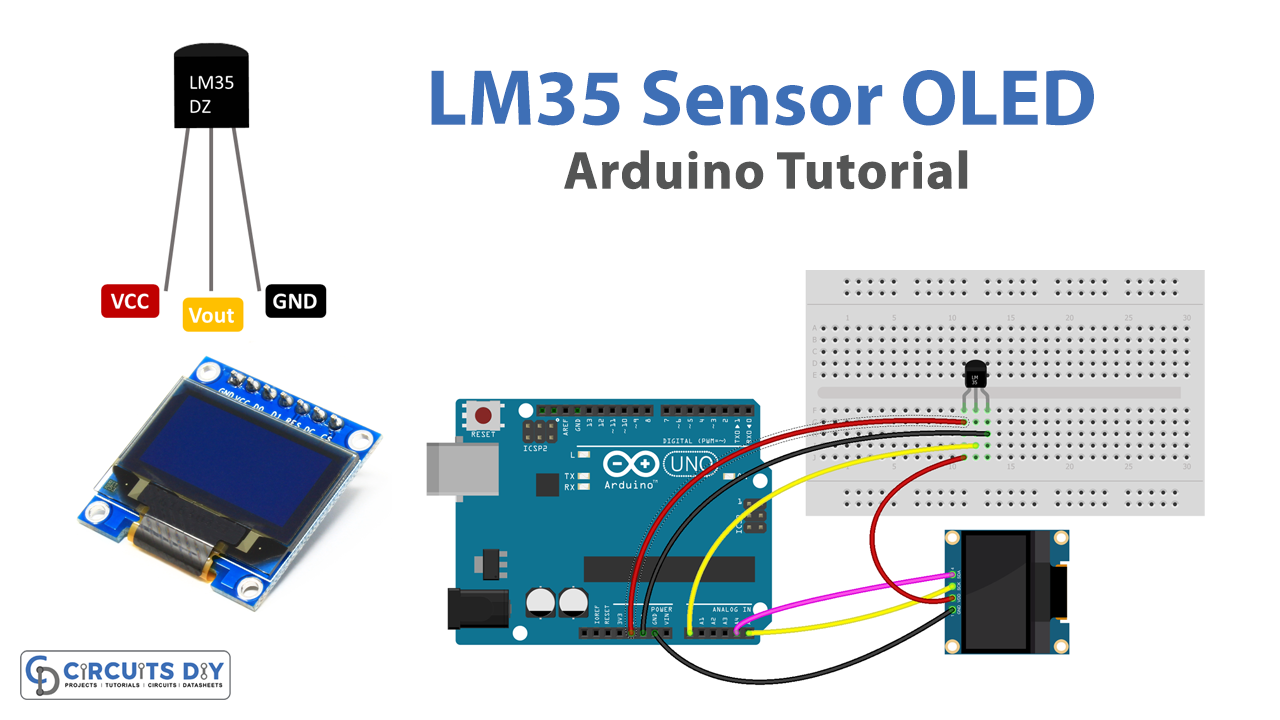
Interfacing an LM35 temperature sensor with an SSD1306 OLED I2C 128X64 OLED display module using an Arduino UNO microcontroller refers to connecting the LM35 temperature sensor to the OLED display module using the I2C communication protocol with the help of an Arduino UNO as a microcontroller. This setup allows the user to measure and display the temperature readings from the LM35 sensor on the OLED display.
The LM35 is a linear temperature sensor that provides a voltage output proportional to the temperature in Celsius. It has a sensitivity of 10mV/°C, meaning that for every 1°C increase in temperature, the output voltage will increase by 10mV. The sensor can measure temperatures ranging from -55°C to 150°C, with an accuracy of ±1°C.
Hardware Components
You will require the following hardware for LM35 Sensor on OLED with Arduino.
| S.no | Component | Value | Qty |
|---|---|---|---|
| 1. | Arduino UNO | – | 1 |
| 2. | USB Cable Type A to B | – | 1 |
| 3. | OLED Display 128×64 | SSD1306 I2C | 1 |
| 4. | Temperature Sensor | LM35 | 1 |
| 5. | Power Adapter for Arduino | 9V | 1 |
| 6. | Breadboard | – | 1 |
| 7. | Jumper Wires | – | 1 |
LM35 Sensor on OLED with Arduino
- Start by including the necessary libraries:
#include <Wire.h>
#include <Adafruit_GFX.h>
#include <Adafruit_SSD1306.h>
- Define the display size and pin number for the LM35 sensor:
#define SCREEN_WIDTH 128 // OLED display width, in pixels
#define SCREEN_HEIGHT 64 // OLED display height, in pixels
#define LM35_PIN A0      // Pin connected to LM35 sensor
- Initialize the OLED display object connected to I2C:
Adafruit_SSD1306 oled(SCREEN_WIDTH, SCREEN_HEIGHT, &Wire, -1);
- In the setup() function, start serial communication and initialize the OLED display:
void setup() {
  Serial.begin(9600);
  if (!oled.begin(SSD1306_SWITCHCAPVCC, 0x3C)) {
    Serial.println(F("SSD1306 allocation failed"));
    while (true);
  }
  delay(2000);  // wait for initializing
  oled.clearDisplay();
}
- In the loop() function, read the analog value from the LM35 sensor, convert it to temperature in centigrade and fahrenheit, and display the result on the OLED display:
void loop() {
  float temperatureC = (analogRead(LM35_PIN) * 0.4887); // converting LM35 reading to centigrade
  float temperatureF = temperatureC * 1.8 + 32; // converting centigrade to farenheit
  String displayString = "Temp: " + String(temperatureC, 1) + "°C / " + String(temperatureF, 1) + "°F";

  Serial.println(displayString);
  oledDisplayCenter(displayString);
}
- Define the function to display text on the OLED display in the center:
void oledDisplayCenter(String text) {
  int16_t x1;
  int16_t y1;
  uint16_t width;
  uint16_t height;

  oled.getTextBounds(text, 0, 0, &x1, &y1, &width, &height);
  oled.clearDisplay(); // clear display
  oled.setCursor((SCREEN_WIDTH - width) / 2, (SCREEN_HEIGHT - height) / 2);
  oled.println(text);  // text to display
  oled.display();
}
Schematic
Make connections according to the circuit diagram given below.
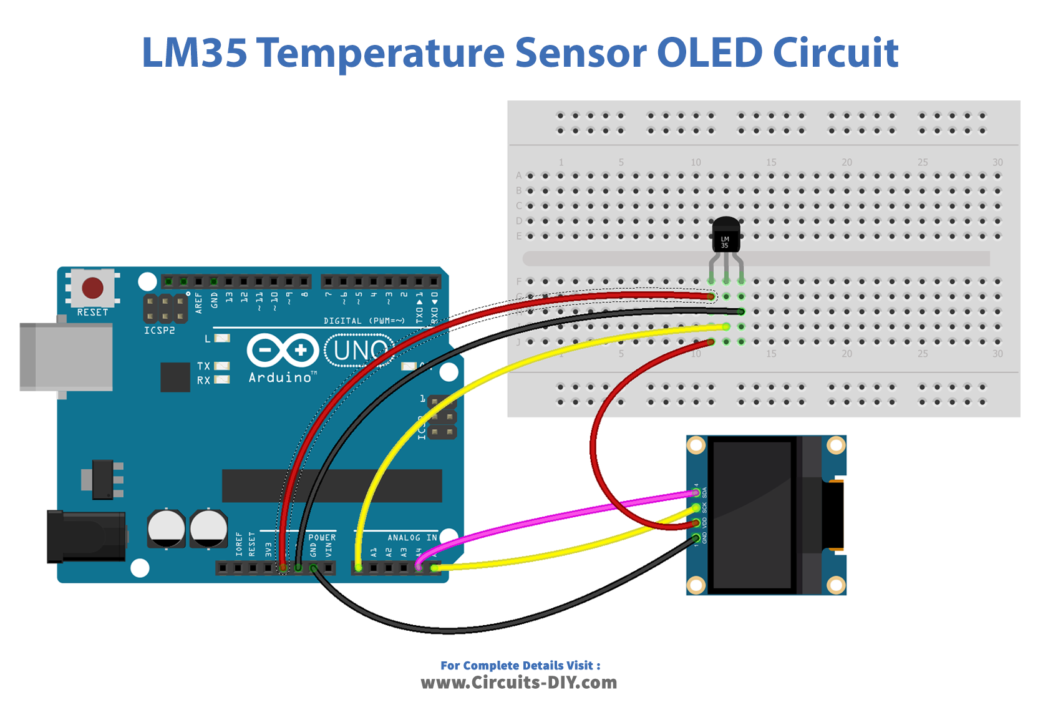
Wiring / Connections
| Arduino | LM35 Temperature Sensor | OLED |
|---|---|---|
| 5V | VCC | VCC |
| GND | GND | GND |
| A0 | OUT | |
| A4 | SDA | |
| A5 | SCL |
Installing Arduino IDE
First, you need to install Arduino IDE Software from its official website Arduino. Here is a simple step-by-step guide on “How to install Arduino IDE“.
Installing Libraries
Before you start uploading a code, download and unzip the following libraries at /Progam Files(x86)/Arduino/Libraries (default), in order to use the sensor with the Arduino board. Here is a simple step-by-step guide on “How to Add Libraries in Arduino IDE“.
Code
Now copy the following code and upload it to Arduino IDE Software.
#include <Wire.h>
#include <Adafruit_GFX.h>
#include <Adafruit_SSD1306.h>

#define SCREEN_WIDTH 128 // OLED display width,  in pixels
#define SCREEN_HEIGHT 64 // OLED display height, in pixels

#define ADC_VREF_mV    5000.0 // in millivolt
#define ADC_RESOLUTION 1024.0

#define PIN_LM35 A0 // pin connected to LM35 temperature sensor

Adafruit_SSD1306 oled(SCREEN_WIDTH, SCREEN_HEIGHT, &Wire, -1); // create SSD1306 display object connected to I2C

String tempString;

void setup() {
  Serial.begin(9600);

  // initialize OLED display with address 0x3C for 128x64
  if (!oled.begin(SSD1306_SWITCHCAPVCC, 0x3C)) {
    Serial.println(F("SSD1306 allocation failed"));
    while (true);
  }

  delay(2000);         // wait for initializing
  oled.clearDisplay(); // clear display

  oled.setTextSize(2);      // text size
  oled.setTextColor(WHITE); // text color
  oled.setCursor(0, 10);    // position to display

  tempString.reserve(10);   // to avoid fragmenting memory when using String
}

void loop() {
  // get the ADC value from the LM35 temperature sensor
  int adcVal = analogRead(PIN_LM35);
  // convert the ADC value to voltage in millivolt
  float milliVolt = adcVal * (ADC_VREF_mV / ADC_RESOLUTION);
  // convert the voltage to the temperature in Celsius
  float tempC = milliVolt / 10;

  tempString  = String(tempC, 2); // two decimal places
  tempString += "°C";

  Serial.println(tempString);    // print the temperature in Celsius to Serial Monitor
  oledDisplayCenter(tempString); // display temperature on OLED
}

void oledDisplayCenter(String text) {
  int16_t x1;
  int16_t y1;
  uint16_t width;
  uint16_t height;

  oled.getTextBounds(text, 0, 0, &x1, &y1, &width, &height);

  // display on horizontal and vertical center
  oled.clearDisplay(); // clear display
  oled.setCursor((SCREEN_WIDTH - width) / 2, (SCREEN_HEIGHT - height) / 2);
  oled.println(text); // text to display
  oled.display();
}
Working Explanation
This is an Arduino code that displays the temperature readings from an LM35 temperature sensor on an OLED display. The code first sets up a serial communication at a 9600 baud rate and initializes the OLED display. It then enters the main loop where it continuously reads the analog voltage value from the LM35 temperature sensor, converts the voltage value to temperature in Celsius, and displays it on the OLED screen in the center. The voltage-to-temperature conversion is done by dividing the voltage in millivolts by 10, as the LM35 outputs 10 millivolts per degree Celsius. The code uses Adafruit libraries to control the OLED display, which makes it easier to display text, set the cursor position, and clear the display.
Applications
- Room temperature monitoring and control.
- HVAC system temperature control.
- Temperature measurement in industrial processes.
- Monitoring temperature in agriculture, greenhouses, and livestock farms.
- Temperature control in ovens and kilns.
- Temperature measurement in automobiles and other vehicles.
- Environmental monitoring and control.
- Monitoring temperature in refrigeration systems.
- Temperature measurement in medical equipment and devices.
- Temperature sensing for safety systems, such as fire alarms.
Conclusion.
We hope you have found this LM35 Sensor on OLED Circuit very useful. If you feel any difficulty in making it feel free to ask anything in the comment section.