Introduction
Safety is the major issue in today’s world. Public places like malls, government places like parliament, courts. educational institutes like universities, colleges, schools, etc, demand proper protection. Even homes require security these days. And, as the world is changing, it’s replacing humans with devices. Hence, security guards are being replaced by security devices. These security devices have some kinds of sensors in them. PIR motion is one of those sensors. Therefore, In this tutorial, we are going to interface “HC-SR501 PIR Sensor with Arduino UNO”.
How do PIR Sensors work?
The PIR sensors have two slots in them. Every slot has a special kind of material that detects the IR range. At the normal temperature, both slots hold an identical amount of IR energy. But, when the sensor senses the warm body like any human or a thing, it hinders one-half of the sensor. As result, it causes a positive differential change. In the same vein, when the body leaves, it produces negative differential change.
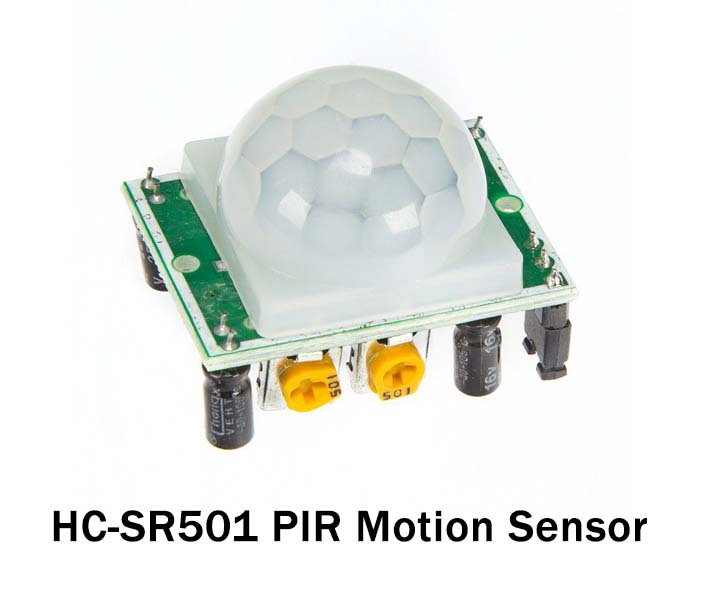
HC-SR501 PIR Sensor
HC-SR501 PIR module has a wide range of input voltage from 4V to 12V. But, it is recommended to use 5Volts. Further, it can efficiently detect the movement of objects or humans. Moreover, the sensor possesses two operating modes, repeatable and non-repeatable. Furthermore, it can easily cover a distance of about 120 degrees within 7 meters. The sensor works in operating temperatures from -20 degrees to 80 degrees celsius. Also, it consumes very little power. Hence, favorable to manage. The sensor operates on two modes that are repeatable and default non-repeatable modes. Moreover, the sensor has a potentiometer to adjust the sensitivity and time.
Hardware Required
| S.no | Component | Value | Qty |
|---|---|---|---|
| 1. | Arduino | UNO | 1 |
| 2. | USB Cable Type A to B | – | 1 |
| 3. | Jumper Wires | – | – |
| 4. | PIR Sensor | HC-SR501 | 1 |
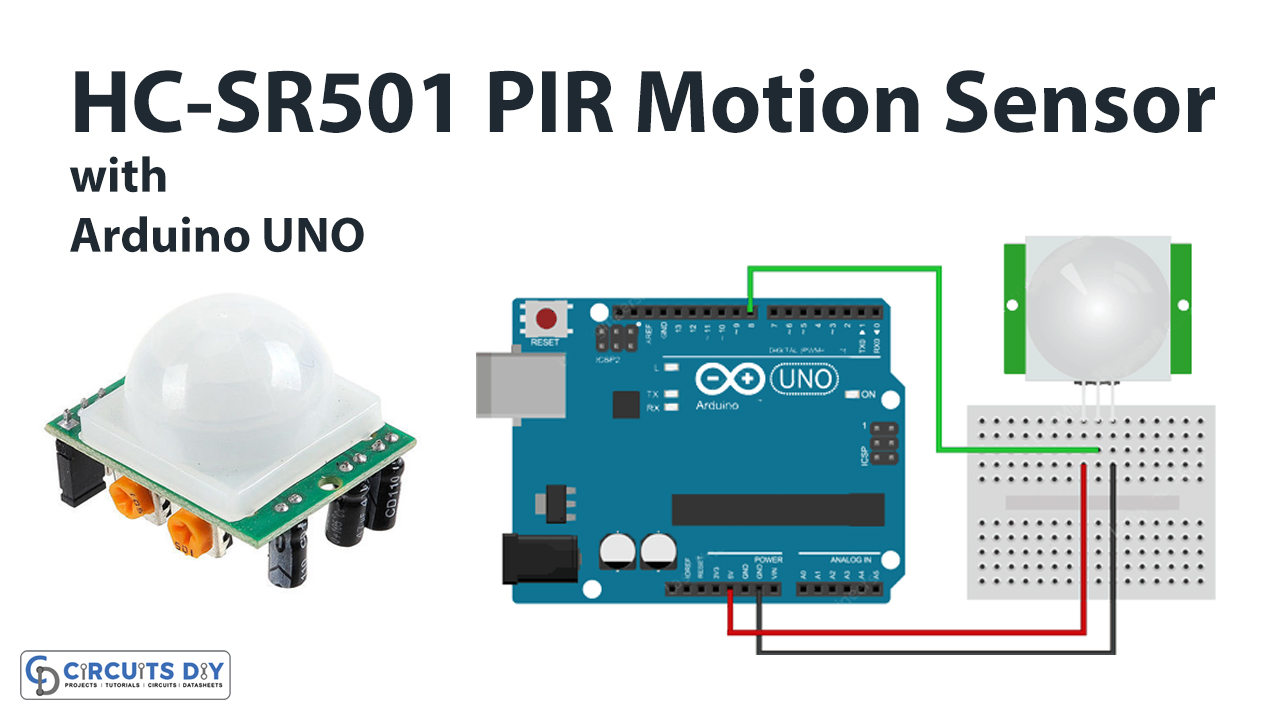
Circuit Diagram

Connection Table
| Arduino | HC-SR501 PIR Sensor |
|---|---|
| 5V | VCC |
| D8 | VOUT |
| GND | GND |
Arduino Code
int ledPin = 13;                // choose the pin for the LED
int inputPin = 8;               // choose the input pin (for PIR sensor)
int pirState = LOW;             // we start, assuming no motion detected
int val = 0;                    // variable for reading the pin status

void setup() {
  pinMode(ledPin, OUTPUT);      // declare LED as output
  pinMode(inputPin, INPUT);     // declare sensor as input

  Serial.begin(9600);
}

void loop(){
  val = digitalRead(inputPin);  // read input value

  if (val == HIGH)	// check if the input is HIGH
  {
    digitalWrite(ledPin, HIGH);  // turn LED ON

    if (pirState == LOW)
	{
      Serial.println("Motion detected!");	// print on output change
      pirState = HIGH;
    }
  }
  else
  {
    digitalWrite(ledPin, LOW); // turn LED OFF

    if (pirState == HIGH)
	{
      Serial.println("Motion ended!");	// print on output change
      pirState = LOW;
    }
  }
}
Working Explanation
To build the circuit interface the HC-SR501 PIR Sensor With Arduino UNO according to the diagram. Copy the above code and paste it into the Arduino IDE. Upload the code. Initially, when there is no motion detected, the LED remains off. When there is any motion sensed by the sensor the LED starts to glow. Hence, you can see the message on the serial monitor. When that body leaves, the LED goes OFF, and the serial monitor prints the message accordingly.
Code Explanation
- Start the code by defining the Arduino pins that are connected with the PIR sensor’s pins. Define pirSTate to hold the state of the sensor. Since initially the state is low, therefore, define it as low. Define the val variable to hold the readings coming from the sensor.
- In the void setup, define the input and output pin modes of an Arduino. Declare the sensor as input and an LED as output. Initialize the serial monitor by using Serial. begin( ).
- In the void loop, to read the input from the sensor, call the function digitalRead( ). Give the if condition and check if the input gets high the LED goes high. Also, it changes the PIR state from low to high and print motion detected! on the Serial Monitor. Else, it will print motion ended! and LED goes low.
Application and Uses
- Automatic street lights.
- Intruder alarms.
- Burglar Alarms.
- Home, office, and industrial automation.