Introduction
Interfacing a 4×4 matrix keypad with an Arduino UNO microcontroller involves connecting the keypad to the microcontroller and programming the microcontroller to receive input from the keypad and perform desired actions based on that input. The keypad, consisting of 4 rows and 3 columns, is connected to the microcontroller’s digital pins and uses a matrix of buttons to generate input signals. The microcontroller uses a library such as the Keypad library to simplify the process of reading the keypad input and interpreting it as key presses. The program written for the microcontroller can be used to perform various functions based on the key pressed, such as displaying the key press on a serial monitor, triggering events, and more.
A 4×4 matrix keypad is a device that consists of 16 buttons arranged in 4 rows and 4 columns. It’s a type of keyboard that’s commonly used in small-scale control systems and user interfaces. The keypad allows users to input numbers, characters, or symbols. The keypad connects to the microcontroller through a set of rows and columns. The microcontroller reads the state of the buttons by scanning the rows and columns. When a button is pressed, it connects the corresponding row and column, which is then detected by the microcontroller. The microcontroller then translates the row and column combination into a specific keycode, which can be interpreted and used to control other devices or perform specific actions
Hardware Components
You will require the following hardware for Interfacing Keypad with Arduino.
| S.no | Component | Value | Qty |
|---|---|---|---|
| 1. | Arduino UNO | – | 1 |
| 2. | USB Cable Type A to B | – | 1 |
| 3. | Keypad 3×4 and 4×4 Kit | – | 1 |
| 4. | Power Adapter for Arduino | 9V | 1 |
| 5. | Jumper Wires | – | 1 |
Keypad with Arduino UNO
- Step 1: Add the required libraries to your code
#include <Keypad.h>
The Keypad library is required to interface the 4×4 matrix keypad with the Arduino UNO.
- Step 2: Define the keypad matrix and the symbols for each button
const byte ROWS = 4;
const byte COLS = 4;
char keys[ROWS][COLS] = {
  {'1', '2', '3', 'A'},
  {'4', '5', '6', 'B'},
  {'7', '8', '9', 'C'},
  {'*', '0', '#', 'D'}
};
byte rowPins[ROWS] = {5, 4, 3, 2}; // Connect keypad ROW0, ROW1, ROW2 and ROW3 to these Arduino pins.
byte colPins[COLS] = {9, 8, 7, 6}; // Connect keypad COL0, COL1, COL2 and COL3 to these Arduino pins.
In this step, we define a 2D char array keys to store the symbols for each button on the keypad and a rowPins and colPins arrays to store the pin numbers that the rows and columns of the keypad are connected to.
- Step 3: Create an instance of the Keypad class
Keypad keypad = Keypad(makeKeymap(keys), rowPins, colPins, ROWS, COLS);
Here, we create an instance of the Keypad class and pass the keys, rowPins, colPins, ROWS, and COLS as arguments to the constructor.
- Step 4: Set up the serial communication in the setup() function
void setup() {
  Serial.begin(9600);
}
In the setup() function, we initialize the serial communication with a baud rate of 9600 bps.
- Step 5: Read the keypad and display the pressed button symbol in the loop() function
void loop() {
  char key = keypad.getKey();

  if (key) {
    Serial.println(key);
  }
  delay(50);
}
In the loop() function, we call the getKey() method of the Keypad object keypad to read the pressed button on the keypad. If a button is pressed, the getKey() method returns the symbol of the pressed button, which is then printed to the serial monitor. We use a delay of 50 milliseconds to avoid multiple readings of the same button press.
Schematic
Make connections according to the circuit diagram given below.
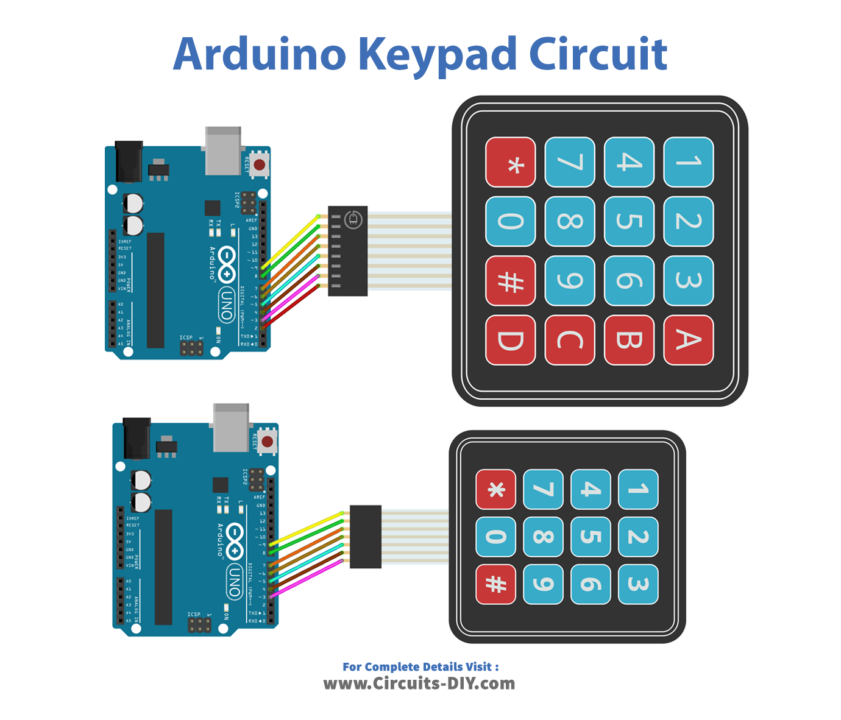
Wiring / Connections
| Arduino | 4×3 keypad | 4×4 keypad |
|---|---|---|
| D2 | R1 | |
| D3 | R1 | R2 |
| D4 | R2 | R3 |
| D5 | R3 | R4 |
| D6 | R4 | C1 |
| D7 | C1 | C2 |
| D8 | C2 | C3 |
| D9 | C3 | C4 |
Installing Arduino IDE
First, you need to install Arduino IDE Software from its official website Arduino. Here is a simple step-by-step guide on “How to install Arduino IDE“.
Installing Libraries
Before you start uploading a code, download and unzip the following libraries at /Progam Files(x86)/Arduino/Libraries (default), in order to use the sensor with the Arduino board. Here is a simple step-by-step guide on “How to Add Libraries in Arduino IDE“.
Code
Now copy the following code and upload it to Arduino IDE Software.
#include <Keypad.h>

const int ROW_NUM = 4; //four rows
const int COLUMN_NUM = 3; //three columns

char keys[ROW_NUM][COLUMN_NUM] = {
  {'1','2','3'},
  {'4','5','6'},
  {'7','8','9'},
  {'*','0','#'}
};

byte pin_rows[ROW_NUM] = {9, 8, 7, 6}; //connect to the row pinouts of the keypad
byte pin_column[COLUMN_NUM] = {5, 4, 3}; //connect to the column pinouts of the keypad

Keypad keypad = Keypad( makeKeymap(keys), pin_rows, pin_column, ROW_NUM, COLUMN_NUM );

void setup(){
  Serial.begin(9600);
}

void loop(){
  char key = keypad.getKey();

  if (key){
    Serial.println(key);
  }
}
Working Explanation
The code defines an array of characters that represents the keys on the keypad and maps the rows and columns of the keypad to specific pins on the Arduino. The keypad is then constructed using the Keypad library’s “makeKeymap” function and the pin connections.
In the setup section, the baud rate for the serial communication is set to 9600 using the “Serial.begin()” function. In the loop section, the code continuously checks if a key is pressed on the keypad using the “keypad.getKey()” function. If a key is pressed, the code uses the “Serial.println()” function to print the character of the pressed key to the serial monitor.
Applications
- Password protection systems
- Menu-driven interfaces for microcontroller projects
- Data entry systems
- Navigation and control interfaces for robots and other electronic devices
- Gaming systems
- Interactive display systems
- Home automation systems
- Alphanumeric input for data logging and display systems
- Standalone keypads for controlling other devices
- ATM machines and other self-service kiosks.
Conclusion.
We hope you have found this Arduino – Keypad Circuit very useful. If you feel any difficulty in making it feel free to ask anything in the comment section.