Introduction
Interfacing a push-button with an Arduino Uno microcontroller is a simple and easy task. A push-button is a type of switch that can be used to control various electronic devices and systems. By connecting a push button to an Arduino Uno, we can program the microcontroller to detect when the button is pressed and perform certain actions based on that input. This can include turning on or off an LED, sending a signal to another device, or even controlling a motor.
In this tutorial, we will learn how to interface a push button with an Arduino Uno and write code to detect button presses and perform specific actions. We will also provide detailed instructions, including wiring diagrams and sample code, to help you get started with this project.
Hardware Components
You will require the following hardware for Interfacing Push Button with Arduino.
| Value | Component | Value | Qty |
|---|---|---|---|
| 1. | Arduino UNO | – | 1 |
| 2. | USB Cable Type A to B | – | 1 |
| 3. | Button | – | 1 |
| 4. | 9V Power Adapter for Arduino | – | 1 |
| 5. | Breadboard | – | 1 |
| 6. | Jumper Wires | – | 1 |
Push Button with Arduino
- The first step is to define the pin number to which the pushbutton is connected. In this case, the pushbutton is connected to digital pin 2, so we create a constant integer variable named
buttonPinand assign it the value of 2.
const int buttonPin = 2;- Next, we create an integer variable named
buttonStateto store the current state of the pushbutton. This variable is initialized to 0.
int buttonState = 0;- In the
setup()function, we initialize the pushbutton pin as an INPUT using thepinMode()function. We also initialize serial communication using
Serial.begin(9600).void setup() {
pinMode(buttonPin, INPUT);
Serial.begin(9600);
}
- In the
loop()function, we read the state of the pushbutton using thedigitalRead()function and assign it to thebuttonStatevariable.
buttonState = digitalRead(buttonPin);- We then use a
if-elsestatement to check the value of thebuttonStatevariable. If it is equal to HIGH, it means that the button is pressed and we print “Button pressed” to the serial monitor. If the value is LOW, it means that the button is not pressed and we print “Button released” to the serial monitor.
if (buttonState == HIGH) {
    Serial.println("Button pressed");
  }
  else {
    Serial.println("Button released");
  }
- The
Serial.println()function is used to print the string to the serial monitor. This can be viewed by opening the Serial Monitor in the Arduino IDE and setting the baud rate to 9600. - Finally, the code is uploaded to the Arduino board and the pushbutton is pressed and released to check the status on the serial monitor.
Schematic
Make connections according to the circuit diagram given below.
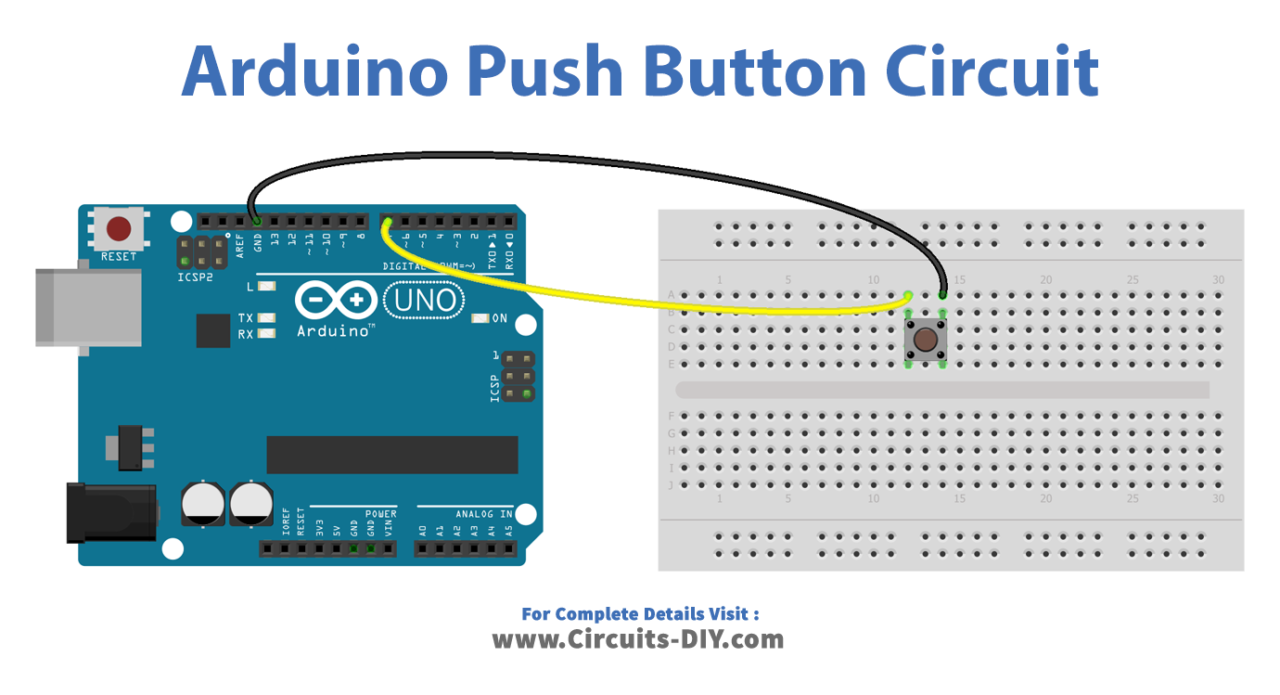
Wiring / Connections
| Arduino | Push Button |
|---|---|
| D7 | One End |
| GND | Other End |
Installing Arduino IDE
First, you need to install Arduino IDE Software from its official website Arduino. Here is a simple step-by-step guide on “How to install Arduino IDE“.
Code
Now copy the following code and upload it to Arduino IDE Software.
const int BUTTON_PIN = 7;       // the number of the pushbutton pin

void setup() {
  // initialize serial communication at 9600 bits per second:
  Serial.begin(9600);
  // initialize the pushbutton pin as an pull-up input
  // the pull-up input pin will be HIGH when the switch is open and LOW when the switch is closed.
  pinMode(BUTTON_PIN, INPUT_PULLUP);
}

void loop() {
  // read the state of the switch/button:
  int buttonState = digitalRead(BUTTON_PIN);

  // print out the button's state
  Serial.println(buttonState);
}
Working Explanation
Interfacing a pushbutton with an Arduino Uno involves configuring the button’s pin as an input, and then reading the state of that pin in the Arduino’s main loop. The code will typically check if the button’s pin is high or low, and based on that, perform a certain action. The Arduino’s built-in digitalRead() function is used to read the state of the button’s pin. When the button is pressed, the pin is connected to the ground, and the digitalRead() function will return a LOW value.
When the button is not pressed, the pin is pulled high by a resistor, and the digitalRead() function will return a HIGH value. The code can then use this information to trigger events or perform actions.
Applications
- Control button for a robotic or automated process
- Emergency stop button for machinery or equipment
- Selection button for menu navigation or options
- Calibration or reset button for sensors or instruments
- Start/Stop button for timers or countdown systems
- Trigger button for data acquisition or measurement systems
- Control button for musical instruments or audio equipment
Conclusion.
We hope you have found this Push Button Tutorial very useful. If you feel any difficulty in making it feel free to ask anything in the comment section.