Introduction
Temperature sensor plays an important role to estimate the climate of the surroundings. Generally, it measures the heat energy or the coldness of the environment or object. Temperature sensor devices convert the input information into electronic data. These sensors are used to record or monitor the changes that happen in temperature. There are various types of temperature sensors in the electronic industry. Thermistors, thermocouples, thermometers, RTDs are some of them.
The internal structure of these sensors converts heat energy into electrical energy. Some analog chips are also used for this purpose. LM35 is one of those chips. This temperature sensor chip gives the analog signal at the output. So, In this tutorial, we are going to interface ” LM35 and LM34 Temperature Sensors with Arduino UNO”
Working Principle of LM35 Sensor
The temperature was first detected by the sensor. It is then converted into electrical voltage. The temperature change is proportional to the change of output voltage. At every 1 degree of temperature change, it produces 10mV.
Features of LM35 Sensor
- The measuring temperature range is -55°C to 150°C
- The drain current is lower than 60uA
- Accuracy : 0.5°C
- The sensor is inexpensive and affordable

Hardware Required
| S.no | Component | Value | Qty |
|---|---|---|---|
| 1. | Arduino | UNO | 1 |
| 2. | USB Cable Type A to B | – | 1 |
| 3. | Jumper Wires | – | – |
| 4. | Temperature Sensors | LM35, LM34 | – |
Circuit Diagram
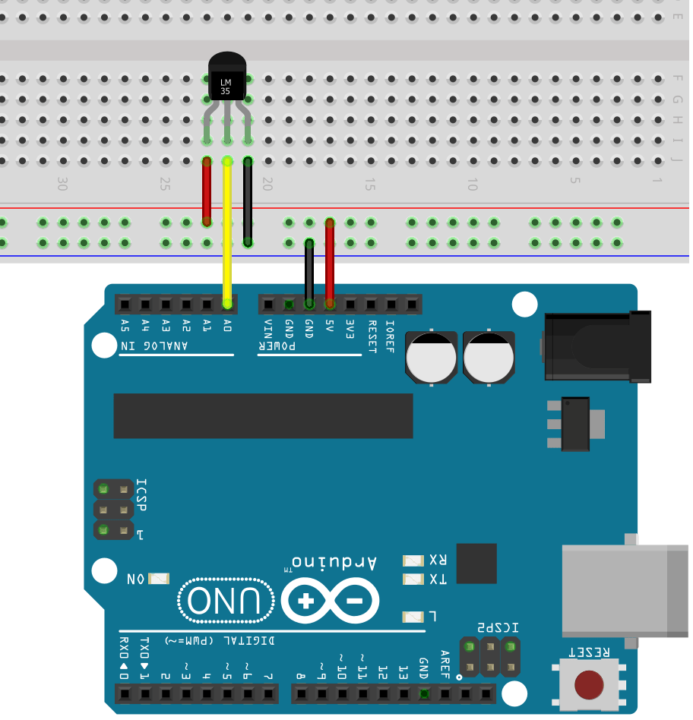
Connection Table
| Arduino | LM35 / LM34 |
|---|---|
| 5V | VCC |
| Any Analog Pin | Vout |
| GND | GND |
Arduino Code
// Circuits DIY
 // For Complete Details Visit -> https://circuits-diy.com
const int sensorPin = A0;
float sensorValue;
float voltageOut;

float temperatureC;
float temperatureF;

// uncomment if using LM35&34
//float temperatureK;

void setup() {
  pinMode(sensorPin, INPUT);
  Serial.begin(9600);
}

void loop() {
  sensorValue = analogRead(sensorPin);
  voltageOut = (sensorValue * 5000) / 1024;

  // calculate temperature for LM35 (LM35DZ)
  temperatureC = voltageOut / 10;
  temperatureF = (temperatureC * 1.8) + 32;

  // calculate temperature for LM34
  //temperatureF = voltageOut / 10;
  //temperatureC = (temperatureF - 32.0)*(5.0/9.0);

  Serial.print("Temperature(ºC): ");
  Serial.print(temperatureC);
  Serial.print("  Temperature(ºF): ");
  Serial.print(temperatureF);
  Serial.print("  Voltage(mV): ");
  Serial.println(voltageOut);
  delay(1000);
}
Working Explanation
Assemble LM35/ LM34 Temperature Sensors with Arduino UNO same as the schematic given above. Now upload the code in your Arduino IDE. Open the serial monitor. You will see the temperatures reading in Celsius and Fahrenheit. Also, you can see the voltage readings in mV. The sensor gives the readings after every second. And, that would be shown on the Serial monitor.
Code Explanation
- First, it defines the pin that is connected to the sensor’s output pin. Then, it defines the variable sensor value which holds the value read by the sensor. voltageOut is defined store the output voltage. temperatureC and temperatureF are used to hold the values in Celcius and Fahrenheit respectively.
- In the void setup, we have declared the sensor pin as the input. And, have initialized the Serial monitor.
- In the void loop, the function is defined to read the analog values. Now, there are functions to convert the values in Celsius and Fahrenheit. Then there are functions to print those values. The loop is then repeated every after one second .
Application and Uses
- It is used to measure the temperature of an object
- To lend the shutdown
- To monitor battery temperatures
- For HVAC applications
- In weather stations