Introduction
The GSM based irrigation circuit using cellphone missed calls and Arduino is an innovative system designed to enable remote control of irrigation systems through the use of mobile phones. This system utilizes the Global System for Mobile Communication (GSM) technology to establish communication between the irrigation system and the mobile phone. With this system, farmers and other users can control the irrigation system from any location, as long as they have access to a mobile phone.
The system is built on the popular open-source microcontroller platform, Arduino, making it easy to implement and customize. This technology has the potential to revolutionize irrigation systems by increasing efficiency, reducing water wastage, and improving crop yield.
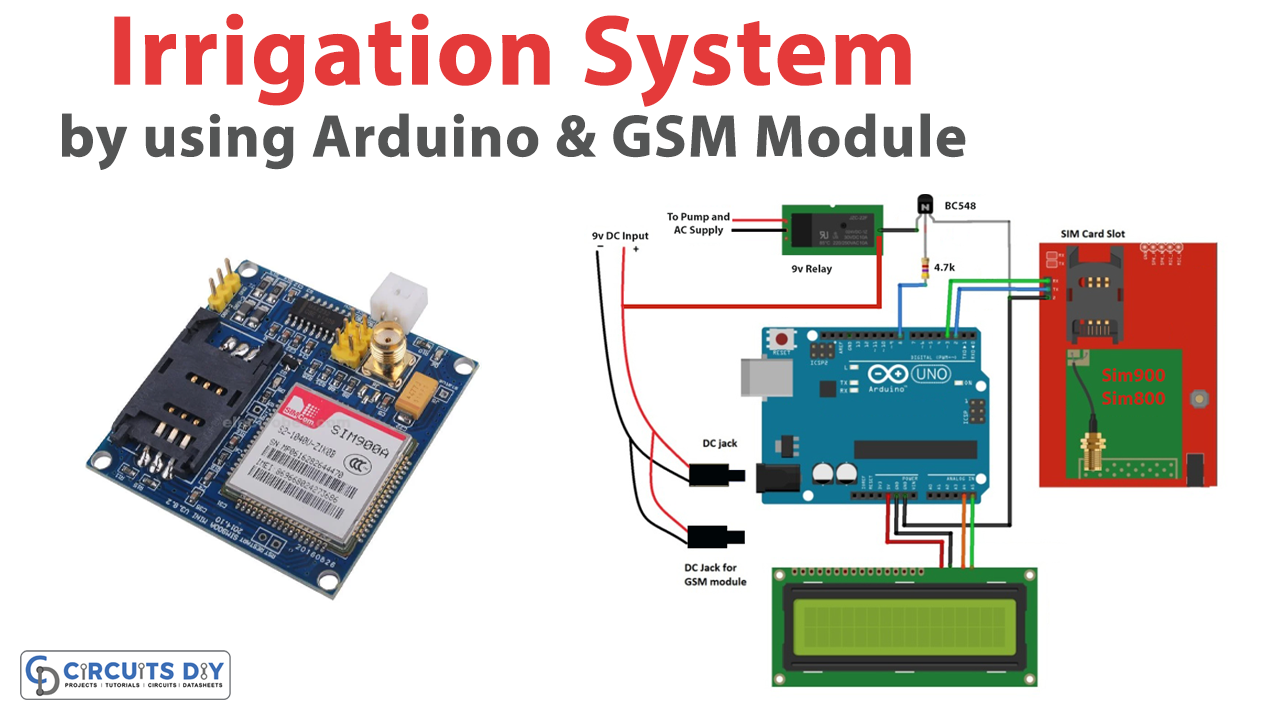
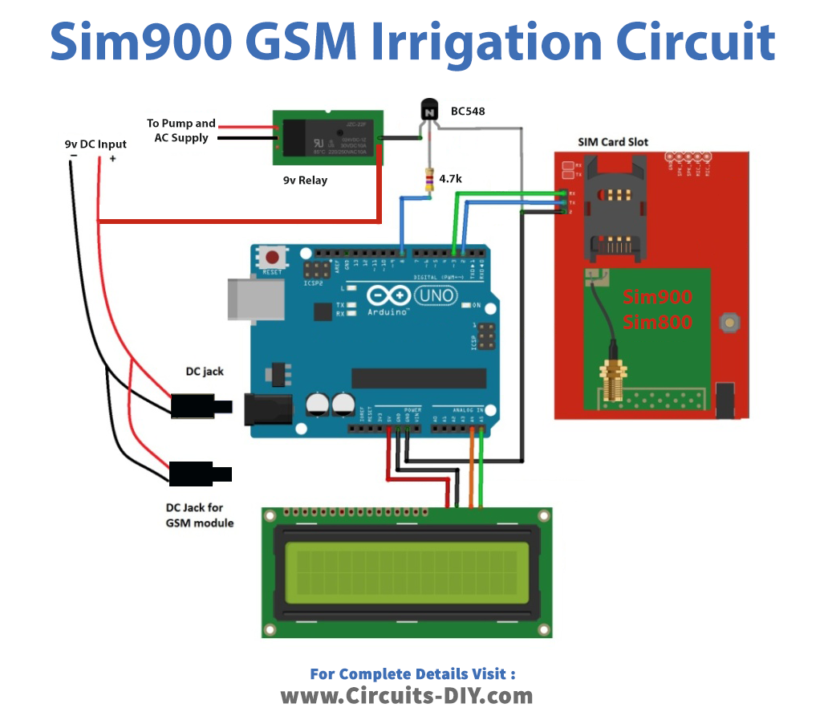
Hardware Components
You will require the following hardware for Interfacing ABC with Arduino.
| Components | Value | Qty |
|---|---|---|
| Arduino UNO | – | 1 |
| USB Cable Type A to B | – | 1 |
| DC Power for Arduino | – | 1 |
| GSM Sensor | SIM900/SIM800 | 1 |
| Transistor | BC548 | 1 |
| Relay | 9V | 1 |
| Resistor | 4.7Ω | 1 |
| Jumper Wires | – | 1 |
Arduino Code
- Include necessary libraries:
#include <LiquidCrystal_I2C.h>
#include <SoftwareSerial.h>
#include <EEPROM.h>
This code imports the necessary libraries that are used in the program.
- Initialize variables:
SoftwareSerial gsm(2, 3);
LiquidCrystal_I2C lcd(0x27, 16, 2);
int address = 0;
int wr_call_add = 1;
int f_address = 2;
int eeprom_dead = 3;
int wr_call_val = 0;
int f_value = 70;
int value = 0;
int ring = 0;
int i = 0;
int var = 0;
int eeprom_tst = 0;
int eeprom_tst_ack = 0;
int tst_var = 100;
int wr_call_tst = 100;
int eeprom_dead_val = 0;
String number = "";
String string = "";
const int output = 8;
boolean wait = true;
boolean at_flag = 1;
boolean net_flag = 1;
char str[] = "91xxxxxxxxxx";
This initializes various variables that will be used throughout the program.
- Set pin modes and initialize hardware:
gsm.begin(9600);
pinMode(output, OUTPUT);
This sets the pin modes for the output pin and initializes the GSM module.
- Check EEPROM:
if (EEPROM.read(f_address) != f_value)
{
    EEPROM.write(f_address, f_value);
    EEPROM.write(address, value);
    EEPROM.write(wr_call_add, wr_call_val);
    eeprom_dead_val = 0;
    EEPROM.write(eeprom_dead, eeprom_dead_val);
}
if (EEPROM.read(eeprom_dead) == 1)
{
    // Handle EEPROM error
}
if (EEPROM.read(address) == 0)
{
    // Do something
}
if (EEPROM.read(address) == 1)
{
    // Do something else
}
This checks the EEPROM to see if there are any issues, and performs certain actions based on the results.
- Initialize hardware:
void output_begin()
{
    lcd.setCursor(0, 0);
    lcd.print("Welcome to");
    lcd.setCursor(0, 1);
    lcd.print("Home Automation.");
    delay(2000);
    lcd.clear();
}
This initializes the LCD display by printing a welcome message.
- Main program loop:
void loop()
{
    serialEvent();
    if (ring == 1)
    {
        // Handle incoming call
    }
    if (EEPROM.read(address) == 0)
    {
        // Do something
    }
    if (EEPROM.read(address) == 1)
    {
        // Do something else
    }
}
This is the main program loop, which checks for incoming calls and performs certain actions based on the state of the EEPROM.
- Serial event handler:
void serialEvent()
{
    while (Serial.available())
    {
        char inChar = (char)Serial.read();
        string += inChar;
        if (inChar == '\n')
        {
            // Handle serial input
        }
    }
}
Schematic
Make connections according to the circuit diagram given below.
Installing Arduino IDE
First, you need to install Arduino IDE Software from its official website Arduino. Here is a simple step-by-step guide on “How to install Arduino IDE“.
Installing Libraries
Before you start uploading a code, download and unzip the following libraries at /Program Files(x86)/Arduino/Libraries (default), in order to use the sensor with the Arduino board. Here is a simple step-by-step guide on “How to Add Libraries in Arduino IDE“.
Code
Now copy the following code and upload it to Arduino IDE Software.
#include <LiquidCrystal_I2C.h>
#include <SoftwareSerial.h>
#include <EEPROM.h>

SoftwareSerial gsm(2, 3); // RX, TX
LiquidCrystal_I2C lcd(0x27, 16, 2);
// ----------- ----------- //
int address = 0; // <<<<<<< Change address = 10 in case of EEPROM failure.
int wr_call_add = 1; // <<<<<<<< Change wr_call_add = 11 in case of EEPROM failure.
int f_address = 2; // <<<<<<<<< Chnage f_address = 12 in case of EEPROM failure.
int eeprom_dead = 3; // <<<<<<<<<< Change eeprom_dead = 13 inc case of EEPROM failure.
// ----------- ----------- //
int wr_call_val = 0;
int f_value = 70;
int value = 0;
int ring = 0;
int i = 0;
int var = 0;
int eeprom_tst = 0;
int eeprom_tst_ack = 0;
int tst_var = 100;
int wr_call_tst = 100;
int eeprom_dead_val = 0;
String number = "";
String string = "";
const int output = 8;
boolean wait = true;
boolean at_flag = 1;
boolean net_flag = 1;
// ================ ============== //
char str[] = "91xxxxxxxxxx";
// ================= ============= //
// Replace xxxxxx your phone number starting with "91" which is India country code.
// Replce "91" with your own country code, if outside India.
void setup()
{
Serial.begin(9600);
lcd.init();
lcd.backlight();
gsm.begin(9600);
pinMode(output, OUTPUT);
if (EEPROM.read(f_address) != f_value)
{
EEPROM.write(f_address, f_value);
EEPROM.write(address, value);
EEPROM.write(wr_call_add, wr_call_val);
eeprom_dead_val = 0;
EEPROM.write(eeprom_dead, eeprom_dead_val);
}
if (EEPROM.read(eeprom_dead) == 1)
{
while (true)
{
lcd.clear();
lcd.setCursor(0, 0);
lcd.print("EEPROM Error.");
lcd.setCursor(0, 1);
lcd.print("System Disabled.");
delay(1500);
lcd.clear();
lcd.setCursor(0, 0);
lcd.print("Reload the code");
lcd.setCursor(0, 1);
lcd.print("with new address");
delay(1500);
}
}
if (EEPROM.read(address) == 0)
{
digitalWrite(output, LOW);
gsm_init();
lcd.clear();
if (EEPROM.read(wr_call_add) == 0)
{
lcd.setCursor(0, 0);
lcd.print("Sending SMS");
lcd.setCursor(0, 1);
lcd.print("Acknowledgement.");
delay(1000);
gsm.println("AT+CMGF=1");
delay(500);
gsm.print("AT+CMGS=");
gsm.print("\"");
gsm.print(str);
gsm.println("\"");
delay(1000);
gsm.println("Motor is OFF / System is Ready.");
delay(100);
gsm.println((char)26);
}
if (EEPROM.read(wr_call_add) == 1)
{
wr_call_val = 0;
EEPROM.write(wr_call_add, wr_call_val);
}
}
if (EEPROM.read(address) == 1)
{
eeprom_test();
output_begin();
}
}
void(* resetFunc) (void) = 0;
void loop()
{
serialEvent();
if (ring == 1)
{
number = "";
var = string.indexOf("+CLIP: \"");
if (var > 0)
{
number += string.substring(var + 8, var + 13 + 7);
}
if (number[0] == str[0] && number[1] == str[1] && number[2] == str[2] && number[3] == str[3]
&& number[4] == str[4] && number[5] == str[5] && number[6] == str[6] && number[7] == str[7]
&& number[8] == str[8] && number[9] == str[9] && number[10] == str[10] && number[11] == str[11])
{
gsm.println("ATH");
lcd.clear();
lcd.setCursor(0, 0);
lcd.print("Incomming call");
lcd.setCursor(0, 1);
lcd.print("Number Verified.");
delay(2000);
if (EEPROM.read(address) == 0)
{
EEPROM.write(address, 1);
}
else if (EEPROM.read(address) == 1)
{
EEPROM.write(address, 0);
}
resetFunc();
}
if (!(number[0] == str[0] && number[1] == str[1] && number[2] == str[2] && number[3] == str[3]
&& number[4] == str[4] && number[5] == str[5] && number[6] == str[6] && number[7] == str[7]
&& number[8] == str[8] && number[9] == str[9] && number[10] == str[10] && number[11] == str[11]))
{
gsm.println("ATH");
lcd.clear();
lcd.setCursor(0, 0);
lcd.print("Unknown number");
lcd.setCursor(0, 1);
lcd.print("Call Rejected.");
wr_call_val = 1;
EEPROM.write(wr_call_add, wr_call_val);
delay(2000);
resetFunc();
}
}
if (EEPROM.read(address) == 0)
{
serialEvent();
lcd.clear();
lcd.setCursor(0, 0);
lcd.print("System Standby");
lcd.setCursor(0, 1);
lcd.print("Status: OFF");
delay(1000);
}
else if (EEPROM.read(address) == 1)
{
lcd.setCursor(0, 0);
lcd.print("STATUS: ON");
lcd.setCursor(0, 1);
lcd.print("----------------");
}
}
void gsm_init()
{
lcd.print("System booting....");
lcd.setCursor(0, 1);
lcd.print("initiating......");
delay(1500);
lcd.clear();
lcd.setCursor(0, 0);
lcd.print("Checking Module");
lcd.setCursor(0, 1);
lcd.print("Connectivity....");
while (at_flag)
{
gsm.println("AT");
while (gsm.available() > 0)
{
if (gsm.find("OK"))
at_flag = 0;
}
delay(1000);
}
lcd.clear();
lcd.setCursor(0, 0);
lcd.print("Module");
lcd.setCursor(0, 1);
lcd.print("Connection: OK");
delay(1500);
eeprom_test();
lcd.clear();
lcd.setCursor(0, 0);
lcd.print("System is Ready");
lcd.setCursor(0, 1);
lcd.print("----------------");
delay(1500);
}
void serialEvent()
{
while (gsm.available())
{
char read_char = gsm.read();
string += read_char;
i++;

if (string[i - 4] == 'R' && string[i - 3] == 'I' && string[i - 2] == 'N' && string[i - 1] == 'G' )
{
ring = 1;
}
}
}
void output_begin()
{
digitalWrite(output, HIGH);
if (EEPROM.read(wr_call_add) == 0)
{
lcd.clear();
lcd.setCursor(0, 0);
lcd.print("Sending SMS");
lcd.setCursor(0, 1);
lcd.print("Acknowledgement.");
delay(1000);
gsm.println("AT+CMGF=1");
delay(500);
gsm.print("AT+CMGS=");
gsm.print("\"");
gsm.print(str);
gsm.println("\"");
delay(1000);
gsm.println("Motor is ON.");
delay(100);
gsm.println((char)26);
}
if (EEPROM.read(wr_call_add) == 1)
{
wr_call_val = 0;
EEPROM.write(wr_call_add, wr_call_val);
}
lcd.clear();
}
void eeprom_test()
{
lcd.clear();
lcd.setCursor(0, 0);
lcd.print("Testing EEPROM");
lcd.setCursor(0, 1);
lcd.print("Memory.");
delay(1500);
eeprom_tst = EEPROM.read(address);
eeprom_tst_ack = EEPROM.read(wr_call_add);
EEPROM.write(address, tst_var);
EEPROM.write(wr_call_add, wr_call_tst);
if (EEPROM.read(address) == tst_var && EEPROM.read(wr_call_add) == wr_call_tst)
{
EEPROM.write(address, eeprom_tst);
EEPROM.write(wr_call_add, eeprom_tst_ack);
if (EEPROM.read(address) != eeprom_tst || EEPROM.read(wr_call_add) != eeprom_tst_ack)
{
digitalWrite(output, LOW);
eeprom_dead_val = 1;
EEPROM.write(eeprom_dead, eeprom_dead_val);
lcd.clear();
lcd.setCursor(0, 0);
lcd.print("EEPROM Test is");
lcd.setCursor(0, 1);
lcd.print("Unsuccessful.");
delay(1500);
eeprom_sms();
}
else if (EEPROM.read(address) == eeprom_tst && EEPROM.read(wr_call_add) == eeprom_tst_ack)
{
lcd.clear();
lcd.setCursor(0, 0);
lcd.print("EEPROM Test is");
lcd.setCursor(0, 1);
lcd.print("Successful.");
delay(1500);
}
}
else if (EEPROM.read(address) != tst_var || EEPROM.read(wr_call_add) != wr_call_tst)
{
digitalWrite(output, LOW);
eeprom_dead_val = 1;
EEPROM.write(eeprom_dead, eeprom_dead_val);
lcd.clear();
lcd.setCursor(0, 0);
lcd.print("EEPROM Test is");
lcd.setCursor(0, 1);
lcd.print("Unsuccessful.");
delay(1500);
eeprom_sms();
}
}
void eeprom_sms()
{
lcd.clear();
lcd.setCursor(0, 0);
lcd.print("Sending SMS");
lcd.setCursor(0, 1);
lcd.print("Acknowledgement");
delay(1000);
gsm.println("AT+CMGF=1");
delay(500);
gsm.print("AT+CMGS=");
gsm.print("\"");
gsm.print(str);
gsm.println("\"");
delay(1000);
gsm.println("EEPROM error. System disabled. Please reload the code with new address.");
delay(100);
gsm.println((char)26);
while (true)
{
lcd.clear();
lcd.setCursor(0, 0);
lcd.print("EEPROM Error.");
lcd.setCursor(0, 1);
lcd.print("System Disabled.");
delay(1500);
lcd.clear();
lcd.setCursor(0, 0);
lcd.print("Reload the code");
lcd.setCursor(0, 1);
lcd.print("with new address");
delay(1500);
}
}
Working Explanation
The code starts with including the required libraries and initializing some variables. It then sets the phone number to send SMS to, initializes the system, and checks for EEPROM failure. If there is an EEPROM failure, it displays an error message on the LCD and disables the system. If the system is working fine, it checks if the motor is off, and if so, sends an SMS to the specified number. If the motor is not off, it waits for a call from the specified number. If the call is from the specified number, it turns the motor off, and if not, it rejects the call and sends an SMS to the specified number.
The code has a loop function that continuously checks for any incoming call from the GSM module. If there is an incoming call, it verifies if the number is the specified number. If it is, it turns off the motor if it is on, and if it is not, it rejects the call and sends an SMS to the specified number. The code has a serial event function that continuously reads data from the GSM module and stores it in a buffer. When the buffer contains the expected string, the code processes the data accordingly. The code also has a gsm_init function that initializes the GSM module and sends some basic commands to the module.
Applications
- Horticulture
- Greenhouses
- Landscaping
- Golf courses
- Parks and gardens
- Residential lawns and gardens
- Industrial irrigation systems
- Irrigation of large-scale plantations