Introduction
The limit switch controlling using an Arduino Uno microcontroller (MCU) refers to the process of using an Arduino Uno microcontroller to monitor the state of a limit switch and perform specific actions based on that state. A limit switch is an electrical switch that is used to detect the presence or absence of an object or to detect the end of travel of a mechanism.
Depending on the state of the switch, the code can perform different actions like activating or deactivating a motor, sending a signal to another device, or even printing the state of the switch in the serial monitor.
Hardware Components
You will require the following hardware for the Interfacing limit switch with Arduino.
| S.no | Component | Value | Qty |
|---|---|---|---|
| 1. | Arduino UNO | – | 1 |
| 2. | USB Cable Type A to B | – | 1 |
| 3. | Limit Switch | – | 1 |
| 4. | Power Adapter for Arduino | 9V | 1 |
| 5. | Wires | – | 1 |
| 6. | Jumper Wires | – | 1 |
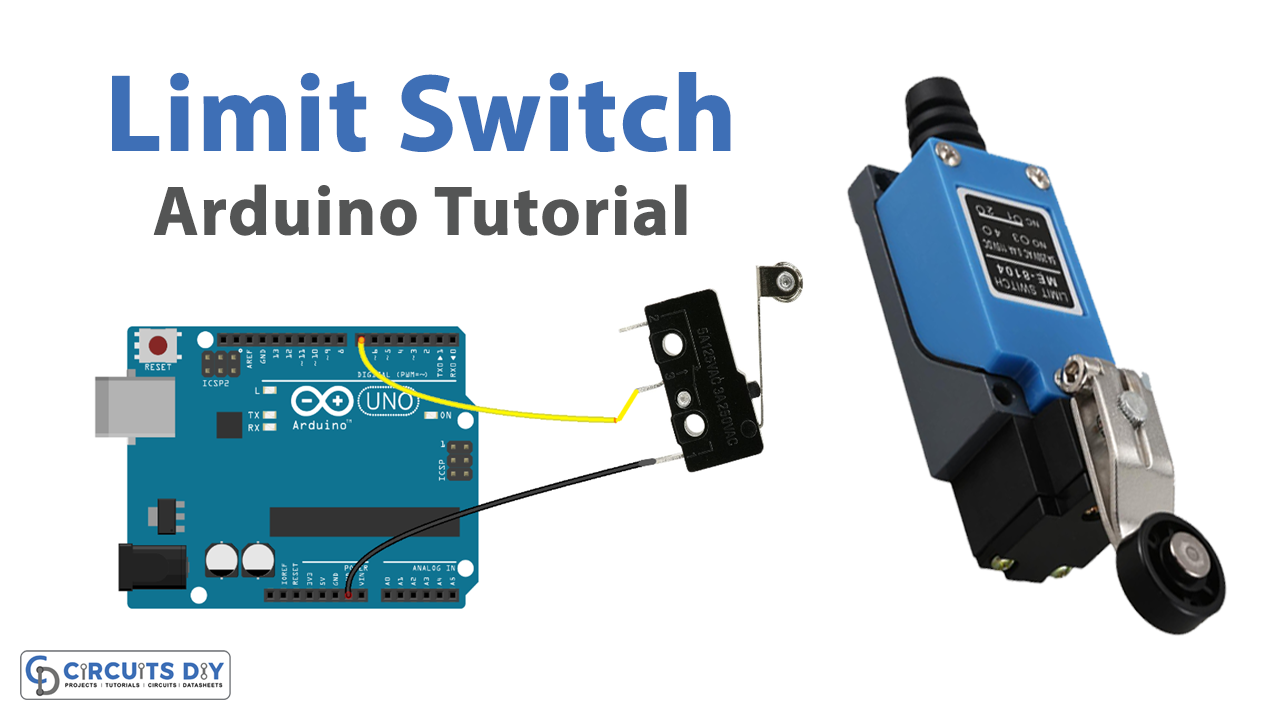
Limit Switch with Arduino
- Connect the limit switch to the Arduino board. The limit switch should be connected to a digital input pin, and it should also be connected to the ground. For example, you could connect the limit switch to digital pin 2 and ground.
- In the “setup()” function, set the digital input pin as an input using the “pinMode()” function and open the serial communication with the computer for monitoring the state of the limit switch.
void setup() {
  pinMode(2, INPUT);  // Set digital pin 2 as an input
  Serial.begin(9600); // Open serial communication at 9600 baud
}
- In the “loop()” function, read the state of the limit switch using the “digitalRead()” function.
void loop() {
    int switchState = digitalRead(2);  // Read digital pin 2
- Check the state of the switch, if the switch is closed the state will be LOW and if the switch is open the state will be HIGH
if(switchState == LOW) {
        // switch is closed
        Serial.println("Switch is Closed");
    } else if(switchState == HIGH) {
        // switch is open
        Serial.println("Switch is Open");
    }
- In the switch closed section you can perform the task you want to perform when the switch is closed like activating a motor or sending a signal to another device.
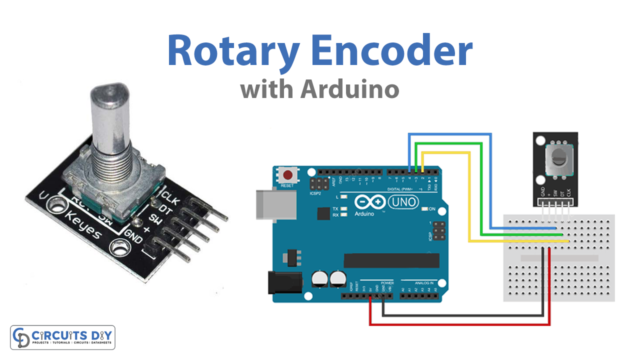
Schematic
Make connections according to the circuit diagram given below.
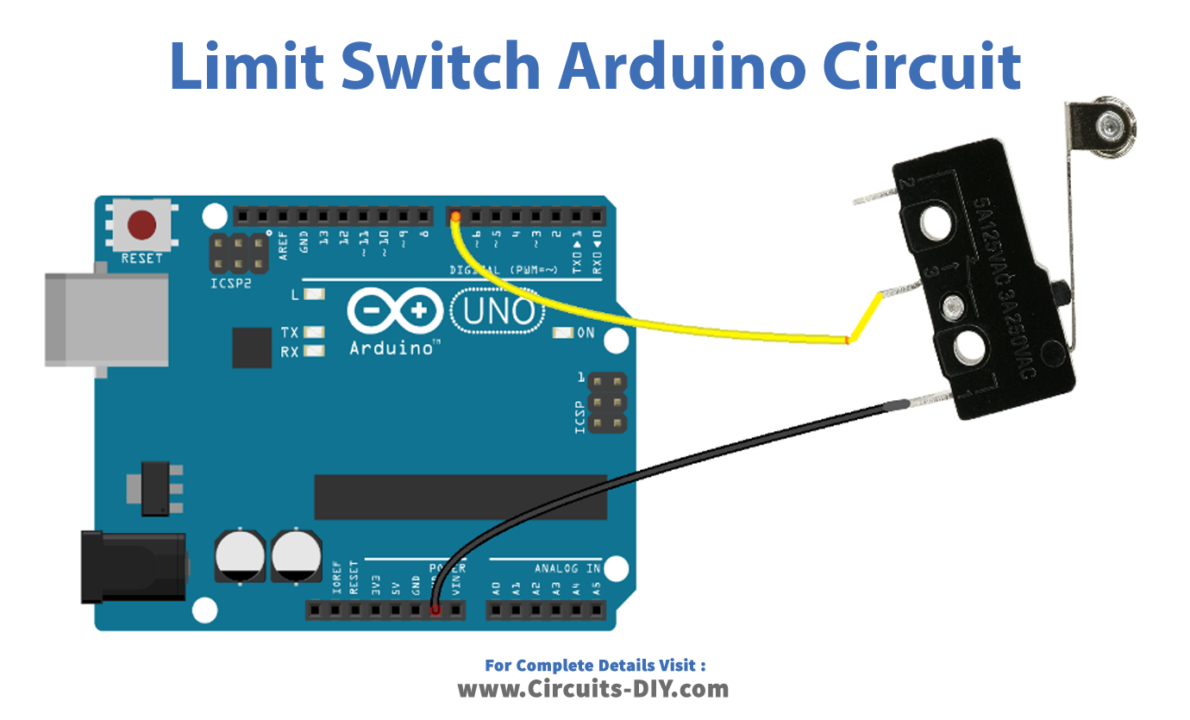
Wiring / Connections
| Arduino | Sensor |
|---|---|
| D7 | VCC |
| GND | GND |
Installing Arduino IDE
First, you need to install Arduino IDE Software from its official website Arduino. Here is a simple step-by-step guide on “How to install Arduino IDE“.
Installing Libraries
Before you start uploading a code, download and unzip the following libraries at /Progam Files(x86)/Arduino/Libraries (default), in order to use the sensor with the Arduino board. Here is a simple step-by-step guide on “How to Add Libraries in Arduino IDE“.
Code
Now copy the following code and upload it to Arduino IDE Software.
#include <ezButton.h>

ezButton limitSwitch(7);  // create ezButton object that attach to pin 7;

void setup() {
  Serial.begin(9600);
  limitSwitch.setDebounceTime(50); // set debounce time to 50 milliseconds
}

void loop() {
  limitSwitch.loop(); // MUST call the loop() function first

  if(limitSwitch.isPressed())
    Serial.println("The limit switch: UNTOUCHED -> TOUCHED");

  if(limitSwitch.isReleased())
    Serial.println("The limit switch: TOUCHED -> UNTOUCHED");

  int state = limitSwitch.getState();
  if(state == HIGH)
    Serial.println("The limit switch: UNTOUCHED");
  else
    Serial.println("The limit switch: TOUCHED");
}
Working Explanation
When using an Arduino Uno microcontroller to control a limit switch, the limit switch is connected to a digital input pin on the Arduino board. This pin is configured to read the state of the switch (HIGH or LOW) and it is set as an input using the “pinMode()” function.
In the “setup()” function, the input pin for the limit switch is configured as an input using the “pinMode()” function. In the “loop()” function, the state of the limit switch is read using the “digitalRead()” function. The function takes the pin number as an argument and returns the state of the pin (HIGH or LOW).
Applications
- Machine automation
- Conveyor systems
- Automotive production lines
- Industrial processing equipment
- Material handling equipment
- Home automation
- Industrial Safety systems
Conclusion.
We hope you have found this Arduino Limit Switch tutorial very useful. If you feel any difficulty in making it feel free to ask anything in the comment section.