Touch-sensing technology is becoming more popular day by day. You might interact with it every day and every hour. Every mobile phone has a touch screen or sensor, and there are many touch-sensing protocols/technologies. As we need a switch to control electronics or electrical appliances or something. Sometimes electrical switches will give a shock when we use electrical switches with wet hands. To control electrical or electronic load is much more interactive than ordinary switches.
A capacitive sensor is a kind of touch sensor, that requires little or no force to activate. It may be used to sense human touch, through more than a quarter of an inch of plastic, wood, ceramic, or other insulating material (not any kind of metal though). This enables the sensor, to be completely visually concealed. Here the digital capacitive touch sensor Arduino interface is made by using TTP223B IC digital capacitive sensor. This is very affordable and gives a good response when we touch it. It can be easily interfaced with any kind of microcontroller and contains only three terminals for the external interface.
Hardware Required
| S.no | Component | Value | Qty |
|---|---|---|---|
| 1. | Arduino UNO | – | 1 |
| 2. | USB Cable Type A to B | – | 1 |
| 3. | Jumper Wires | – | – |
| 4. | IC | TTP223 | 1 |
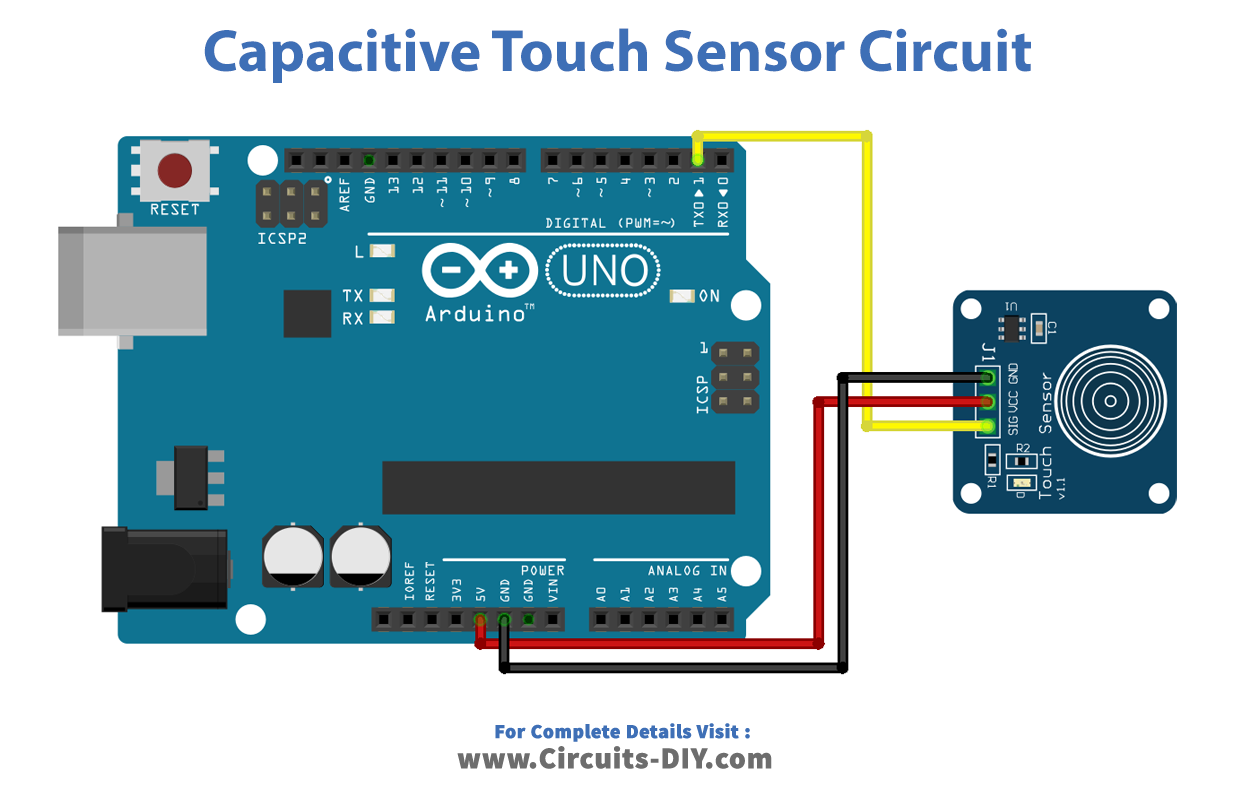
Arduino Digital Capacitive Touch Sensor Circuit
Arduino Code
//Digital Capacitive Touch Sensor Arduino Interfacing

#define sensorPin 1 // capactitive touch sensor - Arduino Digital pin D1

int ledPin = 13; // Output display LED (on board LED) - Arduino Digital pin D13

void setup() {
  Serial.begin(9600);
  pinMode(ledPin, OUTPUT);
  pinMode(sensorPin, INPUT);
}

void loop() {
  int senseValue = digitalRead(sensorPin);
  if (senseValue == HIGH){
    digitalWrite(ledPin, HIGH);
    Serial.println("TOUCHED");
  }
  else{
    digitalWrite(ledPin,LOW);
    Serial.println("not touched");
  }
  delay(500);

}
Capacitive Touch Sensor Switch Arduino
Working Explanation
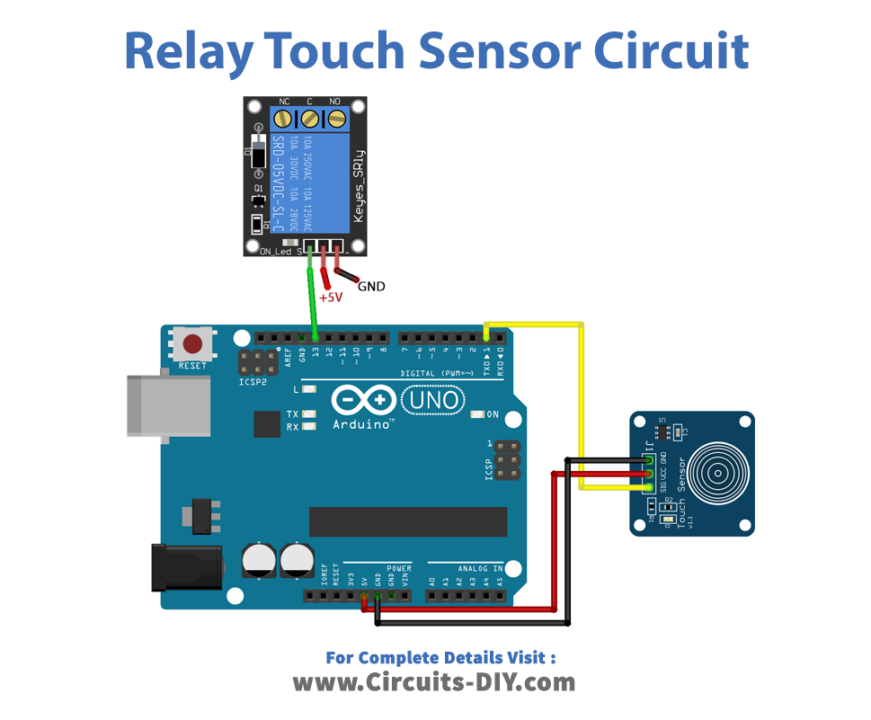
Here connect the Vcc pin of the sensor breakout board to Arduino’s +5V pin and Gnd to Gnd. Then connect the signal (SIG) pin to Arduino digital pin D1. Then upload the following code, to get a response when you touch the capacitive sensor. After uploading the code, open the serial monitor, with the Arduino still connected.
In this circuit, we hook up Arduino to control the load (AC Bulb) connected with a 5V DC relay. And this signal pin for the relay is taken from Arduino digital pin D13. Other wirings for the capacitive touch sensor are the same as for the observation hookup. We know that a capacitor stores charge. The more its capacitance, the more charge it can store. The capacitance of this capacitive touch sensor depends on, how close your hand is to the plate. Here the Arduino measures, how much time the capacitor (i.e. the touch sensor) takes to charge. It is an estimate of the capacitance. The capacitance may be very small, nevertheless. The Arduino measures it with accuracy.
Arduino Code to Control (ON / OFF) the Load Device
Upload the following Arduino Code to control (ON / OFF) the Load device.
//Digital Capacitive Touch Sensor Switch Arduino Interfacing

#define sensorPin 1 // capactitive touch sensor - Arduino Digital pin D1

int relayPin = 13; // Output RelayPin - Arduino Digital pin D13

boolean currentState = LOW;
boolean lastState = LOW;
boolean RelayState = LOW;

void setup() {
  Serial.begin(9600);
  pinMode(relayPin, OUTPUT);
  pinMode(sensorPin, INPUT);
}

void loop() {
  currentState = digitalRead(sensorPin);
    if (currentState == HIGH && lastState == LOW){
    delay(1);

    if (RelayState == HIGH){
      digitalWrite(relayPin, LOW);
      RelayState = LOW;
    } else {
      digitalWrite(relayPin, HIGH);
      RelayState = HIGH;
    }
  }
  lastState = currentState;
}
Applications
- As input devices, capacitive sensing touch screens are used in mobile phones, tablets, digital audio players, etc
- These sensors replace mechanical buttons.