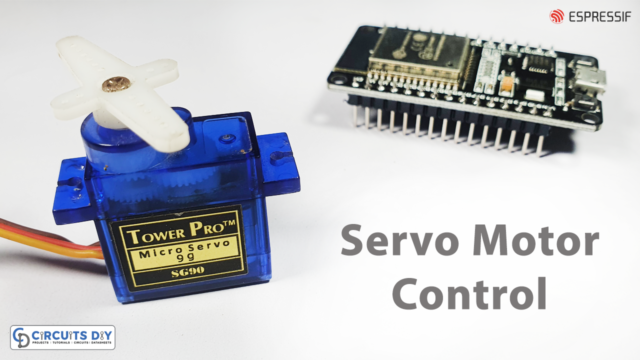
Overview
The integration of servo motor control with a web server using ESP32 microcontrollers has significantly expanded the capabilities of modern robotics and automation projects. This innovative approach combines the precision and versatility of servo motors with the convenience and accessibility of web-based control interfaces, offering a wide range of applications across various industries.
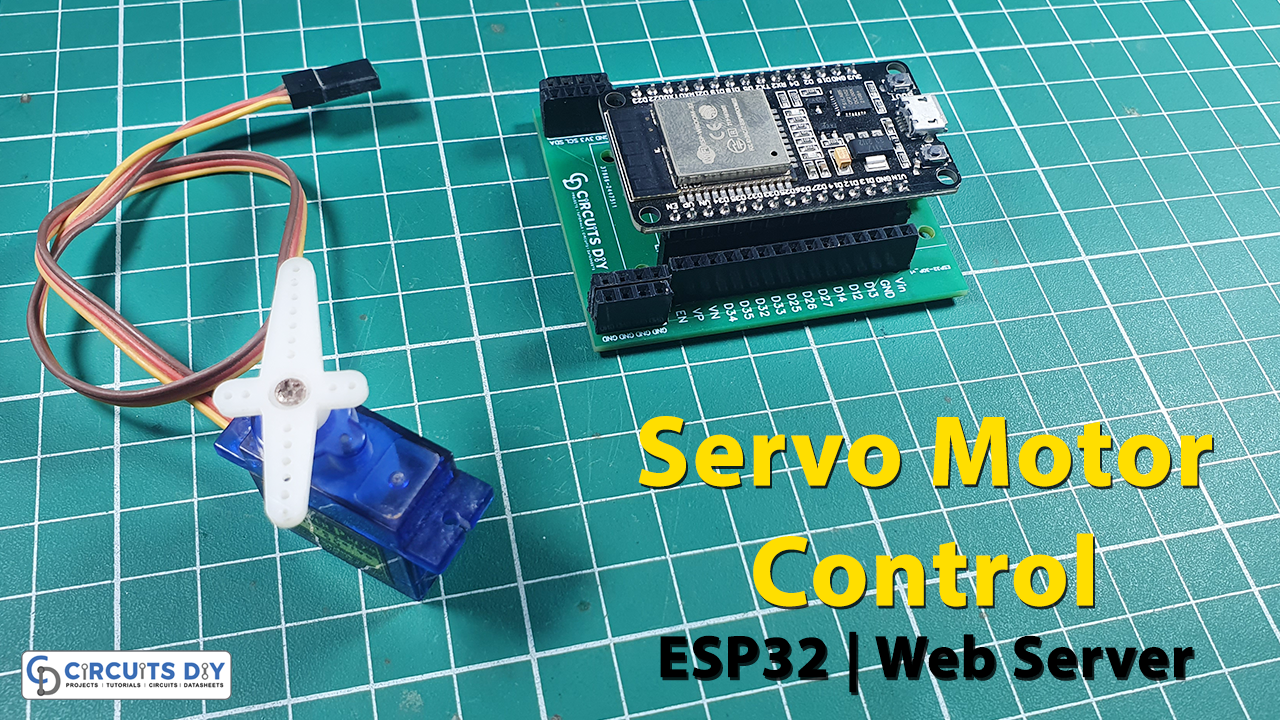
In today’s tutorial, we are going to control “Servo Motor” using a webserver & ESP32 Microcontroller.

PCBWay commits to meeting the needs of its customers from different industries in terms of quality, delivery, cost-effectiveness, and any other demanding requests. As one of the most experienced PCB manufacturers in China. They pride themselves to be your best business partners as well as good friends in every aspect of your PCB needs.
What is a Web Server?
A web server on ESP32 refers to the capability of the ESP32 microcontroller to host and serve web pages and web applications. The ESP32 is a powerful microcontroller with built-in Wi-Fi and Bluetooth capabilities, making it suitable for IoT (Internet of Things) projects that require connectivity to the Internet.
When the ESP32 is configured as a web server, it can receive HTTP (Hypertext Transfer Protocol) requests from clients, typically web browsers running on devices such as computers, smartphones, or tablets. The ESP32 processes these requests and responds by serving web pages, handling API calls, or executing specific actions based on the received commands.
Hardware Components
You’ll need the following hardware components to get started:

| Components | Value / Model | Qty |
|---|---|---|
| ESP32 | DOIT DEVKIT V1 Board | 1 |
| Micro Servo Motor | S0009 | 1 |
| Jumper Wires | – | 1 |
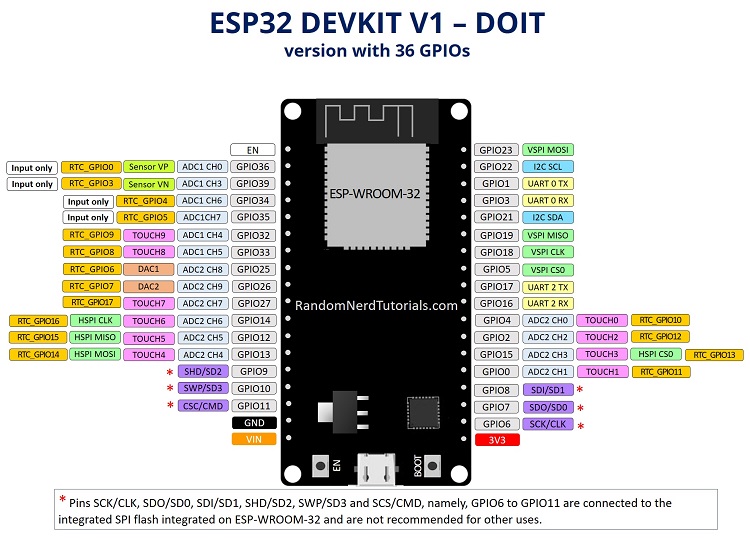
ESP32 Pinout
Steps-by-Step Guide
(1) Setting up Arduino IDE
Download Arduino IDE Software from its official site. Here is a step-by-step guide on “How to install Arduino IDE“.
(2) ESP32 in Arduino IDE
There’s an add-on that allows you to program the ESP32 using the Arduino IDE. Here is a step-by-step guide on “How to Install ESP32 on Arduino IDE“.
(3) Include Libraries
Before you start uploading a code, download and unzip the Servo.h library at /Program Files(x86)/Arduino/Libraries (default). Here is a step-by-step guide on “How to Add Libraries in Arduino IDE“.
(4) Schematic
Make connections according to the circuit diagram given below.

Wiring / Connections
| ESP32 | Servo Motor |
|---|---|
| VIN | VCC |
| GND | GND |
| GPIO13 | Signal |
(5) Uploading Code
Now copy the following code and upload it to Arduino IDE Software.
#include <WiFi.h>
#include <Servo.h>

Servo myservo;  // create servo object to control a servo
// twelve servo objects can be created on most boards

// GPIO the servo is attached to
static const int servoPin = 13;

// Replace with your network credentials
const char* ssid     = "REPLACE_WITH_YOUR_SSID";
const char* password = "REPLACE_WITH_YOUR_PASSWORD";

// Set web server port number to 80
WiFiServer server(80);

// Variable to store the HTTP request
String header;

// Decode HTTP GET value
String valueString = String(5);
int pos1 = 0;
int pos2 = 0;

// Current time
unsigned long currentTime = millis();
// Previous time
unsigned long previousTime = 0;
// Define timeout time in milliseconds (example: 2000ms = 2s)
const long timeoutTime = 2000;

void setup() {
  Serial.begin(115200);

  myservo.attach(servoPin);  // attaches the servo on the servoPin to the servo object

  // Connect to Wi-Fi network with SSID and password
  Serial.print("Connecting to ");
  Serial.println(ssid);
  WiFi.begin(ssid, password);
  while (WiFi.status() != WL_CONNECTED) {
    delay(500);
    Serial.print(".");
  }
  // Print local IP address and start web server
  Serial.println("");
  Serial.println("WiFi connected.");
  Serial.println("IP address: ");
  Serial.println(WiFi.localIP());
  server.begin();
}

void loop(){
  WiFiClient client = server.available();   // Listen for incoming clients

  if (client) {                             // If a new client connects,
    currentTime = millis();
    previousTime = currentTime;
    Serial.println("New Client.");          // print a message out in the serial port
    String currentLine = "";                // make a String to hold incoming data from the client
    while (client.connected() && currentTime - previousTime <= timeoutTime) { // loop while the client's connected
      currentTime = millis();
      if (client.available()) {             // if there's bytes to read from the client,
        char c = client.read();             // read a byte, then
        Serial.write(c);                    // print it out the serial monitor
        header += c;
        if (c == '\n') {                    // if the byte is a newline character
          // if the current line is blank, you got two newline characters in a row.
          // that's the end of the client HTTP request, so send a response:
          if (currentLine.length() == 0) {
            // HTTP headers always start with a response code (e.g. HTTP/1.1 200 OK)
            // and a content-type so the client knows what's coming, then a blank line:
            client.println("HTTP/1.1 200 OK");
            client.println("Content-type:text/html");
            client.println("Connection: close");
            client.println();

            // Display the HTML web page
            client.println("<!DOCTYPE html><html>");
            client.println("<head><meta name=\"viewport\" content=\"width=device-width, initial-scale=1\">");
            client.println("<link rel=\"icon\" href=\"data:,\">");
            // CSS to style the on/off buttons
            // Feel free to change the background-color and font-size attributes to fit your preferences
            client.println("<style>body { text-align: center; font-family: \"Trebuchet MS\", Arial; margin-left:auto; margin-right:auto;}");
            client.println(".slider { width: 300px; }</style>");
            client.println("<script src=\"https://ajax.googleapis.com/ajax/libs/jquery/3.3.1/jquery.min.js\"></script>");

            // Web Page
            client.println("</head><body><h1>ESP32 with Servo</h1>");
            client.println("<p>Position: <span id=\"servoPos\"></span></p>");
            client.println("<input type=\"range\" min=\"0\" max=\"180\" class=\"slider\" id=\"servoSlider\" onchange=\"servo(this.value)\" value=\""+valueString+"\"/>");

            client.println("<script>var slider = document.getElementById(\"servoSlider\");");
            client.println("var servoP = document.getElementById(\"servoPos\"); servoP.innerHTML = slider.value;");
            client.println("slider.oninput = function() { slider.value = this.value; servoP.innerHTML = this.value; }");
            client.println("$.ajaxSetup({timeout:1000}); function servo(pos) { ");
            client.println("$.get(\"/?value=\" + pos + \"&\"); {Connection: close};}</script>");

            client.println("</body></html>");

            //GET /?value=180& HTTP/1.1
            if(header.indexOf("GET /?value=")>=0) {
              pos1 = header.indexOf('=');
              pos2 = header.indexOf('&');
              valueString = header.substring(pos1+1, pos2);

              //Rotate the servo
              myservo.write(valueString.toInt());
              Serial.println(valueString);
            }
            // The HTTP response ends with another blank line
            client.println();
            // Break out of the while loop
            break;
          } else { // if you got a newline, then clear currentLine
            currentLine = "";
          }
        } else if (c != '\r') {  // if you got anything else but a carriage return character,
          currentLine += c;      // add it to the end of the currentLine
        }
      }
    }
    // Clear the header variable
    header = "";
    // Close the connection
    client.stop();
    Serial.println("Client disconnected.");
    Serial.println("");
  }
}
How code works
This code snippet sets up an ESP32 microcontroller as a web server to control a servo motor remotely. Here’s a breakdown of the code in short:
- Include Libraries: The code includes necessary libraries such as WiFi.h for Wi-Fi connectivity and Servo.h for controlling the servo motor.
- Define Variables: It defines variables for the servo motor pin (
servoPin), Wi-Fi network credentials (ssidandpassword), and a web server (server) listening on port 80. - Setup Function: In the
setup()function, it initializes the serial communication, attaches the servo motor to the specified pin, connects to the Wi-Fi network, and starts the web server. - Loop Function: The
loop()function continuously checks for incoming client connections. Upon a new client connection, it reads and processes the HTTP request. If the request is a GET request for servo control (GET /?value=), it extracts the servo position value and adjusts the servo motor accordingly (myservo.write(valueString.toInt())). - HTTP Response: It constructs an HTML web page with a slider to control the servo motor position. The JavaScript code handles slider input changes and sends AJAX requests to the ESP32 with the desired servo position value.
- Client Handling: After processing the HTTP request and sending the HTML response, it closes the client connection and waits for the next client.
Applications
- Remote Servo Control: Control a servo motor remotely over Wi-Fi using a web-based interface.
- Web Server Hosting: Host a web server on an ESP32 microcontroller to serve HTML pages.
- Slider Interface: Use a slider on the web page to adjust the position of the servo motor.
Conclusion
The provided code demonstrates how to create a web server on an ESP32 microcontroller to remotely control a servo motor. By hosting a web interface, users can easily manipulate the servo motor’s position using a slider, showcasing the versatility and accessibility of IoT applications using ESP32-based systems.