Introduction:
The concentration of water vapor present in the air is known as humidity which is in the gaseous form of water and hence cannot be seen with a naked eye. Humidity is dependent on the temperature and pressure in the air. A device that senses the amount of vapor present in the air is called a humidity sensor. It converts the findings into an electrical signal according to the measured value. It is divided into two categories depending upon the method of measurement that is RH (relative humidity sensors) and AH (absolute humidity sensors).
Humidity is an important factor for an environment because humidity directly affects the temperature. The higher the humidity is, the warmer it is felt. Industries need to keep an effective check on the level of humidity since it may affect the health and safety of the staff working and the quality of the product which directly affects the cost.
A humidity sensing circuit using an Arduino can be built using a few components. The working explanation and the source code are given below.
Hardware Requirement:
The hardware required to build an easy and cost-effective circuit is as follows:
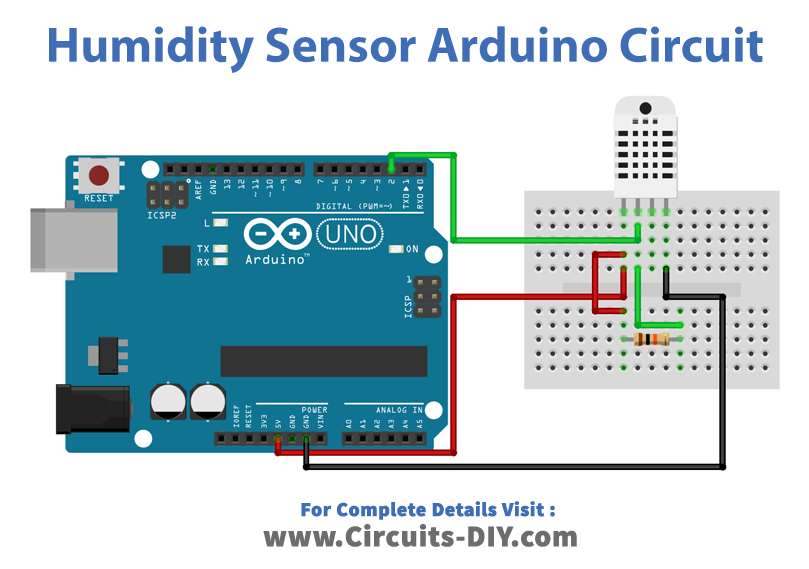
Circuit Diagram:
Construction & Working:
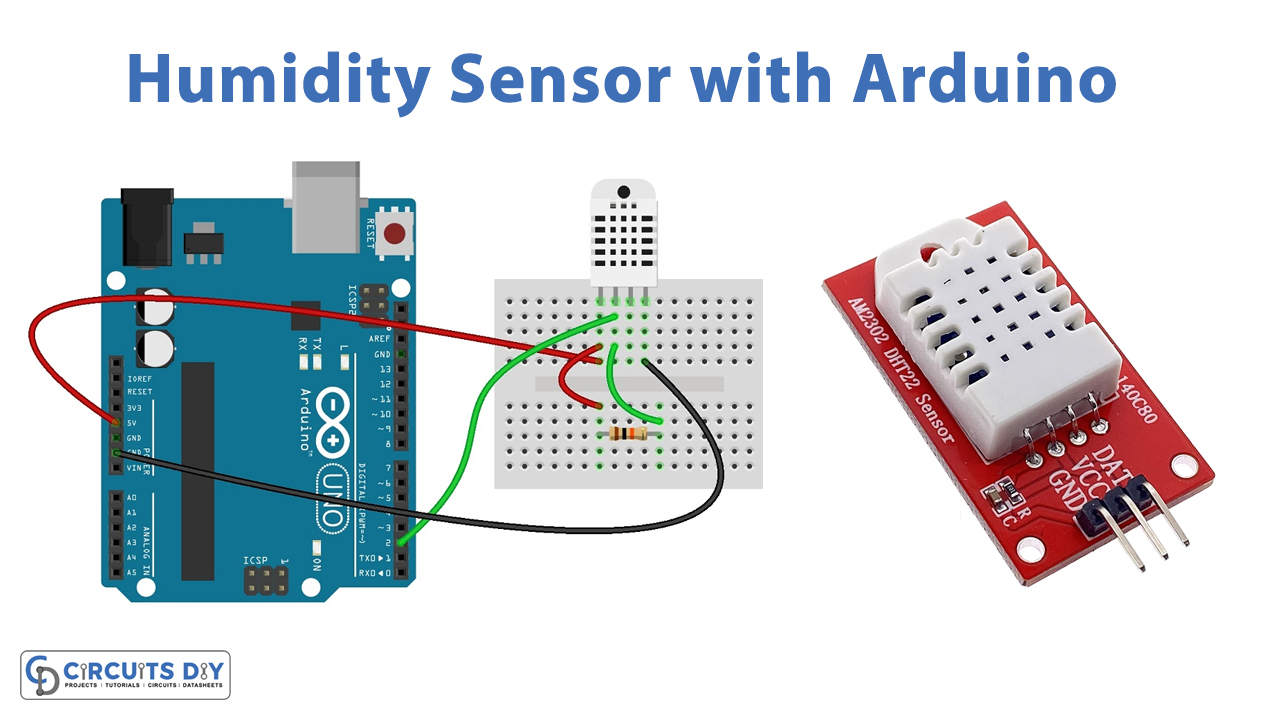
Here we have used an Arduino UNO board and a DHT22 humidity sensor. The pin1 of the sensor is connected to the +5V while the pin4 is connected to the GND (ground). The pin2 is of the sensor is the data pin that can be connected to any digital pin of the controller. A 10K resistor is connected in between the pin2 and the pin1 of the sensor.
When the device is powered up, the sensor uses a capacitive humidity sensor and a thermistor to sense the temperature and humidity of the air. The change in humidity causes a change in capacitance while the change in resistance occurs due to the change in temperature which is then changed into a digital value after processing by the IC. The controller gets the signal at its data pin and shows the values on the LCD or a serial monitor.
NOTE: If using a board with 3.3V logic like an Arduino Due connect pin 1 to 3.3V instead of 5V!
Source Code:
Arduino code to print the humidity and temperature value on the serial monitor. The sensor can be used to control various electronic peripherals.
#include “DHT.h”
#define DHTPIN 2 // what pin we’re connected to

// Uncomment whatever type you’re using!
//#define DHTTYPE DHT11 // DHT 11
#define DHTTYPE DHT22 // DHT 22 (AM2302)
//#define DHTTYPE DHT21 // DHT 21 (AM2301)
// Connect pin 1 (on the left) of the sensor to +5V
// NOTE: If using a board with 3.3V logic like an Arduino Due connect pin 1
// to 3.3V instead of 5V!
// Connect pin 2 of the sensor to whatever your DHTPIN is
// Connect pin 4 (on the right) of the sensor to GROUND
// Connect a 10K resistor from pin 2 (data) to pin 1 (power) of the sensor
// Initialize DHT sensor.
// Note that older versions of this library took an optional third parameter to
// tweak the timings for faster processors. This parameter is no longer needed
// as the current DHT reading algorithm adjusts itself to work on faster procs.

DHT dht(DHTPIN, DHTTYPE);

void setup() {
Serial.begin(9600);
Serial.println(“DHTxx test!”);

dht.begin();
}
void loop() {

// Wait a few seconds between measurements.

delay(2000);

// Reading temperature or humidity takes about 250 milliseconds!
// Sensor readings may also be up to 2 seconds ‘old’ (its a very slow sensor)

float h = dht.readHumidity();

// Read temperature as Celsius (the default)

float t = dht.readTemperature();

// Read temperature as Fahrenheit (isFahrenheit = true)

float f = dht.readTemperature(true);

// Check if any reads failed and exit early (to try again).

if (isnan(h) || isnan(t) || isnan(f)) {
Serial.println(“Failed to read from DHT sensor!”);
return;
}

// Compute heat index in Fahrenheit (the default)

float hif = dht.computeHeatIndex(f, h);

// Compute heat index in Celsius (isFahreheit = false)

float hic = dht.computeHeatIndex(t, h, false);

Serial.print(“Humidity: “);
Serial.print(h);
Serial.print(” %\t”);
Serial.print(“Temperature: “);
Serial.print(t);
Serial.print(” *C “);
Serial.print(f);
Serial.print(” *F\t”);
Serial.print(“Heat index: “);
Serial.print(hic);
Serial.print(” *C “);
Serial.print(hif);
Serial.println(” *F”);
}
Applications & Uses:
Humidity measurement is an important factor for our environment and thus is applicable in the following ways:
- It is an important aspect of climate monitoring since it helps to detect the air temperature as well as the moisture present in the air.
- In industries, the humidity affects the quality of the product, and thus it is significant to keep an eye on the humidity level.
- The degree of humidity affects the performance of the products which have certain adaptability to the environment and measuring humidity for such products is also crucial.
- Humidity measurement is almost important for every type of industry and environment and plays a key role in many applications.