Introduction
In most of the projects that need a display, you have used a simple LCD every time. Now, this time make your project a little entertaining, mesmerizing, and fascinating by using an Organic light-emitting diode, abbreviated as OLED. Basically, OLED is a flat light-emitting technology made up of organic thin films between two conductors. Since, the display requires no backlight, therefore, more efficient than the simple LCD. Hence, it also has better and improved image quality, lower power consumption, and better durability. So, in this tutorial, we are going to interface ” OLED Graphic Display with Arduino UNO”.
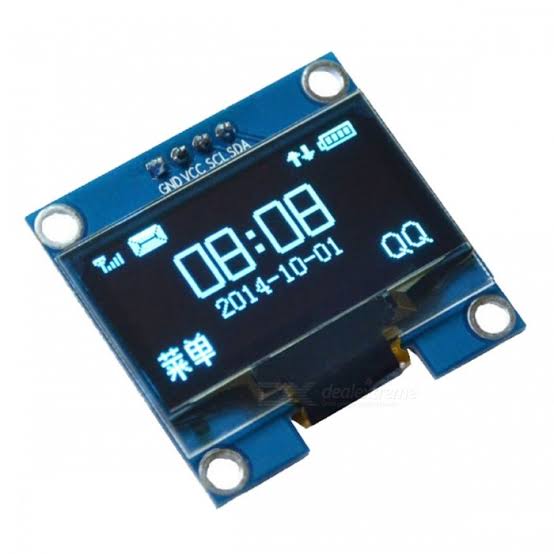
An Overview of the OLED
OLED module has the single-chip CMOS OLED driver SSD1306 which can interact and communicate with the microcontroller using a 12C or SPI interface. Certainly, 12C requires more input/output pins than 12C, but it is also faster. The OLED display modules come in different sizes and can be swappable. Since the display requires no backlight, hence reduces the extra power requirement and cost. Also, modules draw an average current of 20mA. The module operates from the voltage range of 1.65v to 3.3 V. Moreover, the module has 1KB GDDRAM, which stands for graphic display data RAM, having 8 pages from 0 to 7, each has 128 columns, and each column can store 8 bits of data.
Hardware Required
| S.no | Components | Value | Qty |
|---|---|---|---|
| 1 | Arduino UNO | – | 1 |
| 2 | USB Cable Type A to B | – | 1 |
| 3 | Jumper Wires | – | – |
| 4 | OLED Graphic Display | – | 1 |
| 5 | Bread Board | – | 1 |
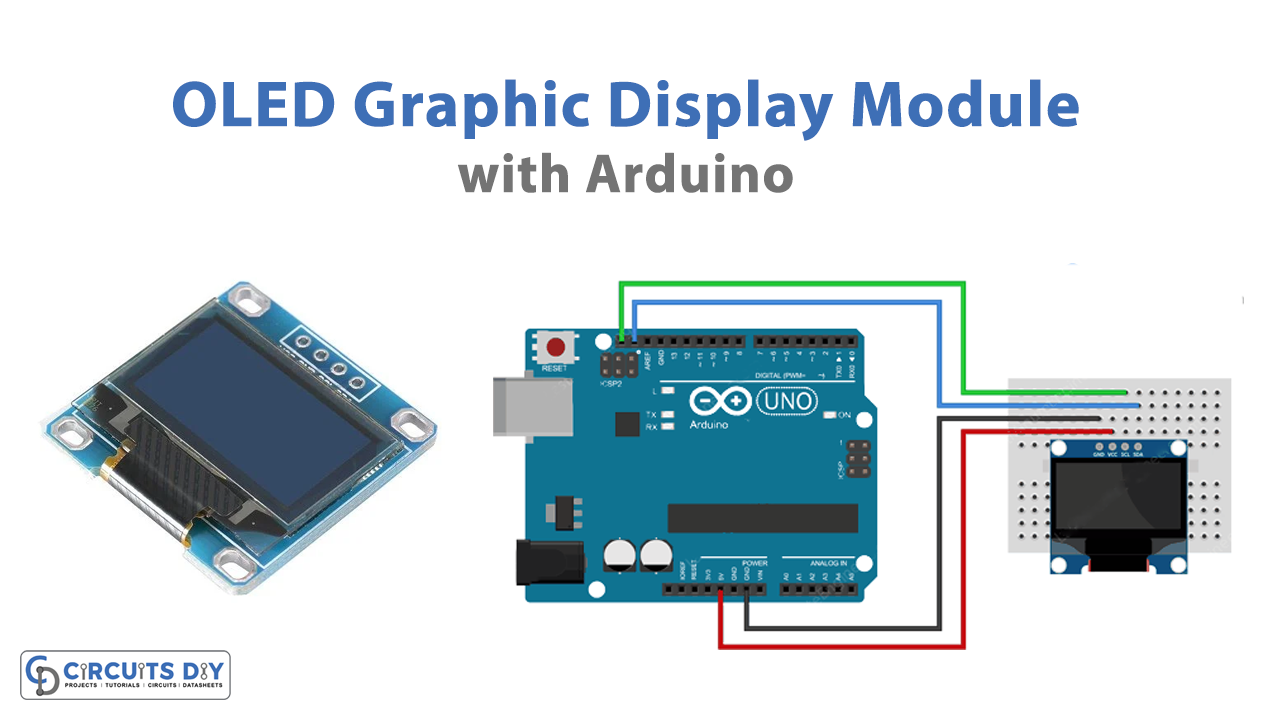
Circuit Diagram
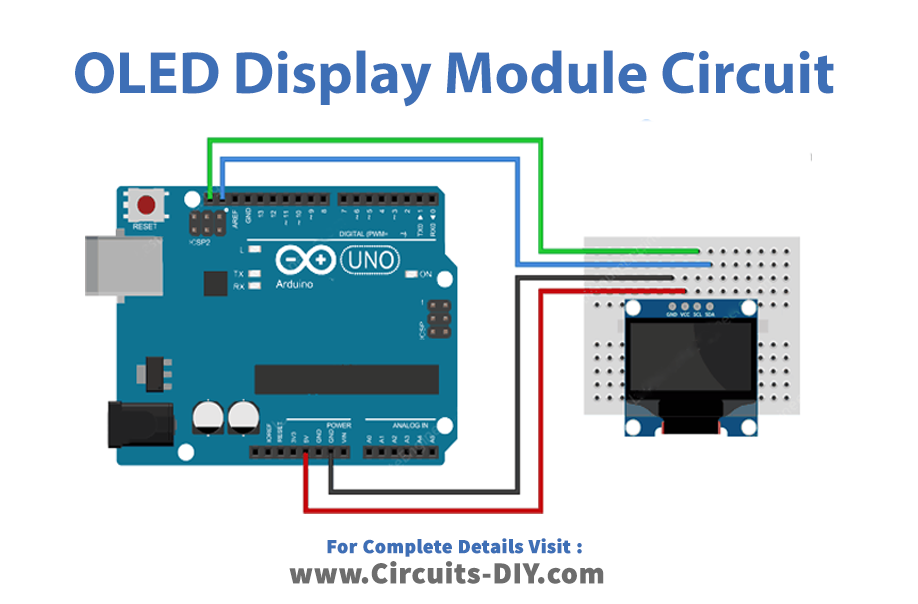
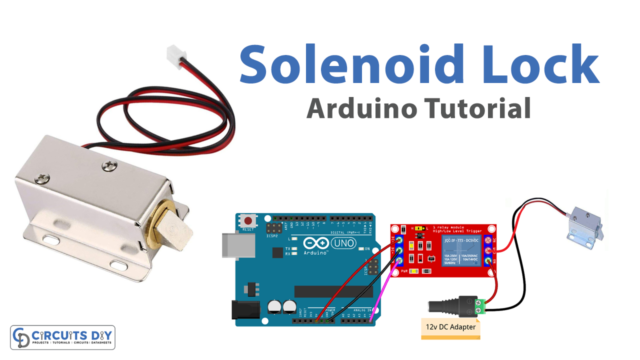
Connection Table
| Arduino | OLED Graphic Display |
|---|---|
| GND | GND |
| 5V | VCC |
| A5 | SCL |
| A4 | SDA |
Arduino Code
#include <SPI.h>
#include <Wire.h>
#include <Adafruit_GFX.h>
#include <Adafruit_SSD1306.h>

Adafruit_SSD1306 display(-1);

void setup()
{
	// initialize with the I2C addr 0x3C
	display.begin(SSD1306_SWITCHCAPVCC, 0x3C);

	// Clear the buffer.
	display.clearDisplay();

	// Display Text
	display.setTextSize(1);
	display.setTextColor(WHITE);
	display.setCursor(0,28);
	display.println("Hello world!");
	display.display();
	delay(2000);
	display.clearDisplay();

	// Display Inverted Text
	display.setTextColor(BLACK, WHITE); // 'inverted' text
	display.setCursor(0,28);
	display.println("Hello world!");
	display.display();
	delay(2000);
	display.clearDisplay();

	// Changing Font Size
	display.setTextColor(WHITE);
	display.setCursor(0,24);
	display.setTextSize(2);
	display.println("Hello!");
	display.display();
	delay(2000);
	display.clearDisplay();

	// Display Numbers
	display.setTextSize(1);
	display.setCursor(0,28);
	display.println(123456789);
	display.display();
	delay(2000);
	display.clearDisplay();

	// Specifying Base For Numbers
	display.setCursor(0,28);
	display.print("0x"); display.print(0xFF, HEX);
	display.print("(HEX) = ");
	display.print(0xFF, DEC);
	display.println("(DEC)");
	display.display();
	delay(2000);
	display.clearDisplay();

	// Display ASCII Characters
	display.setCursor(0,24);
	display.setTextSize(2);
	display.write(3);
	display.display();
	delay(2000);
	display.clearDisplay();

	// Scroll full screen
	display.setCursor(0,0);
	display.setTextSize(1);
	display.println("Full");
	display.println("screen");
	display.println("scrolling!");
	display.display();
	display.startscrollright(0x00, 0x07);
	delay(2000);
	display.stopscroll();
	delay(1000);
	display.startscrollleft(0x00, 0x07);
	delay(2000);
	display.stopscroll();
	delay(1000);
	display.startscrolldiagright(0x00, 0x07);
	delay(2000);
	display.startscrolldiagleft(0x00, 0x07);
	delay(2000);
	display.stopscroll();
	display.clearDisplay();

	// Scroll part of the screen
	display.setCursor(0,0);
	display.setTextSize(1);
	display.println("Scroll");
	display.println("some part");
	display.println("of the screen.");
	display.display();
	display.startscrollright(0x00, 0x00);
}

void loop() {}
Working Explanation
To Interface OLED Graphic Display Module with Arduino connect the circuit according to the given diagram. Open the Arduino IDE and write the above-mentioned code. Upload it into your Arduino UNO. Turn on the circuit and observe the OLED display.
Code Explanation
- Download and install the Adafruit_GFX and Adafeuit_SSD1306 libraries. You can download the libraries from:
- Include those libraries along with the wire and SPI library for external communication. Then, create an Adafruit_SSD1306 object display and send -1 to the constructor. Since the OLED display has no reset pin, therefore this -1 is used so that no pin Arduino would be utilized as the reset pin.
- In the void setup, initialize the OLED display by using the function display. begin( ). The function uses two parameters. The first parameter is there to turn ON the internal charge pump circuitry. The second parameter is the fixed 12C address of the display. To clear the buffer before printing the first message, use the function display. clearDisplay( ). Next, use the function setTextSize to define the display text size. use display.set the text color to set the color of the text. Use a set cursor to set the cursor by horizontal and vertical coordinates. After that use println( ) to print your message. To display the inverted text first clear the display. then use setTextColor( ). Here define the two parameters, the font color, and the background color. Then set the cursor and print the message. Now, there is a code for changing the font size. There the font size can be changed by the function setTextSize( ). Then there is a code to display numbers. Here write numbers in Println ( ) function after that there is a code of specifying the base for numbers. Then the code has formulated the programs for specifying base for numbers, displaying ASCII characters, and full-screen scrolling. The functions in every program are similar with some changes.
- This program has an empty void loop.