Introduction
Consider your smartphone as an example to better comprehend the idea of an accelerometer and gyroscope. When you turn your phone while watching the video, the phone automatically switches from portrait to landscape mode. Your phone’s accelerometer is a reason for this. Similar to this, some mobile phone games that you play allow you to navigate by using GPS. Because of the gyroscope found in smartphones, this is possible. In other words, accelerometers and gyroscopes can be employed effectively to measure the acceleration of a moving body or the angular velocity of any object. There are different accelerometers and gyroscope sensors/modules available in the electronics market. One of them is MPU6050. So, in this tutorial, we are going to Make “MPU6050 with Arduino – Display values on SSD1306 OLED”
Brief Overview of MPU6050 Sensor
Micro-Electro-Mechanical System MPU6050 includes a three-axis accelerometer and a three-axis gyroscope. We can quantify things like displacement, acceleration, and other motion-related characteristics thanks to it.
The Digital Motion Processor (DMP) of the MPU6050 can solve complicated calculations. For interacting with Arduino, this module uses the I2C module.
Hardware Required
| S.no | Component | Value | Qty |
|---|---|---|---|
| 1. | Arduino UNO | – | 1 |
| 2. | USB Cable Type A to B | – | 1 |
| 3. | MPU6050 | – | 1 |
| 4. | SSD1306 | – | |
| 5. | Jumper Wires | – | – |
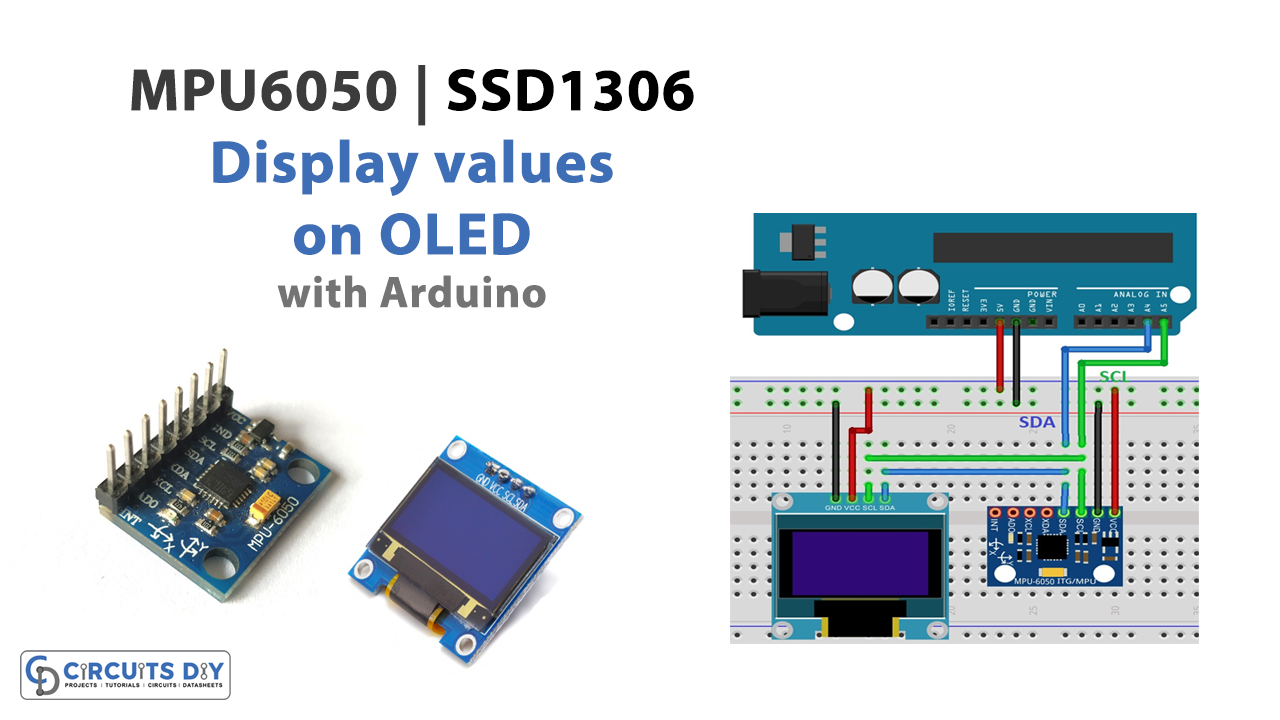
Circuit Diagram

Connection Table
| Arduino UNO | MPU6050 | SSD1306 |
|---|---|---|
| GND | GND | GND |
| 5v | Vcc | Vcc |
| A4 | SDA | SDA |
| A5 | SCL | SCL |
Arduino Code
// Basic demo for accelerometer readings from Adafruit MPU6050

#include <Adafruit_MPU6050.h>
#include <Adafruit_Sensor.h>
#include <Wire.h>

Adafruit_MPU6050 mpu;

void setup(void) {
  Serial.begin(115200);
  while (!Serial)
    delay(10); // will pause Zero, Leonardo, etc until serial console opens

  Serial.println("Adafruit MPU6050 test!");

  // Try to initialize!
  if (!mpu.begin()) {
    Serial.println("Failed to find MPU6050 chip");
    while (1) {
      delay(10);
    }
  }
  Serial.println("MPU6050 Found!");

  mpu.setAccelerometerRange(MPU6050_RANGE_8_G);
  Serial.print("Accelerometer range set to: ");
  switch (mpu.getAccelerometerRange()) {
  case MPU6050_RANGE_2_G:
    Serial.println("+-2G");
    break;
  case MPU6050_RANGE_4_G:
    Serial.println("+-4G");
    break;
  case MPU6050_RANGE_8_G:
    Serial.println("+-8G");
    break;
  case MPU6050_RANGE_16_G:
    Serial.println("+-16G");
    break;
  }
  mpu.setGyroRange(MPU6050_RANGE_500_DEG);
  Serial.print("Gyro range set to: ");
  switch (mpu.getGyroRange()) {
  case MPU6050_RANGE_250_DEG:
    Serial.println("+- 250 deg/s");
    break;
  case MPU6050_RANGE_500_DEG:
    Serial.println("+- 500 deg/s");
    break;
  case MPU6050_RANGE_1000_DEG:
    Serial.println("+- 1000 deg/s");
    break;
  case MPU6050_RANGE_2000_DEG:
    Serial.println("+- 2000 deg/s");
    break;
  }

  mpu.setFilterBandwidth(MPU6050_BAND_5_HZ);
  Serial.print("Filter bandwidth set to: ");
  switch (mpu.getFilterBandwidth()) {
  case MPU6050_BAND_260_HZ:
    Serial.println("260 Hz");
    break;
  case MPU6050_BAND_184_HZ:
    Serial.println("184 Hz");
    break;
  case MPU6050_BAND_94_HZ:
    Serial.println("94 Hz");
    break;
  case MPU6050_BAND_44_HZ:
    Serial.println("44 Hz");
    break;
  case MPU6050_BAND_21_HZ:
    Serial.println("21 Hz");
    break;
  case MPU6050_BAND_10_HZ:
    Serial.println("10 Hz");
    break;
  case MPU6050_BAND_5_HZ:
    Serial.println("5 Hz");
    break;
  }

  Serial.println("");
  delay(100);
}

void loop() {
  /* Get new sensor events with the readings */
  sensors_event_t a, g, temp;
  mpu.getEvent(&a, &g, &temp);

  /* Print out the values */
  Serial.print("Acceleration X: ");
  Serial.print(a.acceleration.x);
  Serial.print(", Y: ");
  Serial.print(a.acceleration.y);
  Serial.print(", Z: ");
  Serial.print(a.acceleration.z);
  Serial.println(" m/s^2");

  Serial.print("Rotation X: ");
  Serial.print(g.gyro.x);
  Serial.print(", Y: ");
  Serial.print(g.gyro.y);
  Serial.print(", Z: ");
  Serial.print(g.gyro.z);
  Serial.println(" rad/s");

  Serial.print("Temperature: ");
  Serial.print(temp.temperature);
  Serial.println(" degC");

  Serial.println("");
  delay(500);
}
Working Explanation
Using the circuit diagram, connect the MPU6050 accelerometer and gyroscope sensor to an Arduino UNO. Start the Arduino IDE. Paste the code thereafter you copy it. Put it on your Arduino UNO now. The SSD1306 LCD shows the readings. To see the various readings, adjust the module sensor’s directions.
Code Explanation
- To start the coding, first, you need the required libraries of Adafruit_MPU6050 and Adafruit_Sensor. You can download the libraries from here
- Now, include those libraries. Also, include the wire library to communicate with the external 12C device. Now create Adafruit_MPU6050 to access related functions.
- In the void setup, use the begin functions to initialize the serial communication and to check if the chip is correct. Use the setAccelerometerRange( ) to set the accelerometer range. Remember that, the smaller range would provide the more sensitive readings. In the same vein, set the gyroscope range by using setGyroRange( ). Similarly, set the bandwidth by using the setFilterBandwidth( ).
- In the void loop, create the object sensors_event_t to hold the results. To read a new value from the sensor and convert those values in the SI unit and scale the values, call getEvent. In the end, use the print and println functions to print the values on the SSD1306 LCD.
Application and Uses
- It has potential applications in robotics.
- Besides this, in tilt sensing devices.
- Furthermore, in gaming devices.
- Also useful for IMU measurements.
Related posts:
 Arduino High Voltage Driver Circuit Using IRF9540 Power MOSFET
 Photocell (LDR) Sensor with Arduino
 Matrix Scrolling Weather Station & Clock
 Interfacing DS18B20 1-Wire Digital Temperature Sensor with Arduino UNO
 How to Read and Write Data in Arduino SD Card
 Smart Biometric Door Lock using NodeMCU and Fingerprint Sensor