Introduction
A temperature monitoring system using the DS18B20 temperature sensor is a device that helps to keep track of the temperature in a given environment and sends out notifications if the temperature exceeds a pre-defined threshold value. This system makes use of the DS18B20 digital temperature sensor which is an accurate and efficient sensor for measuring temperature. The temperature readings are taken by the sensor and compared against the threshold value set. If the temperature exceeds the threshold value, the system will send an email notification through the IFTTT (If This Then That) service.
The DS18B20 is a digital temperature sensor manufactured by Maxim Integrated. It is a small, waterproof, and cost-effective temperature sensing device that can measure temperature in a range of -55°C to +125°C with a high accuracy of ±0.5°C. It uses a 1-Wire interface, which means it requires only one pin for both power and data transfer, making it ideal for use in space-constrained systems like those in an automotive or home automation environment. The DS18B20 communicates over a 1-Wire bus that by definition requires only one data line (and ground) to communicate with a central microprocessor.
Hardware Components
You will require the following hardware to Send Email Notifications with Arduino.
| S.no | Component | Value | Qty |
|---|---|---|---|
| 1. | Arduino UNO | – | 1 |
| 2. | USB Cable Type A to B | – | 1 |
| 3. | Temperature Sensor | DS18B20 | 1 |
| 4. | Arduino Ethernet Shield 2 | – | 1 |
| 5. | Ethernet Cable | – | 1 |
| 6. | Resistor | 4.7kΩ | 1 |
| 7. | 9V Power Adapter for Arduino | – | 1 |
| 8. | Jumper Wires | – | 1 |
Send Email Notification – Arduino
- Import the required libraries:
#include <SPI.h>
#include <Ethernet.h>
#include <OneWire.h>
#include <DallasTemperature.h>
- Define the temperature threshold and the Arduino pin connected to the sensor’s DQ pin:
#define TEMP_THRESHOLD  27 // °C
#define SENSOR_PIN  13 // Arduino pin connected to DS18B20 sensor's DQ pin
- Create an instance of the OneWire and DallasTemperature libraries:
OneWire oneWire(SENSOR_PIN);         // setup a oneWire instance
DallasTemperature DS18B20(&oneWire); // pass oneWire to DallasTemperature library
- Define the MAC address of the Ethernet shield and an Ethernet client instance:
// replace the MAC address below by the MAC address printed on a sticker on the Arduino Shield 2
byte mac[] = { 0xDE, 0xAD, 0xBE, 0xEF, 0xFE, 0xED };

EthernetClient client;
- Define the variables for the HTTP port, method, hostname, and path name:
int    HTTP_PORT   = 80;
String HTTP_METHOD = "GET";
char   HOST_NAME[] = "maker.ifttt.com";
String PATH_NAME   = "/trigger/send-email/with/key/XXXXXXXXXXXXXXXXXXXXX"; // change your Webhooks key
- Define a flag
isSentto make sure that the email is sent only once:
bool isSent = false;
- In the
setup()function, start the serial communication, initialize the Ethernet shield using DHCP, and initialize the temperature sensor:
void setup() {
  Serial.begin(9600);
  Serial.println("TEMPERATURE MONITORING via EMAIL STARTED!");

  // initialize the Ethernet shield using DHCP:
  if (Ethernet.begin(mac) == 0) {
    Serial.println("Failed to obtaining an IP address using DHCP");
    while (true);
  }

  DS18B20.begin(); // initialize the sensor
}
- In the
loop()function, get the temperature reading from the sensor, and print it to the serial monitor. Check if the temperature is above the defined threshold and if an email hasn’t been sent already. If both conditions are met, trigger the email-sending function:
void loop() {
  DS18B20.requestTemperatures(); // send the command to get temperatures
  float temperature = DS18B20.getTempCByIndex(0);  // read temperature in Celsius

  Serial.print("Temperature: ");
  Serial.print(temperature); // print the temperature in Celsius
  Serial.println("°C");

  if (temperature >= TEMP_THRESHOLD  {
 if (isSent == false) { // to make sure that Arduino does not send duplicated emails
      sendEmail(temperature);
      isSent = true;
    }
  } else {
    isSent = false; // reset to send if the temperature exceeds threshold again
  }
}
Schematic
Make connections according to the circuit diagram given below.
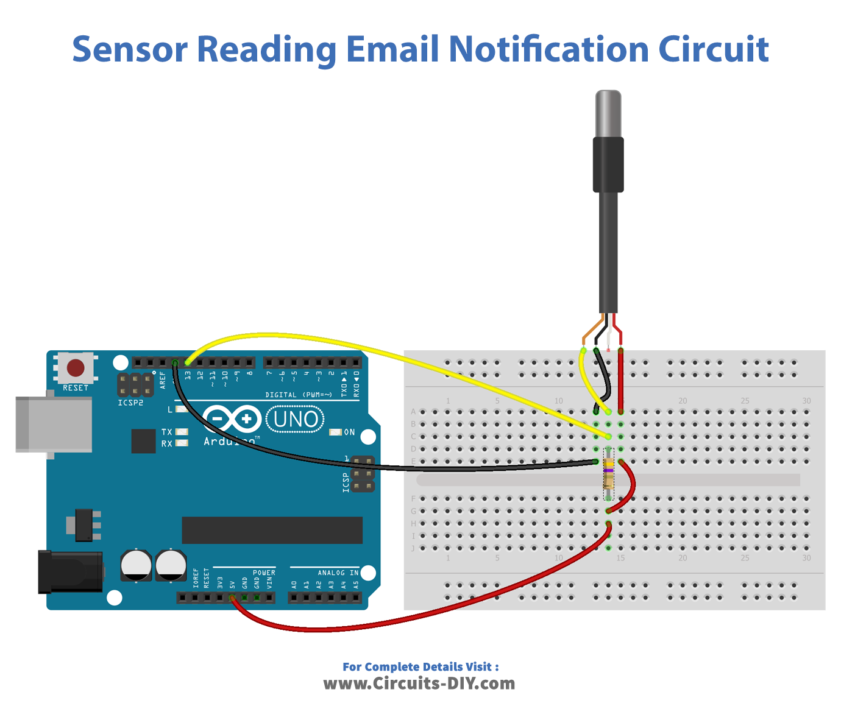
Wiring / Connections
| Arduino | Sensor |
|---|---|
| 5V | VCC |
| GND | GND |
| D13 | DQ |
Installing Arduino IDE
First, you need to install Arduino IDE Software from its official website Arduino. Here is a simple step-by-step guide on “How to install Arduino IDE“.
Installing Libraries
Before you start uploading a code, download and unzip the following libraries at /Progam Files(x86)/Arduino/Libraries (default), in order to use the sensor with the Arduino board. Here is a simple step-by-step guide on “How to Add Libraries in Arduino IDE“.
Code
Now copy the following code and upload it to Arduino IDE Software.
#include <SPI.h>
#include <Ethernet.h>
#include <OneWire.h>
#include <DallasTemperature.h>

#define TEMP_THRESHOLD  27 // °C
#define SENSOR_PIN  13 // Arduino pin connected to DS18B20 sensor's DQ pin

OneWire oneWire(SENSOR_PIN);         // setup a oneWire instance
DallasTemperature DS18B20(&oneWire); // pass oneWire to DallasTemperature library

// replace the MAC address below by the MAC address printed on a sticker on the Arduino Shield 2
byte mac[] = { 0xDE, 0xAD, 0xBE, 0xEF, 0xFE, 0xED };

EthernetClient client;

int    HTTP_PORT   = 80;
String HTTP_METHOD = "GET";
char   HOST_NAME[] = "maker.ifttt.com";
String PATH_NAME   = "/trigger/send-email/with/key/XXXXXXXXXXXXXXXXXXXXX"; // change your Webhooks key

bool isSent = false;

void setup() {
  Serial.begin(9600);
  Serial.println("TEMPERATURE MONITORING via EMAIL STARTED!");

  // initialize the Ethernet shield using DHCP:
  if (Ethernet.begin(mac) == 0) {
    Serial.println("Failed to obtaining an IP address using DHCP");
    while (true);
  }

  DS18B20.begin(); // initialize the sensor
}

void loop() {
  DS18B20.requestTemperatures(); // send the command to get temperatures
  float temperature = DS18B20.getTempCByIndex(0);  // read temperature in Celsius

  Serial.print("Temperature: ");
  Serial.print(temperature); // print the temperature in Celsius
  Serial.println("°C");

  if (temperature >= TEMP_THRESHOLD) {
    if (isSent == false) { // to make sure that Arduino does not send duplicated emails
      sendEmail(temperature);
      isSent = true;
    }
  } else {
    isSent = false; // reset to send if the temperature exceeds threshold again
  }
}

void sendEmail(float temperature) {
  // connect to IFTTT server on port 80:
  if (client.connect(HOST_NAME, HTTP_PORT)) {
    // if connected:
    Serial.println("Connected to server");
    // make a HTTP request:
    String queryString = "?value1=" + String(temperature);
    // send HTTP header
    client.println("GET " + PATH_NAME + queryString + " HTTP/1.1");
    client.println("Host: " + String(HOST_NAME));
    client.println("Connection: close");
    client.println(); // end HTTP header

    while (client.connected()) {
      if (client.available()) {
        // read an incoming byte from the server and print it to serial monitor:
        char c = client.read();
        Serial.print(c);
      }
    }

    // the server's disconnected, stop the client:
    client.stop();
    Serial.println();
    Serial.println("disconnected");
  } else {// if not connected:
    Serial.println("connection failed");
  }
}
Working Explanation
In the setup function, the serial communication is initiated at 9600 baud rate and the message “TEMPERATURE MONITORING via EMAIL STARTED!” is displayed on the serial monitor. The Ethernet shield is initialized using the DHCP (Dynamic Host Configuration Protocol) with the MAC address specified in the mac variable. The DallasTemperature library is initialized using the OneWire instance and a oneWire instance is created using the SENSOR_PIN (13).
In the loop function, the temperature is read using the DS18B20.requestTemperatures() and DS18B20.getTempCByIndex(0) functions. The read temperature is displayed on the serial monitor and is compared with the TEMP_THRESHOLD (27°C). If the temperature is greater than or equal to the threshold, an email is sent using the sendEmail function, but only once (preventing duplicated emails) as monitored by the isSent flag. If the temperature is less than the threshold, the isSent flag is reset.
Applications
- Food and beverage storage temperature monitoring
- HVAC systems
- Incubators and cold storage units
- Automotive engine temperature monitoring
- Environmental monitoring
- Medical equipment temperature monitoring
- Industrial process temperature control
- Data center temperature monitoring
Conclusion.
We hope you have found this Temperature Send Email Notification Circuit very useful. If you feel any difficulty in making it feel free to ask anything in the comment section.